Day of the Dead Dollar Tree Wreath

I made a Day of the Dead wreath from Dollar Tree materials, including the mesh tubing. I love how it turned out but it was a big one and took literally all day to make the wreath and paint the skull. See pic of it at the end. I used this tutorial to make the big one: https://gracemonroehome.com/how-to-make-a-deco-mesh-loop-wreath/

I had a pile of left over pieces of mesh tubing so instead of throwing it away, I used it to create a smaller version. I think it turned out pretty darn cute!

I had a small Dollar Tree Day of the Dead skull painting kit I used for this one. It is approximately 3 1/2” x 5”. It comes with several craft paints, but I chose to use our Missouri Limestone Paint Company chalk-style paint colors instead. I love how vibrant they are, but many chalk paints would work, too, as well as the paints that came with it.

I also made about a 9” wreath form out of 18 gauge wire we had here.

But, if you were going to use new pkgs of the DT mesh tubing, I would get maybe 3 pkgs (1 of each color). DT also may have a heavy wire that you can mold as shown below, and you will need the 3 1/2”x5” Day of the Skull paint kit. You will also need a pkg of pipe cleaners. I chose to use black.

I cut a piece of wire about 22” long.

I formed it into a circle about 9” round, then wove another row around in and out to make it a bit more sturdyand cut off any excess. I crimped the ends so they wouldn’t be sharp.

I wanted to make sure my skull would fit inside. I had already started painting it here. I also ended up removing the little stand as I didn’t need it.

I then cut the black pipe cleaner as needed into 4 equal pieces.

I cut the wire mesh pieces into about 6” lengths. I didn’t have enough purple, so I only did 3 of them to spread out. But if I would have had enough, this is the pattern I would use.

I put 3 colors together and then made 3 loops. I used the pipe cleaner piece and put it around and twisted them tightly together.

I then started attaching them to the wire form. I alternated the cut edges so they weren’t all going on the same direction.

I stopped adding when I got to a point where the skull would fit on the side with no wire showing.

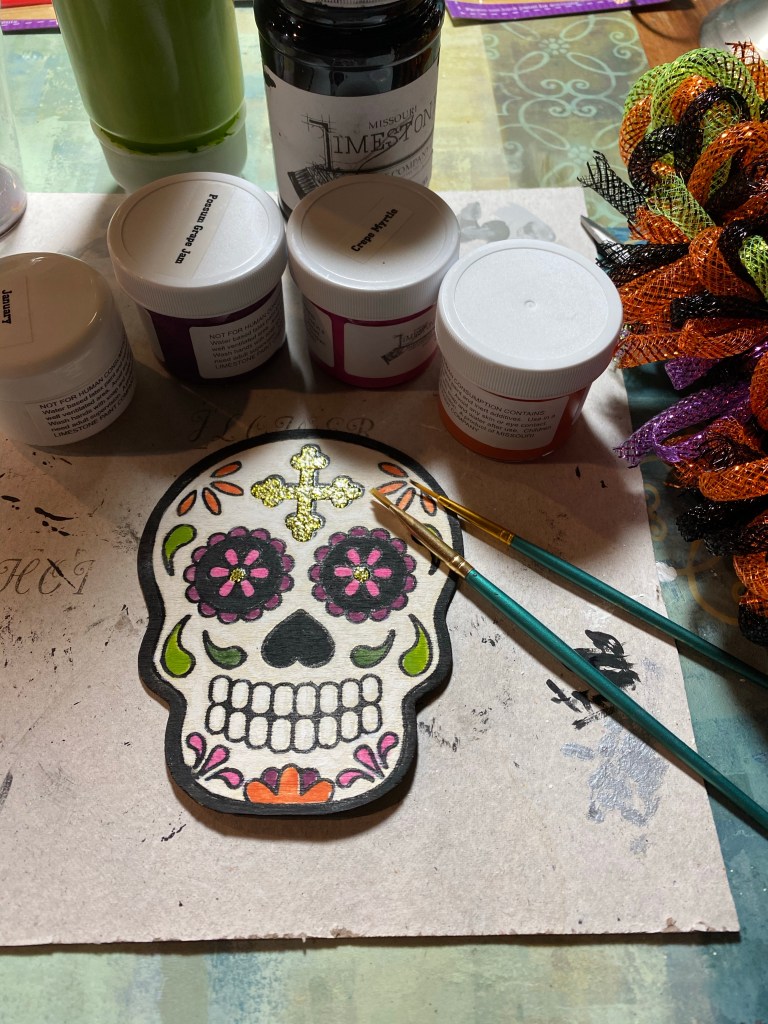
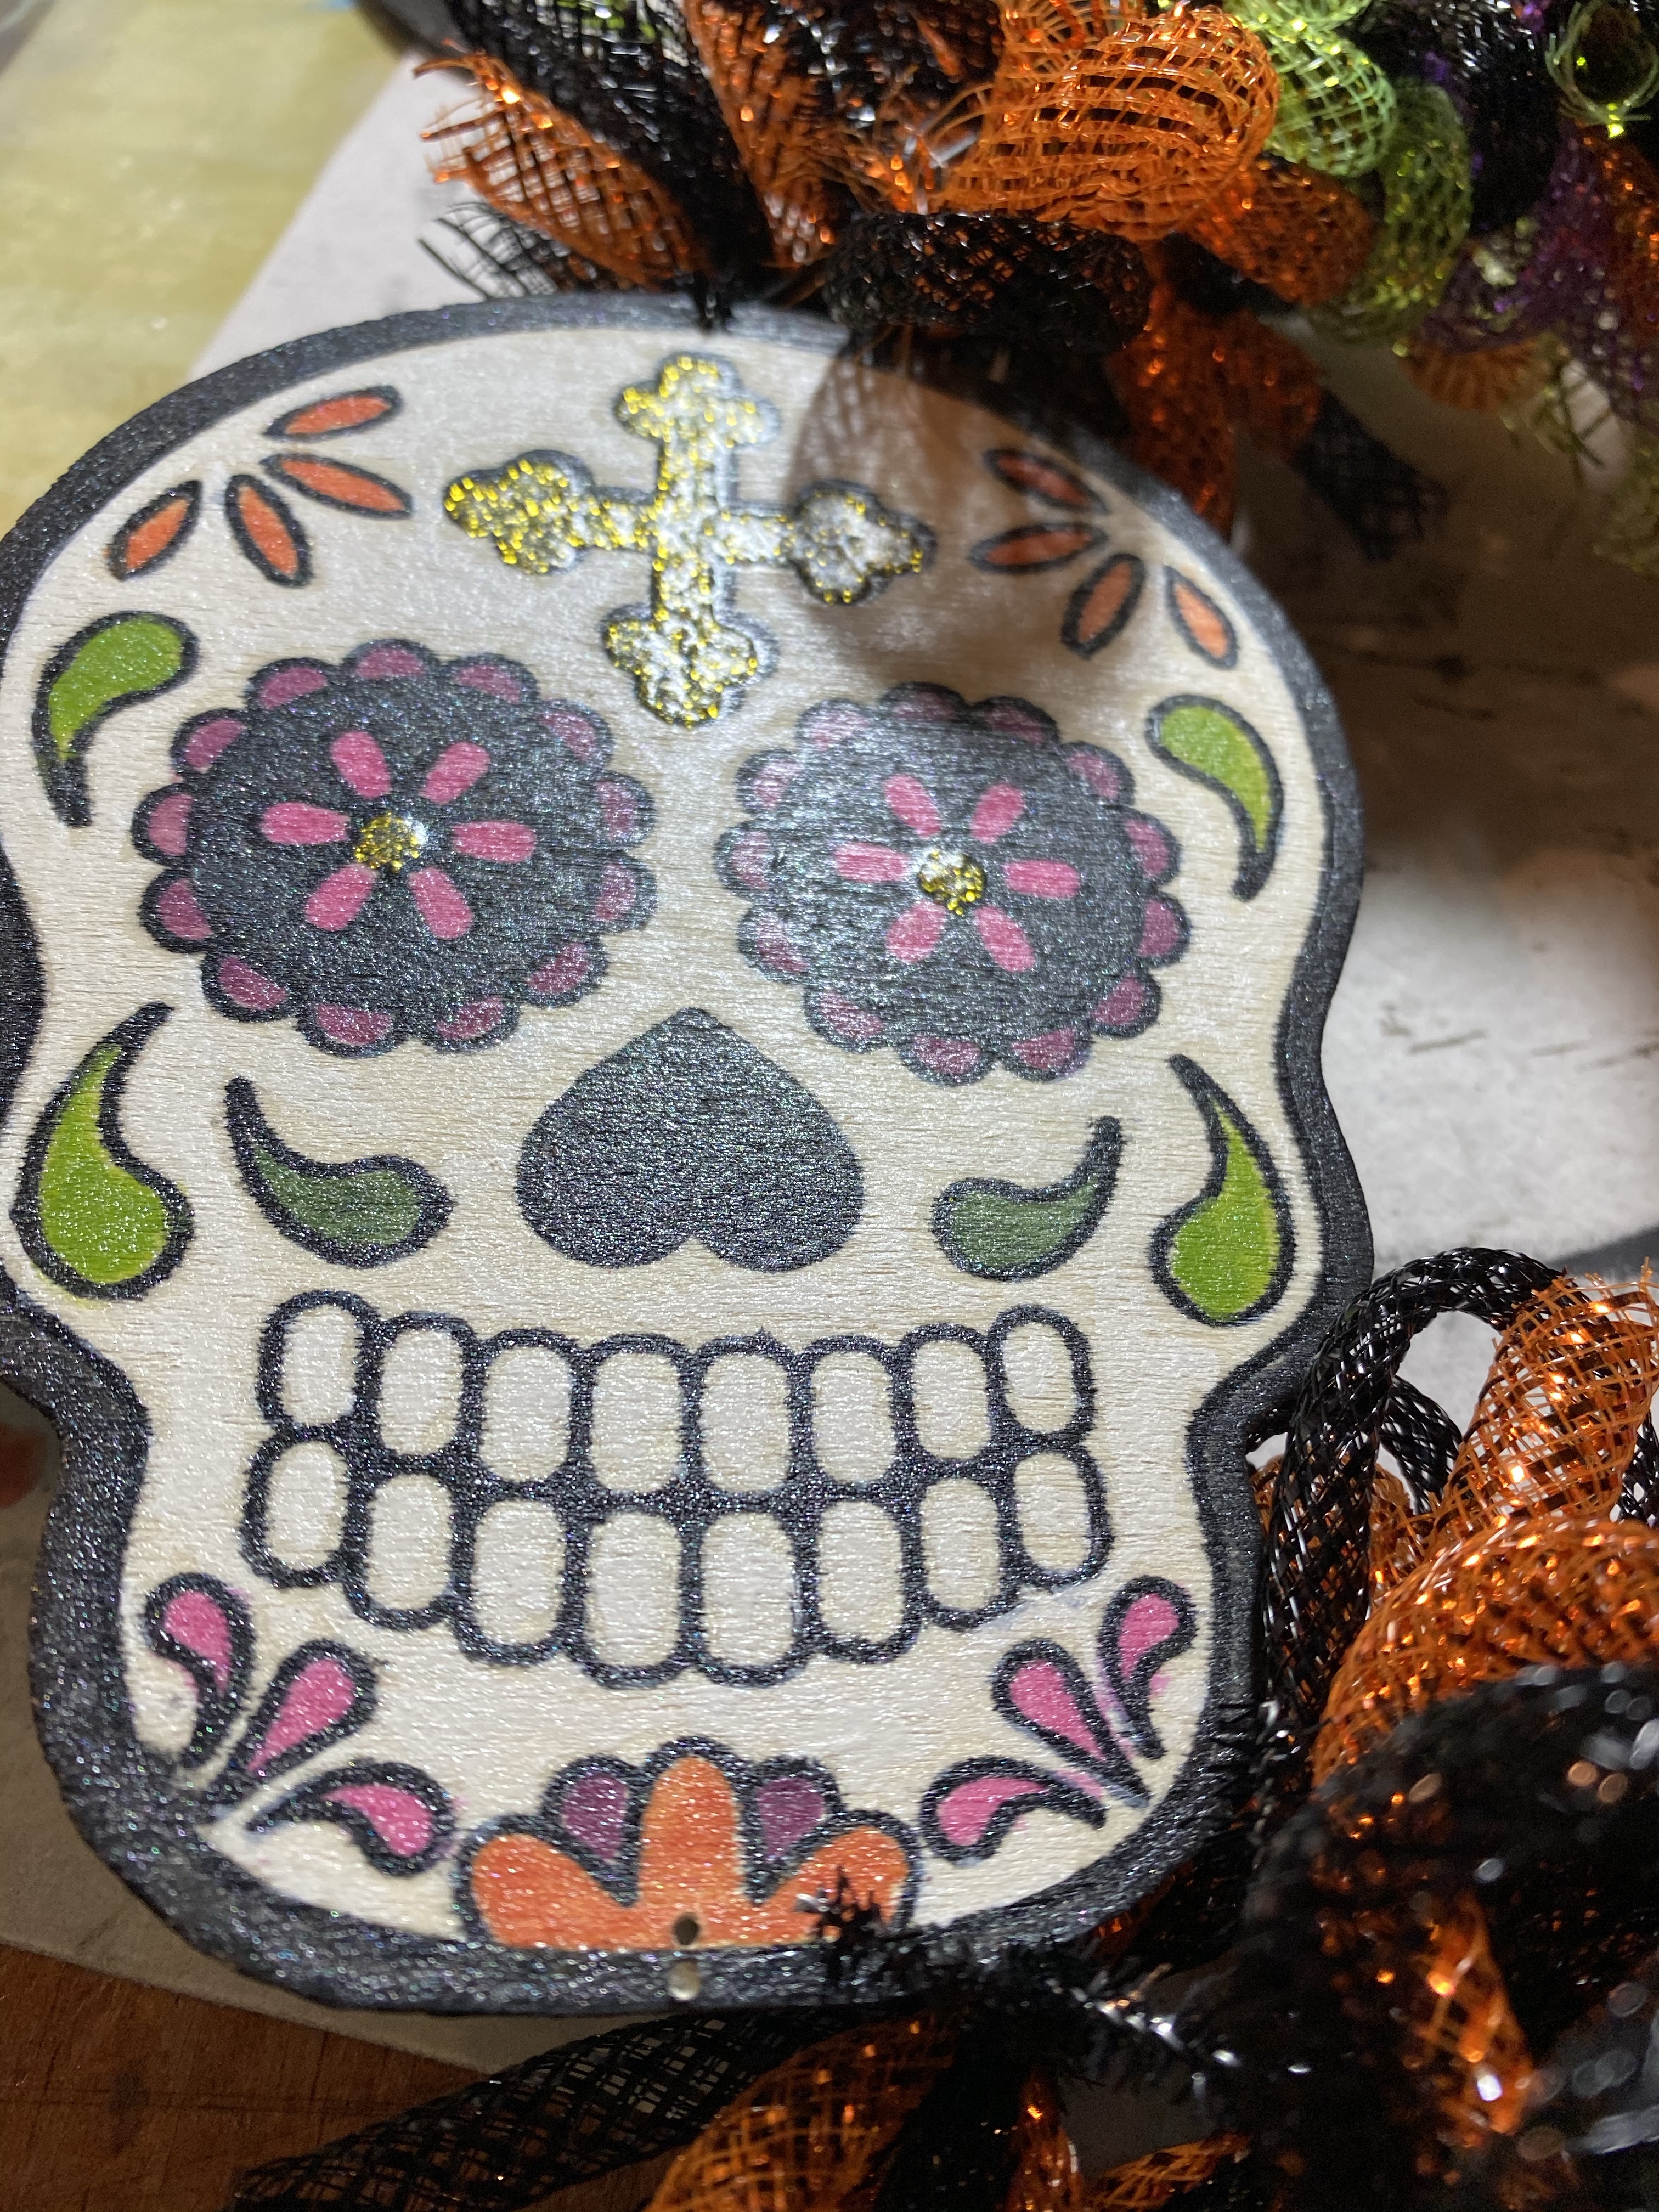
I then painted the skull with colors that would go well with the mesh tubing. I used the black already on it as an outline, painting the face and teeth white, and painted colors inside the black lines. I also painted the back black.

I sealed it front and back with Mod Podge acrylic spray and Mod Podge Pearlized spray to give it a little shimmer.

Danny drilled tiny holes, big enough for the pipe cleaner to to through on the top and bottom and I used the pipe cleaner from the last pieces of attached mesh to hold the skull in place.

And there you have it. A mini Day of the Dead wreath next to the big one I made earlier.

Sharpie Paint Pen Coffee Mugs: It does work…..but….

This has been an experiment on how to decorate Dollar Tree mugs.

I’ve decorated mugs in a couple of ways. For example, I used Dollar Tree mugs and permanent adhesive vinyl. That works great. I have washed these By Hand numerous times and they are still going strong.

But…..put them in the dishwasher and they become a mangled mess. Washing by hand is fine, but one of these days someone is going to forget and put them in the dishwasher and all will be lost.

So, I went back to researching. This time I read and watched videos on what others had done. I finally chose to follow this method on my Dollar Tree mugs.

1. Of course, the first thing to do is always clean well and then wipe down with rubbing alcohol to get rid of any oils.

2. I make stencils from contact paper, which does well as it fits so tightly to the mug and is easy to remove. For this leaf pattern (purchased from the Silhouette store) I made my stencil, put it on the mug and colored it in with a brown Sharpie paint pen. It has to be the oil-based paint pen. The regular Sharpie permanent ink one won’t work.

3. Then I let it dry for 72 hours. Once dry I put it on parchment paper on a cookie sheet in a cold oven. Set the temp. For 250 degrees F turned it on and baked the cup for 20minutes. I then turned the oven off and left it in there untouched for an hour or so, until it was cool to the touch.

My mug turned out great. I experimented with it and washed it with hot soap and water by hand several times. It came out perfect every time! Yay! A success for creating painted mugs to hand wash!

But! What if I forgot or if someone buys a mug from me and they forget I said to hand wash?

So, now it was time to possibly say goodbye to my cute fall coffee mug as it might get ruined in the dishwasher.

I did make sure I put it in the top rack. When it came out, it was still in one piece and looked great. However, a change has taken place.

The leaf was now lighter, the yellow tones looked gray and the mug itself took on a creamier color.

It still looks great! I’m happy it is not ruined…but…I was a little disappointed in the color change.

I did learn that if I do want to sell these, I will need to run them through the dishwasher before I take a photo due to the color change.

Here’s a before and after. It is a noticeable difference.

Now, I’m going to be trying something else. I learned, in my research, that Mod Podge makes a dishwasher safe sealer. I’m going to try that next and will let you know what happens.

Be watching this space. Also, be sure to follow my blog to be notified when I post something new!

The Flowers of Summer Forever in Bloom

Sometimes I will do anything to keep from cleaning the house…..so I went in search of projects on Pinterest.

One that caught my eye was using flowers to create art. I kept reading and knew I had to try this. it involved pounding the flowers with a hammer. 😳

Yes, my vase is a black antique doorknob painted a navy blue and distressed. The flowers are a type of miniature petunia called Millionbells.

I actually saw two different tutorials. One was to use watercolor paper and wax paper. The other was to use a piece of fabric and tape. They used a white paper-like tape. The only thing I had was wax paper and packing tape. And no watercolor paper or fabric that would work.

I started looking around and my eyes fell on some storage boxes I bought at Dollar Tree. Those collapsible fabric type ones. I’m not sure they are exactly fabric, but I figured they would work to practice with. I didn’t have white tape, but I did have some packing tape, so I thought I’d try it, too.

The storage container had two different weights of material, so I thought I would try both.

I have to say straight up, my practice became art. I am so amazed! I wish I had known about this at the beginning of summer. Anyway….on with the tutorial.

I gathered my supplies, including a hammer.

For my first try I used wax paper, the lighter weight material, and a bunch of flowers and stems.

I covered the flowers with the waxed paper and turned it over so I would be pounding on the material itself.

When finished, I removed the wax paper and the flowers and let it dry. It was like a beautiful, muted watercolor.

I then used the heavier material and this time used the packing tape and taped the flowers to material, trying to make sure the flower head was face down as much as possible. I then turned it over and started pounding again. I pounded until it looked like I got most of the flowers and stem.

The photo above shows what it looked like when I turned it back over and started removing the tape. Beautiful!

Shiny tile from Home Depot

So then I had to figure out what to do with them. I cut around the flowers on the first one and decoupaged it to a tile. When dry I sprayed it with a couple of coats of spray matte lacquer. I can display it or use it as a coaster. For the other one, I framed it in a vintage frame I had. It looks like it has always been in that frame. It looks so vintage!

Close up of the framed print
Close up of the tiled print

My house is still not cleaned, but now my curiosity is satisfied, I am ready to tackle it ….. tomorrow.

Decoupage Napkins in a Faux Galvanized Tin Holder

Here are the steps I took to create the coasters:

1. I purchased these stone tiles as part of a package at Home Depot. I cleaned the them thoroughly.

2. I usually paint the tops and sides with our Missouri Limestone Paint Company chalk-style paint in “January” as white paint will really help the print stand out. But these coasters were already white on one side so I skipped this step.

3. I chose areas of the napkin that would look good centered on the tiles and cut them a little bigger than the coaster. I peeled off the two white layers of the napkin so that I was left with only the printed part. Sometimes napkins will only have one white layer.

4. For the decoupage medium, I used Mod Podge on this set. I applied a layer over the white paint and while still wet I applied the napkin. I used a piece of plastic wrap to press the napkin into the stone, making sure I had no bubbles.this plastic wrap helps to keep the napkin from sticking to my fingers.

5. Once dry, I used 220 sandpaper to sand the edges.

6. I then used 2 coats of Rustoleum spray lacquer on the tops and sides to seal the napkin. Using lacquer will not reactivate the poly, so no bubbles formed.

I used a painting technique to create a faux galvanized tin look to a plain black coaster holder.

You can see how I did this technique in another blog post, found here.

I enjoyed doing this technique so much I have used it on a variety of items.

Paint a Pair of Leather Shoes in Less Than an Hour

I am not a newbie when it comes to painting shoes with chalk-style paint, specifically the brand we own and produce “Missouri Limestone Paint Company”. I’ve painted shoes made of quality leather as well as those that are from cheap man-made materials. Then I’ve worn the heck out of them. This latest pair I painted two coats and applied two coats of salve – all in less than an hour.

Oh my! These look ready for the trash! But they are so comfortable! Especially when I’m on my feet painting, apparently. Lol
But no more painting in this beautiful pair of shoes! They look brand new, don’t they?

Would you like to know how I did it? First, a sneak peek to see the transformation in progress.

I started out by cleaning the shoes well with Windex. This is my go to cleaner for many things I paint.

All the added color on this pair is from our chalk-style paint. This paint is on there for good, trust me. Cleaning didn’t remove it, nor could I scratch it off. I didn’t want to sand it or use chemicals on it, so…. I painted over it. 😏

Missouri Limestone Paint Company chalk-style paint Color: Gray Goose
I painted the elastic on the strap, too.
I even painted the soles!

I also know from experience, our paint does very well on rubber. I painted a Rubbermaid mailbox several years ago….no sealer….and it still looks brand new today. So, I also painted the soles of this pair of shoes, but did not seal them.

Needs a second coat of paint

I painted the first coat. It dried quickly, but so also helped it along with a hair dryer. You can see the reddish look coming through along with the spots from the original paint splatters. But look! No brush strokes! Our paint (when applied in thin coats), does not leave brush strokes.

2nd coat covered well

It is time to apply the salve. I love Wise Owl Salve and keep it on hand for projects like this.

Can you tell which shoe has had the Wise Owl Salve applied? If you said the left one, you are correct!

As you can see, I applied the Wise Owl salve on the left shoe so you can see what a difference it makes.

Wow, right?

I applied the first coat of salve and buffed it. Then, I applied a light second coat and just rubbed it in, but did not buff. Remember, I DID NOT use the salve on the soles.

And there you have it! Another pair of shoes given a new life. I promise not to paint in these! I will periodically apply another coat of salve and buff it in.

A Faux Galvanized Tin Hanging Pendant Light

https://sharsumpaint.com/2020/08/06/a-faux-galvanized-tin-hanging-pendant-light/

I found a great tutorial for creating faux galvanized tin using paint. I repurposed this brass plated hanging pendant light and it looks like the real thing.

The tutorial shows it on a cardboard box. Since I was painting on metal, I used a spray primer first.

https://shellyhickox.blogspot.com/2015/04/decoart-media-faux-galvanized-canisters.html?m=1

This is what I did:

1. Took the light apart and scuffed up the pieces. Cleaned well.

2. Sprayed all pieces with primer.

3. Painted with Metallic Silver waterbased paint. I put a small amount in plastic cup and painted out of it. I even painted the cord.

4. Added a little Medium gray color chalk-style paint to the metallic, stirred it in, and using a piece of natural sponge, I dabbed it on each piece. I used our brand we own and produce: Missouri Limestone Paint Company.

5. Then I added a little white and dabbed again all over.

6. Then I added some black and dabbed again.

7. Finished by dabbing a little silver metallic with a brush, making sure there wasn’t much paint on the brush.

8. Sealed with Wise Owl Salve.

A Black and White Coffee Bar Sign

I created this fun coffee bar sign. It was easy and turned out great!

I started with an 11×14” thin canvas board from Dollar Tree and a package of Priss wall stickers from Dollar General. I used Mod Podge to glue them down and Varathane water-based polyurethane satin finish to seal them.

I laid out the words in a design I liked and then took the backing off the first one to apply. I saw right away the adhesive wasn’t sticking well to the canvas board so I made the decision to use Mod Podge to glue each one down.

Once they were all down and sealed well l gave them another coat of Mod a Podge.

I will usually use a hair dryer to help the dry time and use my fingers to press down to help alleviate any lifting or bubbles.

I didn’t care for the gloss of the Mod Podge so I used the Varathane satin finish polyurethane to seal and gave it two thin coats. I like to use a damp car sponge to apply polyurethane. It now had a nice matte finish.

I thought a black frame would set it off. I didn’t want to go to Dollar Tree so I started searching for an 11×14” frame I might have. Score! I found a frame and it is vintage! I know it is vintage because it held my husband’s 1971 college diploma. Lol! Not anymore!

I kept the glass in as it will help with durability.

And there you have it! An adorable black and white 11×14” coffee bar sign. Wouldn’t it look great paired with a set of Rae Dunn coffee mugs?

A Round Pedestal Table Gets an Amazing Makeover

I found this small (20.75” tall and 24” wide) solid wood table at a flea market about a year ago.

https://sharsumpaint.com/2020/07/16/a-round-pedestal-table-gets-an-amazing-makeover/

It was in good shape, but dated. It needed a makeover. We had sanded the top almost all the way, but it still needed a bit more to get it down to bare wood.

However, life got in the way and so it sat in our basement waiting patiently for its makeover.

A few days ago, it happened. I took the heat gun and stripped away the rest of the residue on the top, then sanded it smooth and hand scuffed the base. I cleaned it well.

I couldn’t wait to try out the DIY wood aging stain recipe I found and mixed up. It had been sitting waiting to be used for several weeks. I had tried it right after I mixed it up on a board. I think it reacts differently on different types of wood and it really hadn’t had a chance to darken the wood much. But, it turned out with a beautiful, natural wood look that I loved.

The stain is a mix of used coffee grounds, vinegar and steel wool. It doesn’t look very pretty in the jar, but wait until you see it on this oak table top!

Here’s the link to the DIY tutorial I found and used: https://www.familyhandyman.com/article/how-to-stain-unfinished-wood-with-used-coffee-grounds/?_cmp=stf

The interesting thing is you don’t see how it is working until it dries. At first it looks like it is just darkening the wood (and it darkens more as it dries) but when it dries, ahhhh….there is that beautiful grayish cast….just like old barn wood that has been left out in the weather for years. And this photo doesn’t even do it justice.

Hmmm…..At this point I happened to notice a strange formation in the grain going across the top. In my eye, I saw a llama head and neck. There are actually 4 of them, seeming to march in a line across the table, but this one stands out more than others. Still not seeing it? Let me help you. Lol

So now I had the stain on, but I wanted to really enhance the old wood look so I sealed it with a mix of liming wax and clear wax.

I wanted to open up the grain for the liming wax to get into it and stay so I used a wire brush and carefully ran it across the table top, going with the grain.

The liming wax I used is by Briwax. I mixed some of it with Howard’s Chalk-tique light wax. You can use any brand of clear wax, though. Mixing them together gives you a little more control over the liming wax and provides a nice finish. I think you can purchase both of these products from several places like Amazon online.

The next photo shows half the table top with the liming wax combo and half without. What a difference the liming wax makes!!

Can you see my 4 marching llamas? I know…. they are hard to see. Lol

Let me help. 🙂

Here is the top all waxed and buffed. Again, pics don’t really show just how beautiful this table top is. The sheen of the wax is gorgeous!

By the way, did you know wax helps repel dust? So using wax on furniture that isn’t going to get a lot of heavy use will save you dusting time, too!

The little metal feet needed a makeover, too, so I took them off and spray painted them a metallic gold. So pretty now!

Now it was time to paint the base. Sometimes I use primer, sometimes I don’t. I didn’t on this one. I had just cleaned and scuffed it up really well. In retrospect, I wish I had primed this and I wouldn’t have had to use as many coats of chalk-style paint, especially since I wasn’t going to distress this piece. I used 4 coats of Missouri Limestone Paint Company “January”, a pure white. You tend to need more coats when using white or very light colors.

But all is well as chalk-style paint dries so quickly. Once the paint coats had all dried well I sealed the base with several thin coats of Varathane Crystal Clear water based polyurethane. I never have had a problem with yellowing in the 6 years I’ve been using it.

The secret is thin coats and no drips or pooling. I use a round damp car wax sponge to put on a thin coat and follow it with a sponge brush if needed to clear up any drips or pooling. For long areas I go in one direction only and work quickly. You can’t go back and forth or overwork the sealer or you will have a mess as it dries so quickly.

And now…. drum roll ….. My finished “llama table!” 😉 What a difference, right?

A Faux Succulent on a Can of Vegetables Decoupaged With a Napkin

How pretty, right? You would never know that’s a can of garbanzo beans under there. 😁

I woke up this morning thinking I wanted to napkin decoupage a tin can and add a succulent to it. I had all the supplies except for the tin can. I did have a can of garbanzo beans, though. I didn’t want to waste food, so I decided to just decoupage the full can. I could always just open up the can later. I did realize, too late, that I shouldn’t paint the lid in case I do want to eat the beans. So I would not paint the lid the next time.

I gathered my supplies and got started.

I didn’t use the refried beans. That is there just to show you what a can of vegetables looks like with its clothes on compared to when it is naked. ☺️

Step 1:

I then painted the can, but next time I won’t, just in case I want to open the can later. I used two light coats of “Grannie’s Lace” from our brand of chalk-style paint Missouri Limestone Paint Company. It really doesn’t matter what paint you use. The can also doesn’t need full coverage. The napkin details will show better just by it being white.

Step 2:

The expiration date was already on the bottom of this can. I just added the name in case I forgot what was in there.

Step 3:

I trimmed the napkin to fit the can, leaving a little overlap on the top and sides. Also with napkins you need to pull apart and remove extra layers as you can see in the above photo.

Step 4:

I was now ready to decoupage. I spread a thick layer of Mod Podge onto the can. I cut down a small baggie and tape it small enough to slip my fingers into it like a mitten. I use the plastic to press the napkin into the Mod Podge. This keeps the napkin from tearing as it will stick to your fingers otherwise. Any little bit of plastic will work. You still must press carefully.

Step 5:

After decoupage dried, I sanded the rim of the top. The part sticking up will sand right off, leaving a clean edge. I then added another coat of Mod Podge all over to seal it.

Step 6: Final Step. I just added a little Spanish Moss and a Faux Succulent to the top. You could use a spot of hot glue to hold it in place, but I didn’t. After all, I may just want to open up that can of garbanzo beans. The moss and succulent will be easy to remove. ☺️

Turning a Funky Yellow Tray into a Rustic Faux Succulent Garden

I bought this tray about a year ago and never really did anything with it.

It’s not really wood and it was a funky yellow color. But yesterday, I decided. I would create a rustic, driftwood finish on it ….

…. and plant a faux succulent garden. Those seem really popular right now.

I already had the two pinkish succulents and I found a few more at Dollar Tree at some point in time. I removed the clips attached to those and saved the clips. You never know when they could be used. 🙂

Using our Missouri Limestone Paint Company chalk-style paint, I paint washed the tray with “French Roast”, wiping it down before it dried. When dry, I dry brushed with “Sunday Silver”, let that dry, then dry brushed with “Winter Gloves”. When that dried, I sanded the whole thing with 320 sandpaper, applied a wax salve, and buffed it. I love the color now! It now has a rustic, driftwood look.

This morning, I added some mosses from Dollar Tree and now have a beautiful succulent garden. I just need to figure out where I will display it.