We are working on a project involving table legs. I love painting this type of leg, but as you can imagine, there is a lot of: paint an edge, let dry, turn, paint another edge, you understand. But, not anymore! With SharSum Paint’s handy dandy, Leg Painting Contraption, painting these table legs is a breeze.
But first, the history of a base we made early in our business that has allowed us to work on a number of projects fairly easily – our Super Duper Lazy Susan Spinner. This is another Invention we do not plan on getting a patent on, but pretty sure no one has ever tried to make one just like this or ever will. 😉
It all started with the idea of making a huge tray out of a free table top that would spin around. We had purchased a Lazy Susan mechanism at Lowe’s for about $7.00. We were ready to roll (I mean spin).
We quickly found out the top was not real wood and upon close inspection when the paint did not stick well that it was covered with a plastic contact paper like material. So…. we didn’t add any more coats and called it done. We attached the mechanism anyway and Ta Da! We now had our Super Duper Lazy Susan Spinner. Waste Not Want Not as they say. We will visit our Spinner again a bit later.


But now, we have 4 legs to paint. I said, “Danny, I wish we had something we could use to hold the table leg up so I can paint it.”

Meet Danny’s Invention – SharSum Paint’s Leg Painting Contraption! This model was specifically built to hold the legs of this particular table, but can easily be recreated for any set of table legs. Looking good so far? Don’t you wish you would have thought of this life-changing Invention?
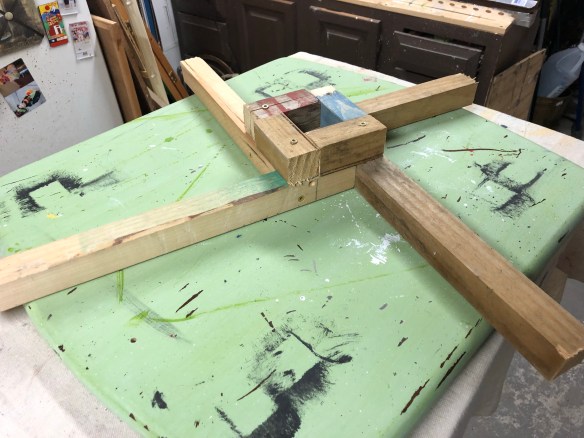
And now, for the finale!!!! Insert the top part of the leg into the space provided on the contraption. Place on the Super Duper Lazy Susan Spinner and paint all sides of the leg at once, spinning the base as needed. Play the video to see this in action.
https://videos.files.wordpress.com/9WNFoaQg/img_2646.movI hope you enjoyed learning how we made these very useful tools. We do not plan on getting patents so if you wish to recreate these items, we give you our permission.
Fellow painters, consider it our gift to you. 😉