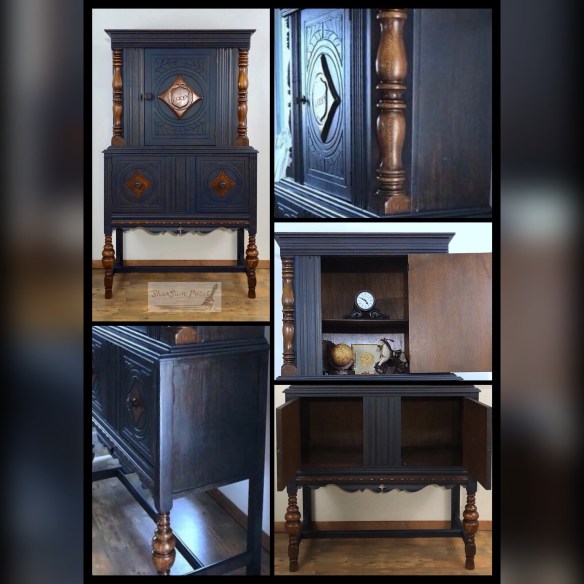
This is a tutorial, but also the story of Sir Albert, a neglected Jacobean cabinet who wanted nothing more than to have someone see the beauty behind his years and restore him to his life among the Royalty. He found me, and I fell in love with him and this process, so I hope you enjoy his story. I tried to show the important steps in the process in bold font so they would stand out and others can try this to help save and restore these beautiful pieces of history. I also want to share the thought and work and heart involved in making these pieces quality furniture once again.
It all started when I found this cabinet. I loved the carvings on it and it reminded me of one my mom and dad had refinished years ago (it is apparently in my blood to do this). However, my dad took off about 5 coats of different color paints to get to the wood, and here I am putting paint on it. He would be just shaking his head over that. 😉

At first, I was going to just clean it well and perk it up with some Howard products. I even went so far as to create a video on how well Restor-a-Shine worked on one of the small doors.
However, as I studied it more, I realized it needed more work than just a light restore, including some places that were alligatored. You know, all dry, crackling, and crisscrossing on the finish. (More on that later.) So, I started dreaming on how I would paint it. Sometime after that I had tried a technique I’ve used before where I mixed the chalk-style paint we sell and use (Missouri Limestone Paint Company Indigo Blue) with distilled water (so there are no impurities). This piece of raw wood had beautiful grain and the paint/stain technique turned out beautiful! I did not measure as this piece was so small. I think it was more paint than water, so I would paint on and wipe off. I did this 3 times. I knew then I wanted to try this on a large piece. Isn’t that gorgeous! I love Indigo Blue – a true navy blue! I love it so much I painted a pair of shoes with it. But that’s another story! I spent about a month daydreaming about painting this beautiful cabinet. But first, I wanted to learn a little more about it. A kind lady in one of my painting groups I belong to, Vintage House by Leah identified it for me as Jacobean Style. Thank you again, Leah, for identifying the style of this piece. I did a lot of research but could never find one that looked exactly like mine or knew what the style was even called.
Once I had the style identified and researched some more, I knew this guy was going to be royalty. So I named him Sir Albert from the Jacobean era during the reign of King James. The rest, as they say, is history!
And then, as luck would have it, I posted a pic of my piece on one of my painting groups and Rachel of Not Too Shabby posted one she had done that was almost identical except that hers didn’t have the shield in the center of the large door! How beautiful is this! I was ready to try my experiment!

I tried a practice run on one of the doors. I had cleaned it earlier really well and used Restor-a-Shine on it before I decided to paint it instead. So now, I just cleaned it well with a 50/50 mix of isopropyl alcohol and distilled water.
It was looking good so far so I knew it was going to work. I could see the more coats I put on, the more the navy blue came out.
My original intention was to do like I had done on the raw wood and paint it on, then wipe it off. But I could tell that where the raw wood soaked up the paint, the stained piece soaked in some places but stayed on top in others. But the thin mix just flowed out of my brush. In many areas I just used a small artist brush.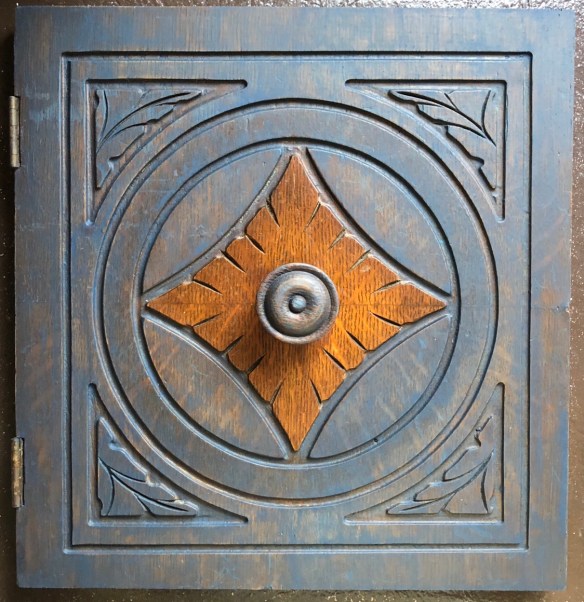
I was ready to do some watercolor painting!
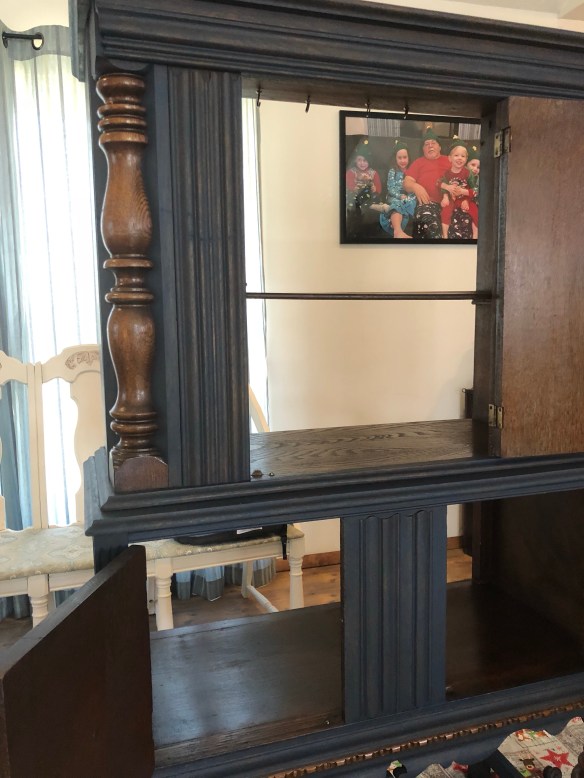
I finally brought the piece home from storage and decided to try my experiment on this piece. I did not want to sand or strip it as I wanted to keep the original color, darkened with age. I believe it had only a coat of shellac, which was missing in places, and other places the shellac had developed what is known as alligator, cracked, or crazed. Who said this furniture restoring was easy, right?
So, back to Google to research some more. And here is what I found and tried:
Reamalgamation! I learned a new word. It means I could do a technique that would pretty much liquify the cracked shellac then would turn it solid again and unblemished. It worked pretty well. It is not perfect, but neither was the whole piece. But at least I now have a smooth finish instead of an area where the finish was deteriorating.
I first cleaned the piece really well.
1st cleaning: 50/50 mixof vinegar and distilled water is a spray bottle with several drops of Dawn dishwashing detergent added to cut grease. This thing was really dirty. The pic below shows about the 5th rag I used and still cleaned more. I cleaned until I wasn’t getting any more dirt on my rag.

I then used a different cleaning mix to make sure there was no residue left.
2nd cleaning: A 50/50 mix of isopropyl alcohol and distilled water.
We did the whole piece two times.
In the process of cleaning a little of the crackling finish brushed off. That didn’t bother me because I was going to touch it up with a little stain and then paint/stain that area anyway. I also wanted a little old world look so this was fine. I didn’t want perfect.
Then, because this was shellac, I learned we needed to use denatured alcohol. Wow! This stuff is dangerous when you read about it on the can. If you try this be very, very careful! And store it high and out of site of children in a locked room. Away from heat. Very flammable. Use in a well ventilated area. And many many more warnings. We weren’t sure how dangerous so we poured just a little into a small mason jar. We were afraid it might eat through anything else. 😱
We got a new natural bristle brush – one of our chippy brushes we use. We dipped it in the denatured alcohol, wiped against the jar so it wasn’t dripping, and painted it on the areas in long strokes. We did not go back over. We dipped the brush each time, so it wouldn’t dry out. It looks really shiny at that point.
We then waited 30 minutes. After 30 minutes, it dulls some. Then we took a very fine steel wool and rubbed gently. And….just like magic… we had a smooth surface.
I tried to get photos in the same spot each time, but I don’t think they quite came out that way, but you can see where there was a cracked finish, now there is not. You can see where a little finish is gone, but as I said, I don’t mind that. I will fix that. I am happy it is smooth without having to remove all the finish or sand it. I wanted to keep that dark look.
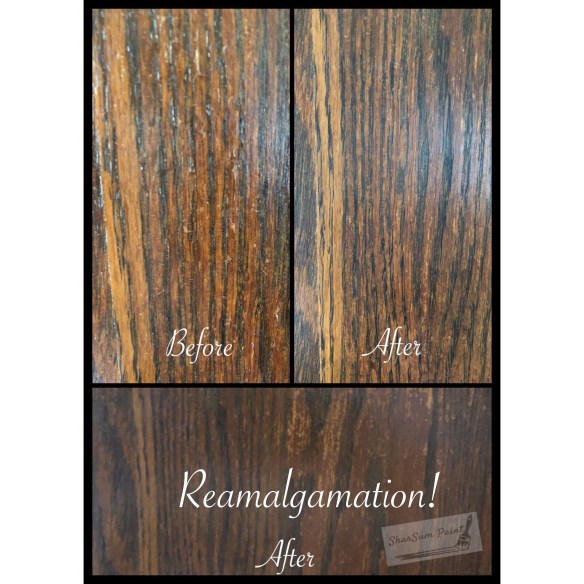
So now, maybe you have learned a new word, too, along with what it means. Amalgamation! It may just save your piece!
Here is the link to the site that helped me:
So now I was ready to do some water color painting with my paint stain mix of 50/50 of chalk-style paint and distilled water. I used a cup of water and an 8 oz jar of paint, mixing together in a mason jar. I poured the paint into the mason jar, then poured the water into the paint jar and shook it to get all the paint out, then poured that into the mason jar.
So far so good. More coats will make it more navy.

The inside and shelves had a few scuffs and marks. I used Howard Restore-a-Finish on them, and they are beautiful. Do they still have a bit of character. Certainly. Don’t we all? 😉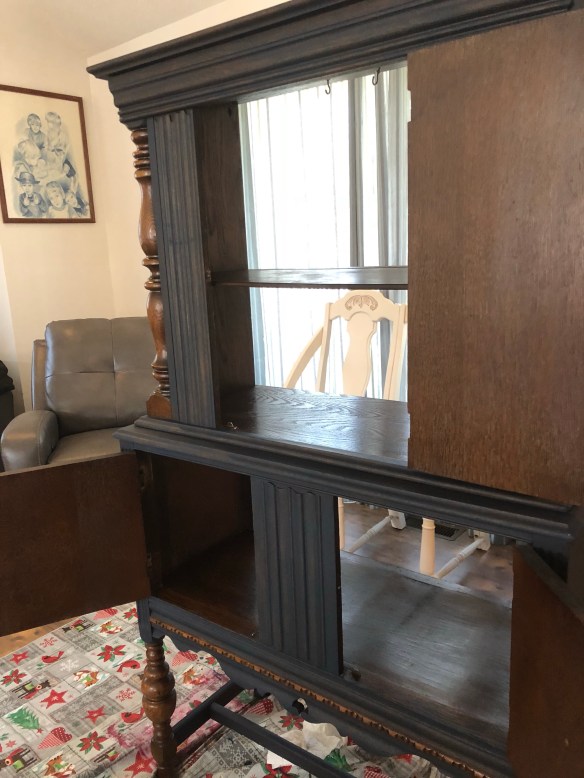
The parts I am keeping wood, I refreshed with Varathane water based stain and polyurethane in dark walnut. I just painted it on and left it to dry. It made the wood shine and covered any nicks and scratches.


So, that’s pretty much it. This actually went much faster than most pieces. I just kept painting until I saw the dark navy I was looking for. I think it was 3 or 4 coats. It goes so fast and dries quickly. Someone asked if I taped around the wood on the front sides. No. I used the small brush and the diluted paint just flowed into the right places. It was pretty amazing to me as no background in watercolor or any type of artistic painting.
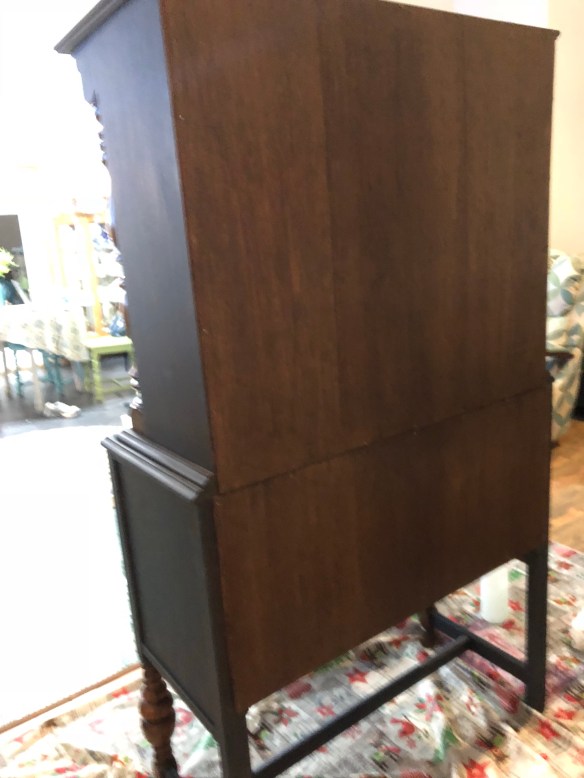
The last thing we did was put on a new back. The old one was cracked and veneer peeled away. When we did, a package of Singer sewing machine needles fell out. 
I love when we find treasures. I am a member of a sewing machine group and found someone there who could use them, so sent them on.
We cut a piece of luan the sizes of the two back pieces and painted two coats of the Varathane water based dark walnut stain and polyurethane. The color matched the wood stained areas perfectly. We used screws to attach the back.

Rachel, my new painting friend, told me she had put new knobs in her piece and I was missing the one on the large door. She searched and found one of them and sent it to me. It was a perfect match, and as Rachel said when I let her know it had come, that she was happy it was back where it belonged on a Jacobean cabinet.


I sealed the whole piece (wood look pieces, too, with Howard FeednWax. I chose it over paste wax due to the fact that it was still mostly a stained piece with wood showing through with lots of nooks and crannies paste would get stuck in. I loved how it worked. Very easy to use and smells good, too. You paint it on. It looks very shiny going on but doesn’t stay that way. Wait 20 minutes and wipe it off. Let dry and lightly buff. A unique thing about wax as a sealer is that it is a natural dust repellent so Sir Albert will not get as dusty as some pieces of furniture.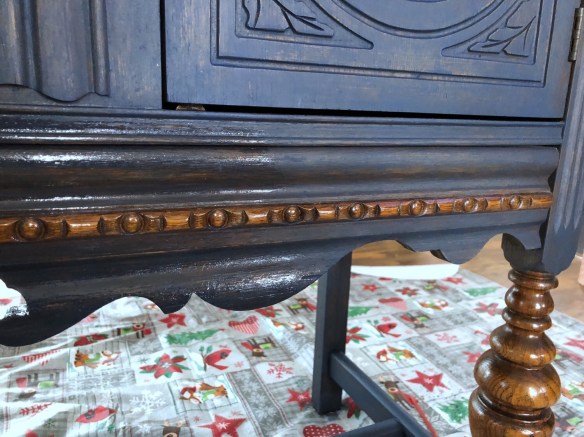
This has been my favorite piece to paint. I hope if you try making some paint/stain and doing some watercolor on a piece you have that you will share photos in the comments here. I would love to see them.
If you have any questions, or if I can make something clearer, please let me know and I will edit this tutorial.
So here is the last photo of Sir Albert of the Jacobean era of the reign of King James in all his glory until….he gets dressed (staged) in all his finery as he searches for his forever home. When he is ready, I will post those photos, too.

Update: I posted Sir Albert on the online buy/sell site furn.ish and he sold overnight. The new owner fell in love at first glance as she had been a police officer for eight years. The shield on the front and the navy blue color reminded her of the uniform she wore with pride. She did rename him Sir Robert after Sir Robert Peel, the father of modern policing. 😍