Gray Weathered Wood Nesting Tables

https://sharsumpaint.com/2019/06/30/gray-weathered-wood-nesting-tables/

I have been searching for a good way to create a gray weathered wood look for a table top ever since I saw my cousin’s new dining room table. I was sure I could paint something similar.

These nesting tables had been waiting patiently for me to work the gray weathered wood magic on them. The time was now.

I came across a tutorial from Angela Marie Made which showed the look I was going for so I pinned it and waited for the right time to try it. Thank you so much for sharing this technique!

First up, the legs – the tables are well made – solid wood with metal inserts for the legs to screw into. I’m sure there is a furniture term for that but I do not know what that is. Just know the legs easily screw on and off with no worries. We cleaned, hand sanded, then cleaned again and they were ready for paint.

My original idea was to paint the legs a light gray, but once I painted one with a new custom color “MO Graystone” we created in our Missouri Limestone Paint Company chalk-style paint line, I knew it would be too light. So I started dry brushing “Sunday Silver” over the lighter gray, lightly in the detail areas and heavier on the rest! I used just a small amount of paint, dabbing most paint on the brush on paper towel first. This is a great way to distress without sanding and it was fun to watch it happen.
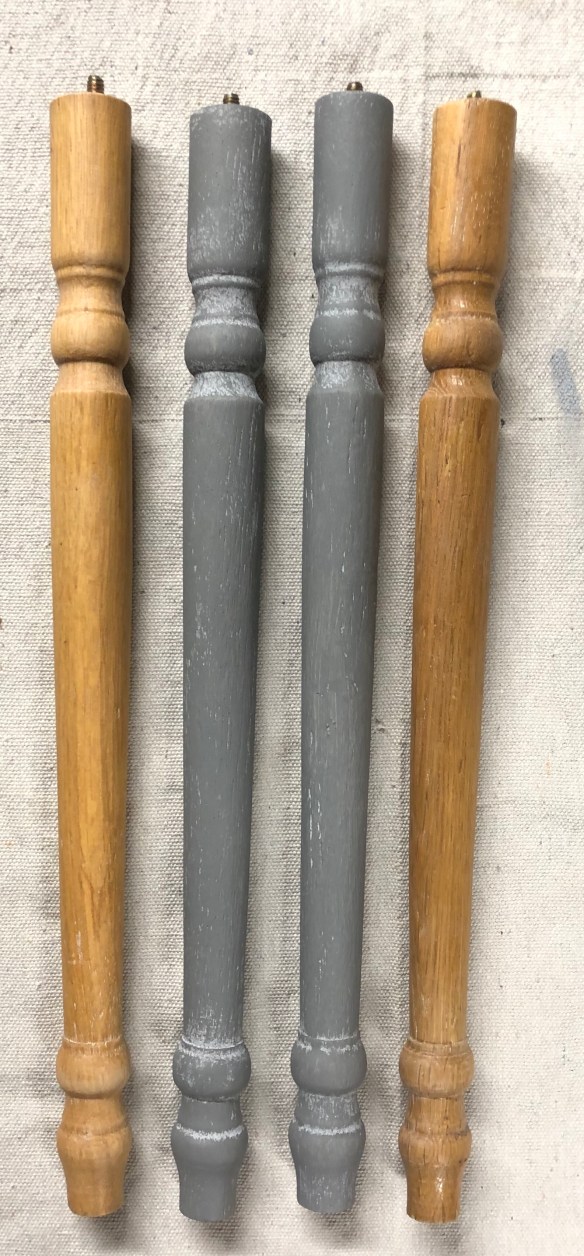
Two down, 10 to go!

Love this distressing technique

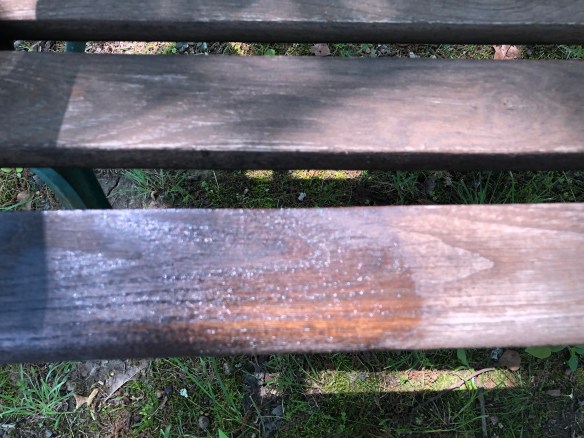
Table tops: My husband cleaned, sanded, and cleaned again (top and bottom) and I used Varathane Premium Fast dry stain in Kona. I stained the bottoms for a finished look but did not do the weathered wood finish on them. I thought that Kona would darken them a lot, but actually didn’t. The wood is a very hard wood so I probably could have given them another couple of coats, but I lack patience in waiting for oil stain to dry so I chose to do just one coat.

I watered down the “January” color 50/50 and painted it on, then wiped off excess and rubbed in what was left. I could tell it was going to be lighter so I also used a little “Sunday Silver” here and there and rubbed it in. Yes, it turned out lighter than my inspiration, but I love how it turned out.

Love when the furniture decides how a technique is going to look.

I put five coats of Varathane water based Crystal Clear polyurethane Satin on each table, sanding lightly between coats. I love the satin finish!

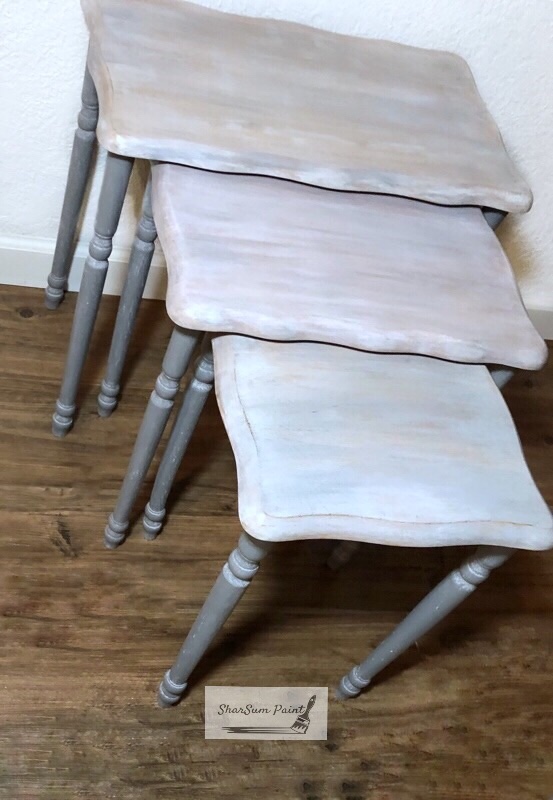
Now that I’ve experienced how nice this technique is, my plans are to use this finish on this farm table set I have to paint and sell. But that’s a project for another day.

A Jewelry Box Makeover

https://sharsumpaint.com/?s=Jewelry+box+makeover&submit=Search

For more information on all of our 45 gorgeous colors and how to purchase them locally or online, please visit our Color Chart Page.

This is a jewelry box I upcycled for my nine year old granddaughter. She chose this one because it was the biggest. 😂

I painted it the color she chose, which is pretty close to the color of the stripes in her curtains. Missouri Limestone Paint Company “Harvest Pumpkin”.

I used Glaze Couture “Champagne” over it for a little sparkle. A painting friend was kind enough to give me the Champagne glaze, but I ordered Black Chiffon from the site, Delya Design.

I painted the drawer sides Rustoleum “Copper Penny Metallic”.

I painted the hardware and then used a touch of Rustoleum “Gold Metallic”.

The detail is Missouri Limestone “Navajo Blanket”. It matches the color of a stencil on her wall.

I then sealed it all with Varathane Water based Crystal Clear Polyurethane Satin Finish.

The navy blue flocking is original and in great shape. The desk I painted for her in her room has that color. She has a pink bedspread so she has a very colorful room. Lol

This jewelry box will be a keepsake she will be able to use even as she gets older.

Time Saver DIY Hack – a Mani/Pedi While Riding in Car From St. Louis to Chicago

Technically, you could call this a painting project. Painting nails. So I say this counts as an appropriate post for my blog. 😁

And if you’ve ever traveled the roads from Missouri through Illinois to get to the Chicago area, you know you need a distraction. Until you get to the wind turbines. I love seeing the wind turbines. I think they look so peaceful.

I was so busy getting ready to go on a trip after some marathon painting and delivering furniture and grandkids visiting, I didn’t have time to actually fit in a visit to the nail salon. And let’s face it. When you are a painter, salon manicures are pretty much a waste of time anyway.

But, I did think ahead so I brought along some nail supplies, planning on doing it in the car while my husband drove. I pretty much make him drive all the time when we go on trips. I learned early on if he was going to tell me step by step how to drive, then he might as well do it himself. Am I right? So, through the years that has freed me up to enjoy many things along the route… grading papers, reading, sleeping, working on the computer (love my hot spot -except when I forget to turn it off-?uh oh), and now setting up a portable nail salon.

First of all I must thank McDonalds. Without their donations, this would have been just another paint your nails in the car thing which would be no big deal. But McDonalds made this a game changer. 😂

I posted this on my Facebook page, too. I tell you, this is going to go viral! Feel free to like my post, my FB page, and share, share, share. You can say you know me when I become an Internet sensation! https://facebook.com/sharsumpaint

Important supplies:

* Used coffee cup from McDonalds (dry it with a napkin they provide)

* Drink carrier (who knew when we accepted McDonald’s offer of one that it would make the perfect salon tray)

* Handy dandy little knife found in the console. 🤷🏼‍♀️ An amazing assortment of items in there. I could take it on Let’s Make a Deal and come home a winner. Note: Be sure to get a lesson on how to close the knife. 🙄

* Those foam things for your toes because God knows its going to be hard enough as it is contorting your body in the front seat to get to them in the first place. You sure don’t want smudges.

* Car air conditioner turned on full blast

Car air conditioner vent works great for drying!

* And, of course nail polish

* First, cut down the coffee cup with the knife. Be careful because this is a dangerous little thing.

* Finally make a pit stop at a rest area before you begin because you don’t want to be interrupted.

*Arrange your supplies and you are all set!

That’s it! Enjoy this life hack you are sure to try again and again.

Warning: This is it on the pics. The actual contortions getting a salon perfect mani/pedi won’t be pretty. And neither will the finished pedicure. I may share the manicure. We will see.

Update: Ok….you get to see a bit of the mani. The hand may or may not have gotten a little bit of filtering.😉

Update: I know I wasn’t going to share any pedi pics (I truly hate seeing those myself) but this is too funny not to share. Turn the mode of the car air conditioner to the leg area and stick your feet under the dash. Perfect pedi drying!

Update: Last pedi pic, I promise. This is all you get to see…think Wilson on Home Improvement … when you only got to see the top of his face. Trust me, you’ll thank me that you are only seeing the top of my toes. But, those sparkles really finish the pedi off nicely. 🥳

Now, what can I do for 2 more hours traveling from Missouri to Chicago? Not as many cornfields to see due to flooding.

And I still can’t believe the luck of finding this knife tool! I’m sure it has a 1,001 more uses. 😂

Missouri Limestone Paint Company Chalk-Style Paint is not Just for Painting Furniture, Decor & Shoes!

Our Missouri Limestone Paint Company chalk-style paint is so versatile, you can even use it to create works of art. Jenny Pope of J’s Vinyl and Paint Boutiq is one of our retailers of Missouri Limestone Paint Company in St. James, Missouri. Jenny created all this beautiful artwork using the gorgeous colors of our paint. Jenny, these are just beautiful! You are so very talented!

Be sure to visit Jennie’s Page and stop by to see her and her shop when in St. James.

https://www.facebook.com/jenniep64/

If you haven’t tried our paint yet, I encourage you to give it a try! We sell it in 6 area shops and online, too!

https://sharsumpaint.com/locations-for-purchasing-paint/

Here are just a few of the things other than furniture we’ve painted with our paint.

Rubbermaid Mailboxes – Coral Shovel:

French Doors – Round Bales, Gray Goose, and French Roast:

Time Out Chairs – Crepe Myrtle and January:

Fireplace – Winter Gloves:

Signs – Coal Shovel and Vinyl:

And yes….Shoes! Indigo Blue and Fabric softener!

The list goes on and on. So many possibilities, so little time!

From Coffee Bar to Buffet

We had the same table and chairs for years before we started painting and now have gone through several. We are now getting ready to change again.

This round table with 2 leaves and chairs we painted with our Missouri Limestone Paint Company chalk-style paint in Trading Post, Old Tin Barn, Sour Green Apple, and Crepe Myrtle and a mix of grays. We gave this set to one son and his family.

My coffee bar I repainted in a new gray we haven’t released yet and are calling MO Gray Stone. This is going to our other son and his family to match their farmhouse dining room table.

The farmhouse set in our dining room now is too big for the space so we will be giving it a makeover in the near future.

If you like the look of this set and would like us to customize it for you, just contact me for details and pricing.

But that means, I will need to be looking for a smaller set. 😁

Bringing a Garden Bench Back to Life!

This garden bench had good bones. It just needed some paint and the boards refreshed and I knew just the way to do it.

First of all – the paint. Our Missouri Limestone Paint Company chalk-style paint is perfect for the cast iron metal on this bench. It actually only took one coat of our gorgeous dark green color called “Evening Shade”. It also needed no sealer. Our chalk-style paint, when used on metals like this, cure naturally with the heat and the sun baking it in.

Yes, we ship!!! You can purchase all of our 45 colors in 16 oz. jars through our online distributor, Connie Mathews of Winston Home Designs.

The whole project took less than two hours, even when you have a cute little helper. 🙂

Next – the wood. The wood was in really good shape, just bleached out and dry. Wise Owl Salve in White Tea scent to the rescue! We don’t sell this product ourselves, but I love it and have used it to rehydrate wood and as a sealer on several projects. It comes in several wonderful scents! I purchase mine through a fellow painter in Massachusetts. I was fortunate to meet Sarah, of the Princess and the Peacock, while on a trip to visit my cousin, who lives about 30 minutes from her shop! I’ve linked her name to the Wise Owl Salve section of her online shop.

I tried to show in the photo below the difference the Salve makes in bringing the wood back to life!

The Salve is so easy to apply, then let it soak it, and buff. And Yes, you can use it on furniture left out in the weather, and we do have some weather here in Missouri. The bench may need a reapplication of wax down the road, but it only takes a few minutes so that isn’t a problem.

And that is all there was to it. This bench now looks almost brand new and holds a prominent spot in my front yard under the trees.