My husband and I (SharSum Paint) are distributors of a brand of chalk-based paint out of Ozark, Missouri, called Missouri Limestone Paint Company. Even better, we personally use the paint we sell and, through our business, teach classes to others on how to use it. As a result, I’m always on the lookout for different techniques to try out and share with others.
Yesterday, I was on Pinterest, naturally. I came across a tutorial on creating a driftwood/barn wood effect. What was really interesting was how the author referenced the final result being reminiscent of “Restoration Hardware” furniture. I had to learn more!
Old barn wood is all the rage right now. Here’s the excellent tutorial showing the method they used and was what gave me the inspiration to try my own version: http://cececaldwells.com/barnwood/
Of course, I took a little liberty with the tutorial and substituted our paint brand ( we all have our favorite brands, right?) and changed it from using a stain/sealer to using liming wax mainly because I wanted to try out liming wax.  If I were going to do this on something like a kitchen table, I might use the method in the tutorial, or possible do the wash, then the drybrush, making sure to blend it in, then seal it with stain/sealer as the final step. I will try to get a sample using stain/sealer later.
I couldn’t wait to try this so this morning bright and early, I got started. Of course, I didn’t take a before pic of my piece of wood, but it was a new piece of pine, I believe….light in color. Anyway, it had some good grain in it. I also looked at the tutorial again and noticed there were quite a few steps listed to get the result of driftwood/barn wood…..the restoration hardware look. 1. gray paint wash 2. stain/sealer 3. dry brush white and 4. seal again. I decided I could create that look in 2 steps…(The older generation reading this might find this statement reminiscent of “I can name that tune in 2 notes”!) : )
I remembered that liming wax will give the whitewash effect the dry brushing does. I also wanted to use wax rather than a sealer. What is liming wax? It is basically a white wax – a clear wax with an added white pigment that gives a white grained finish, a white washed faded effect to your bare or stained wood or painted furniture. Liming works best on either open grained wood such as oak, pine or ash but is also beautiful on ornately carved furniture where the white wax will settle in the crevices and give a soft worn look (like antiquing with dark wax but cleaner and more gentle). Originally, lime was used for this technique, which is pretty caustic. Using a white wax will give you a similar look but it is safe to use and at the same time will also protect your furniture and make it smooth to touch. What is even better is you don’t have to buy liming wax. You can make your own. I used the Briwax toulene-free clear wax we carry at a local store in Sullivan, Missouri as well as at our other locations in Bourbon, Cuba, and Rolla. I added a little Missouri Limestone Paint Company “January’, just eye-balling the amount…..I would say maybe 3 parts wax to 1 part January to start, and then stirred it up. It looked nice and white after stirring. Briwax is so easy to apply and buff. Not much elbow grease is needed at all. It does have a chemical smell, however, so I would make sure to work in a well ventilated area.
Here are the steps I used. The finished result is below although the picture doesn’t show how truly beautiful the board is after this technique.
1. I poured a small amount of Missouri Limestone paint Company “Gray Goose”
into a small cup. I had another small cup of water. I dipped the brush into the Gray Goose paint, then dipped it in the water. I applied this thinned down paint to the whole board, adding more paint and dipped water as needed to cover. I let that sit for a few minutes, then wiped it off lightly with a wet cloth (I use baby wipes – they work great). I let that dry and then reapplied. The two coats is what darkened the wood more and then I didn’t need a stain. I also didn’t need a poly sealer as I wanted to use wax to seal.
2. Then came the liming wax I made (see above). I did apply it with a round brush, really working it into the grain of the wood. I let it sit about 30 minutes or so and then buffed it out. I did two applications of this as well.
That’s it! Only two steps! On a piece of furniture, I would go ahead and do one or two more coats of clear Briwax for more durability. Watch this site soon for a “Restoration Hardware” type piece of furniture I will be painting using this technique.
Here’s a photo of my finished board. The photo, though, does reflect how truly beautiful this technique is.

Here are some picture frames. They were raw oak.


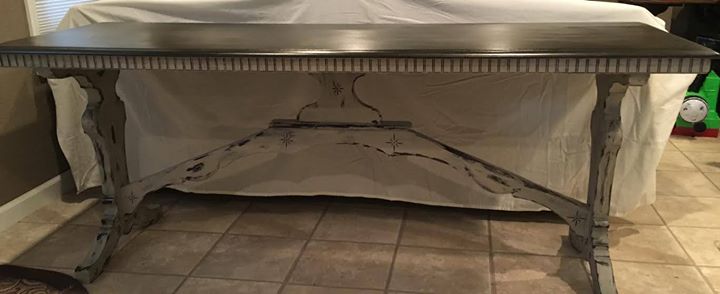
But wait! There’s more! Here is my first finished piece – The Restoration Hardware Look – already sold! I am 100% in love with this look.


Stay tuned for a post on my version of this technique using a stain/sealer.


