You can find anything on Google. It worked perfectly.
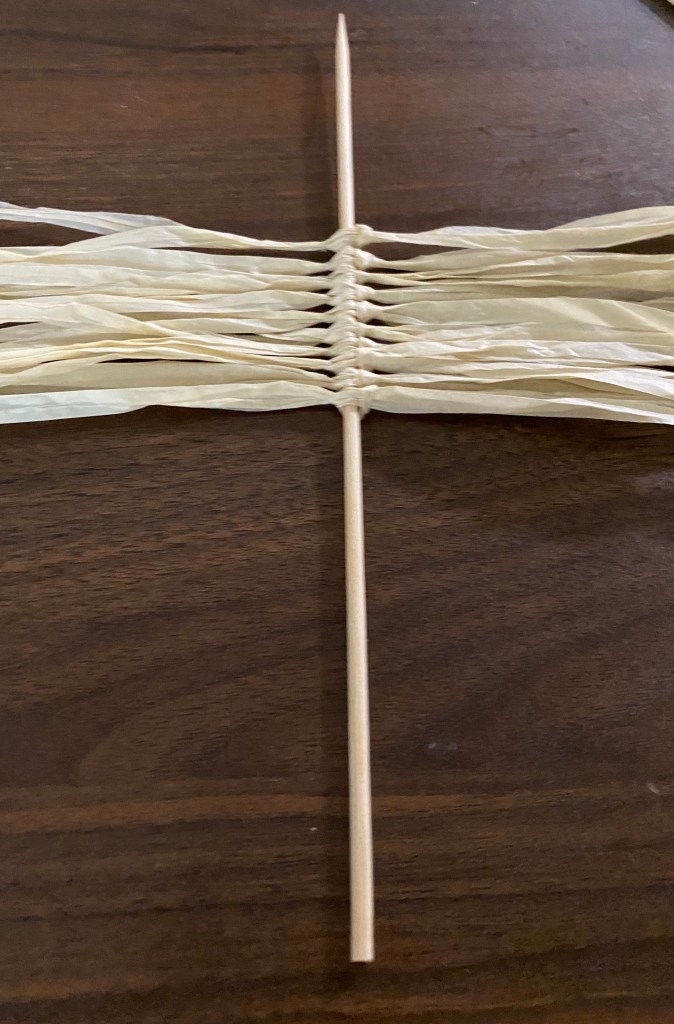
I cut off strips from the hula skirt. The idea video above explains how to attach the strips.
Once I had enough strips tied on, I put down a sheet of parchment paper, placed my piece on it, sprayed it with my homemade starch, then added another piece of parchment paper, and ironed it dry.
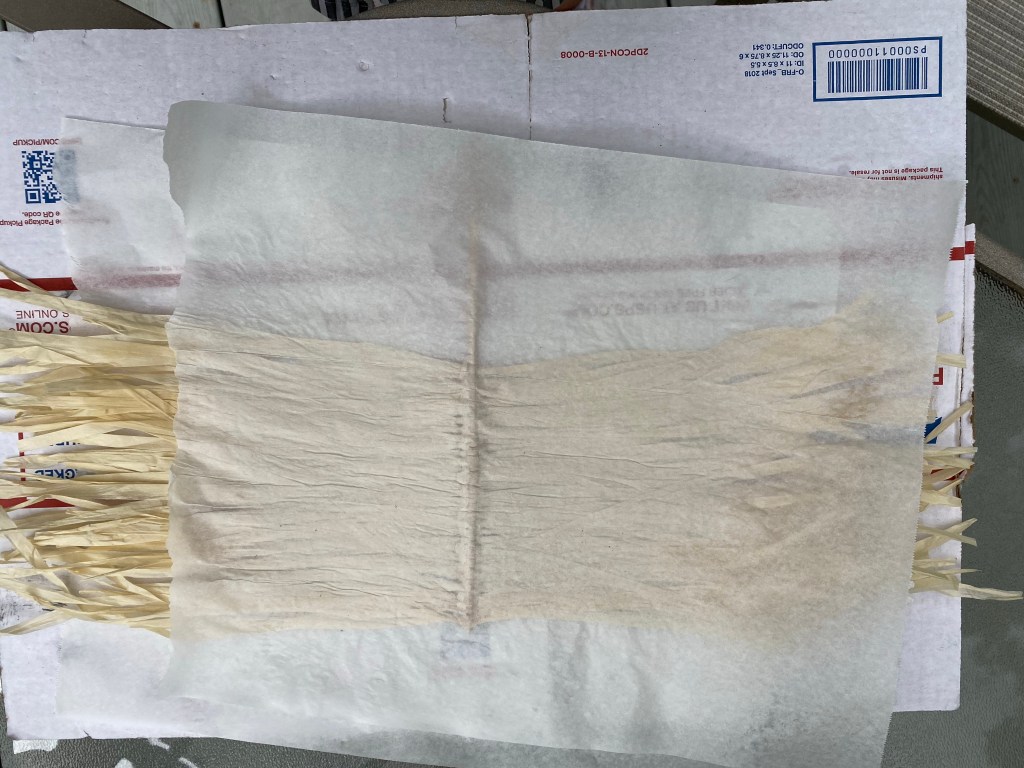
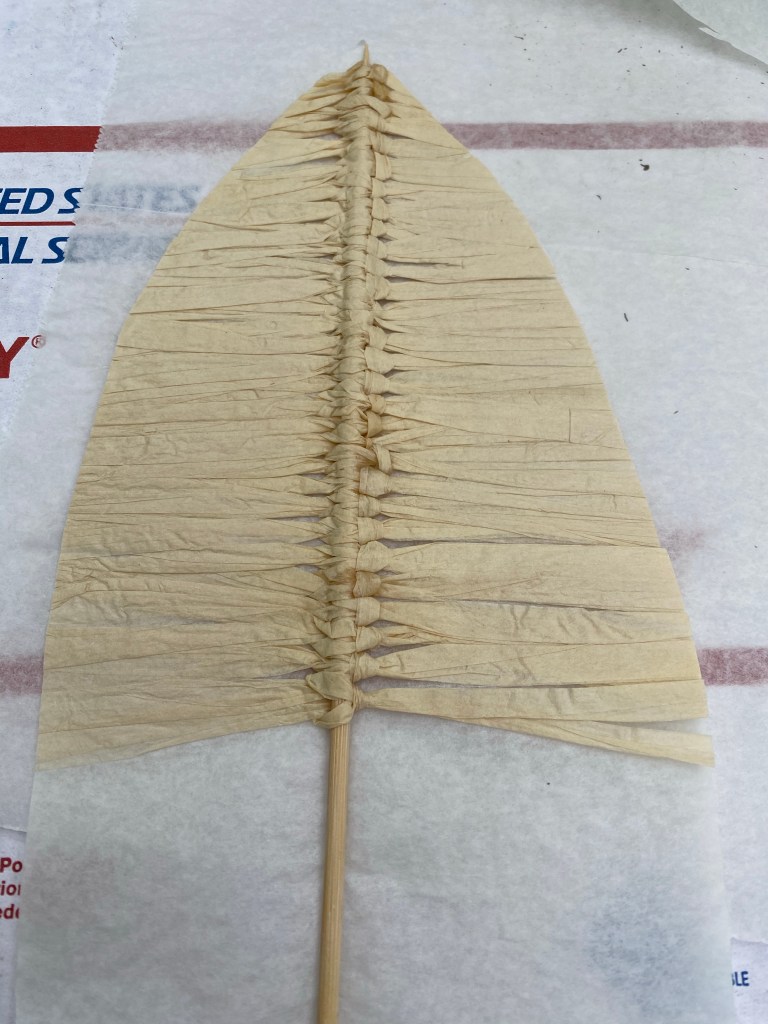
It came out nice and stiff. I was able to peel off the top piece of parchment paper easily. I left the back piece on at that point because I thought it would be easy to cut the shape of the feather with it attached. And it was!
I then used glue. The gluing isn’t shown here but I spread tacky glue on the back across the top and bottom and down the seam to hold all the strips together and so they wouldn’t shift up and down.
One it was cut out, I peeled each piece apart as they were all stuck together from the starch.
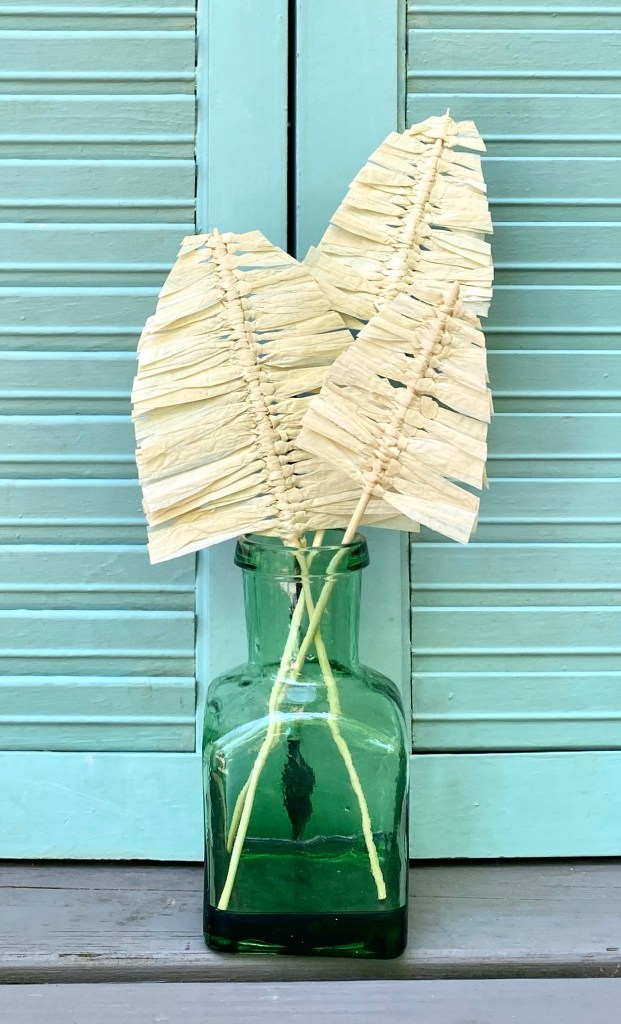
I will say this wasn’t a quick project, but it was easy to do. And I made it outside in this beautiful weather we are having!
And that green glass vase! I thrifted it long ago. I never knew how I would use it until now.
This is line art I created on glass – by tracing a print out with a metallic paint pen . 🙂 This YouTube channel video has many great ideas that think fit right in with this modern boho style. This project I saw on the video, by Katie Bookser, in particular caught my eye.
I printed an image from the site of free images she shared and placed it under the glass of the photo frame I was using. Then with a white metallic paint pen from Dollar Tree, I simple traced the image.
Once the paint was dry, I turned it face down on a unique piece of blue scrapbook paper I placed in the frame. In the close ups, you can see a bit of writing on the paper. With the painting face down, you can easily clean the glass.
This 8”x 12” frameless photo frame is very unique. The glass and contents pop in and out from the front. You press on the edges to release them. There is also a fun surprise under the scrapbook paper. I used a snowflake picture I made this winter. Repurposing are its finest. 🙂
Photos were a little challenging due to glass reflection.
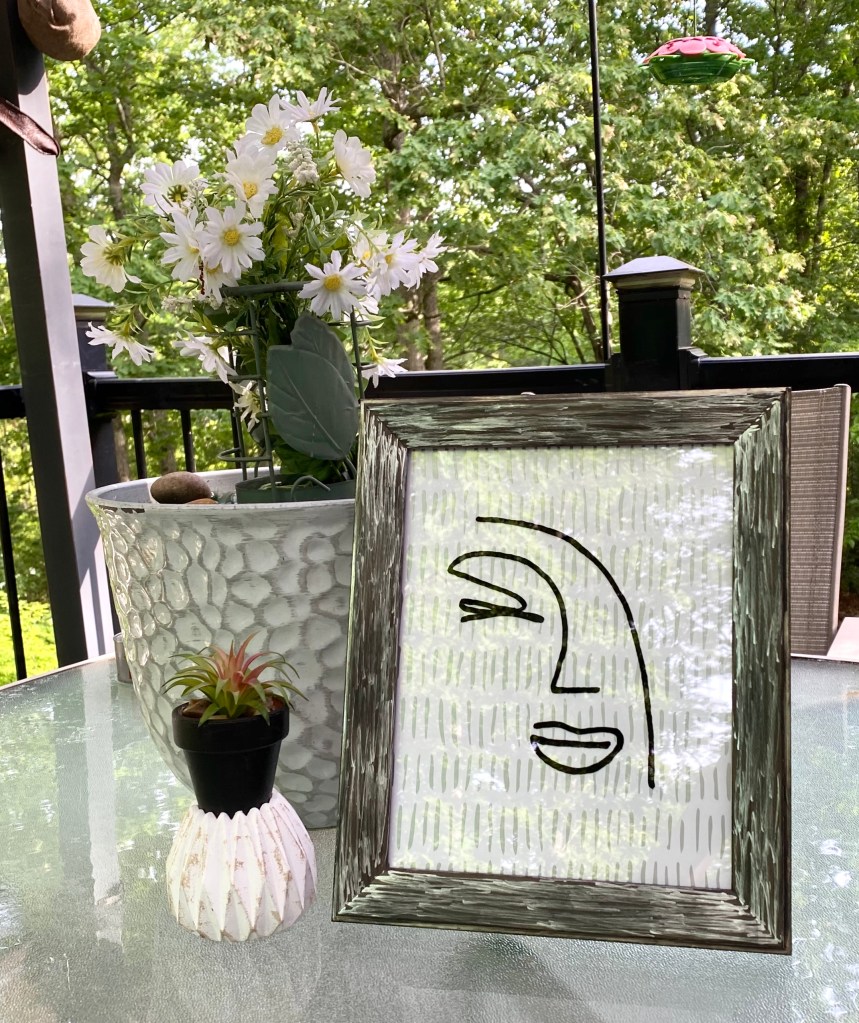
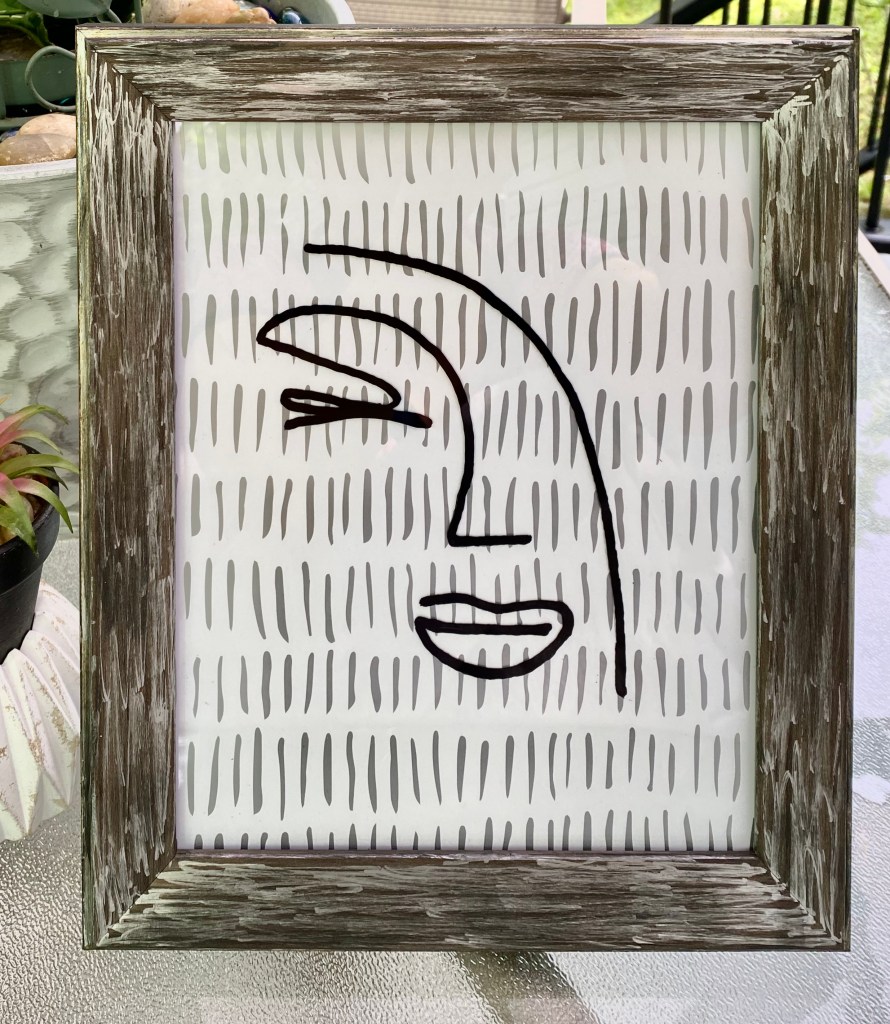
I had so much fun with tracing line art on glass yesterday, I just had to play around with another one this morning. I’ve discovered I love to do this!
The graphic is from a free vector site called vecteezy. I did a search for face line art. I traced this graphic on glass with a black permanent ink Sharpie.
The tribal peel and stick wallpaper came from Dollar Tree. The nice solid frame is a Hobby Lobby one I thrifted from somewhere.
I painted the lines on the front with a silver metallic pen and the sides with black chalk paint.
This one is true bohemian style. So cool!
I was fighting reflections on the glass, but I actually love the reflection of the leaves in the first photo. And it’s a beautiful morning on the deck for taking photos. Honeysuckle must be blooming because I can catch a whiff of it every now and then.☺️
It was a rainy day yesterday and since rainy days are made for crafting, I had a couple more projects in me.
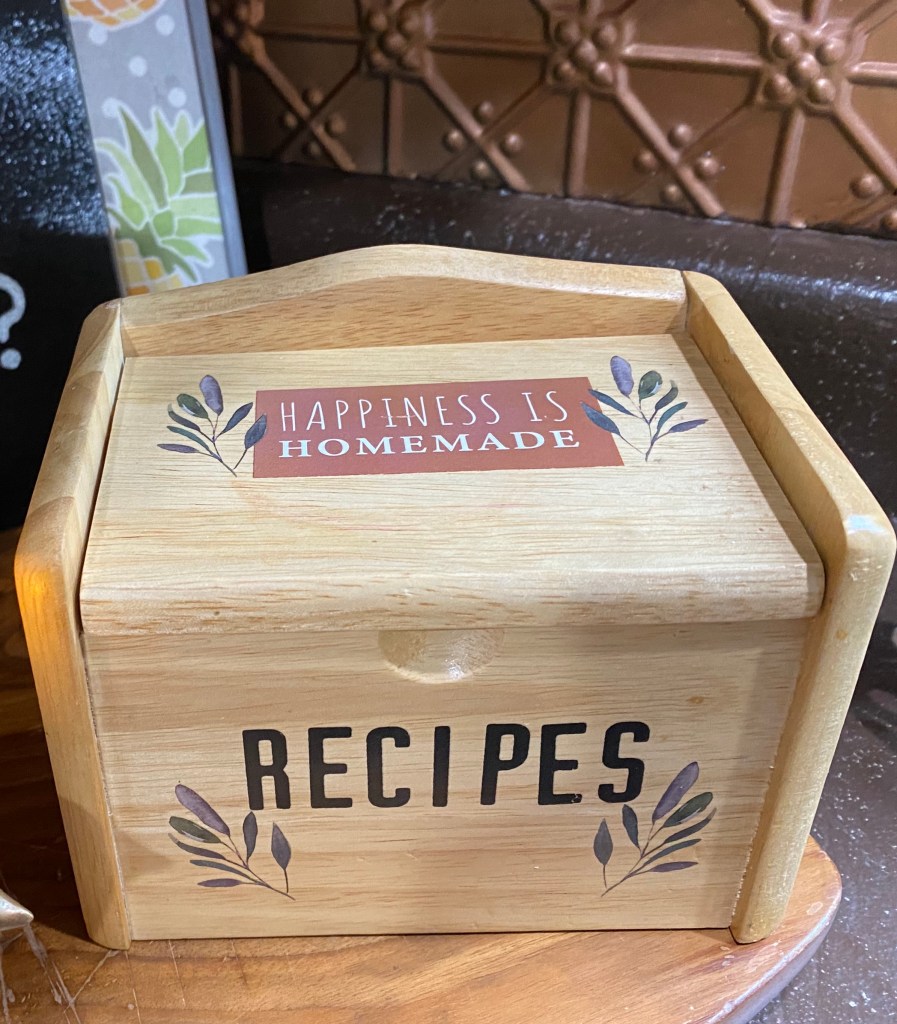
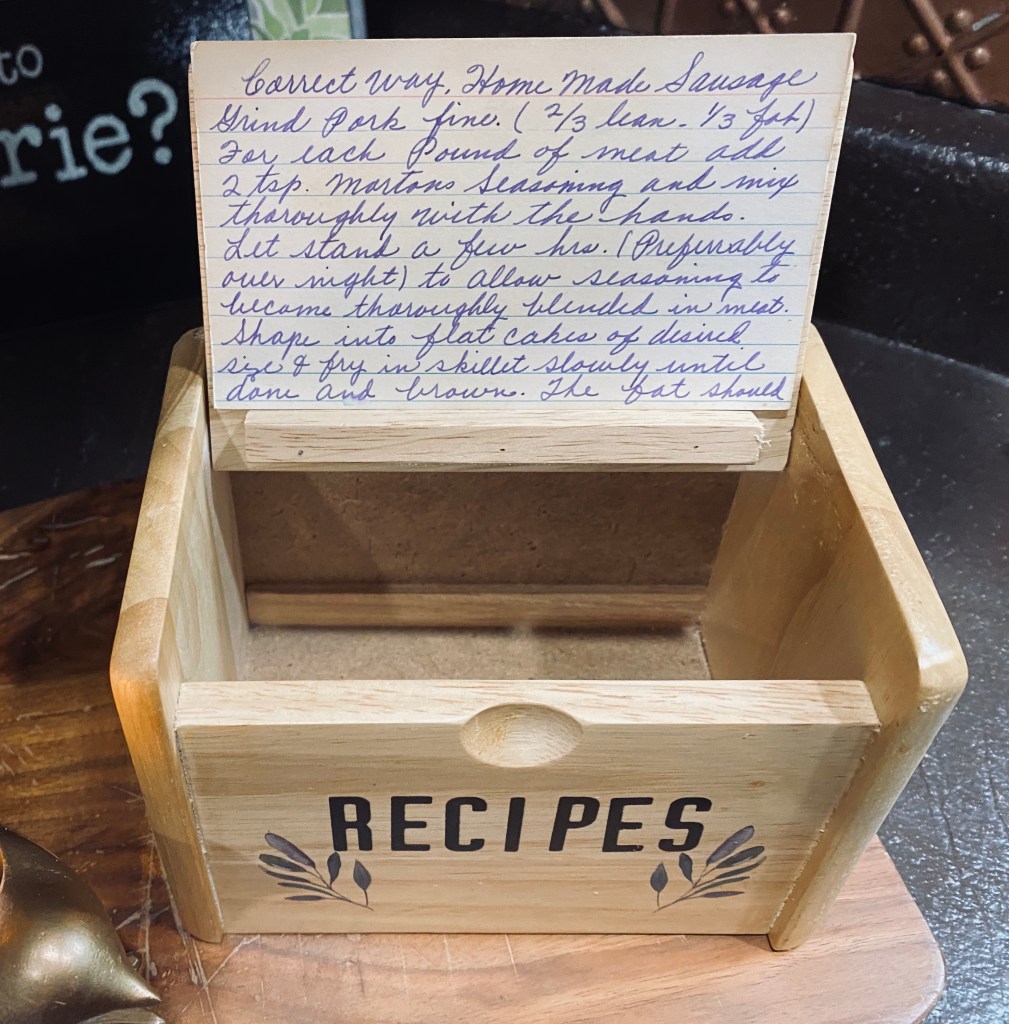
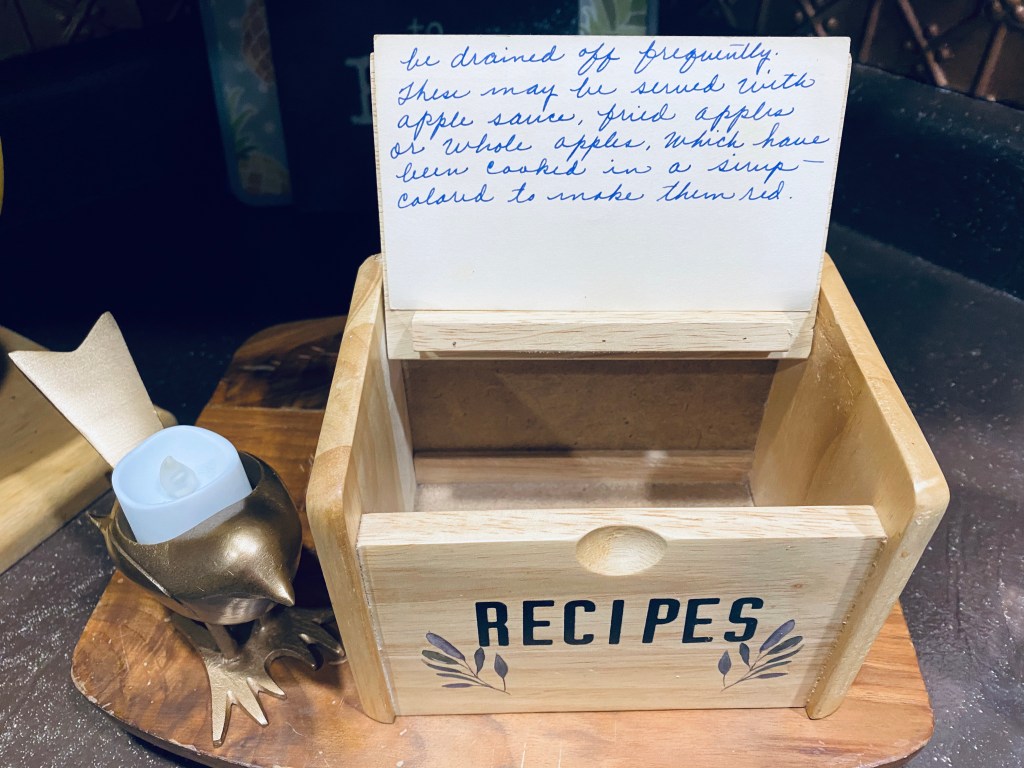
I was in Danny’s workshop area and happened to see this cute recipe box I thrifted so long ago I didn’t even remember it. Who knows why it was in there. 🤷🏼♀️
I opened it up and the lid has a little shelf inside to hold a recipe card. How cool is that! The wood was natural and I decided it was the perfect thing for a modern boho decor as well as many other styles.
I immediately knew I was adding some transfers to it and knew just which ones to use from some small ones I got at Dollar Tree.
Aunt Ada’s recipe card for homemade sausage seemed like the perfect recipe to display. I love how she titled it “Correct Way” and how beautiful her handwriting was. 🥰
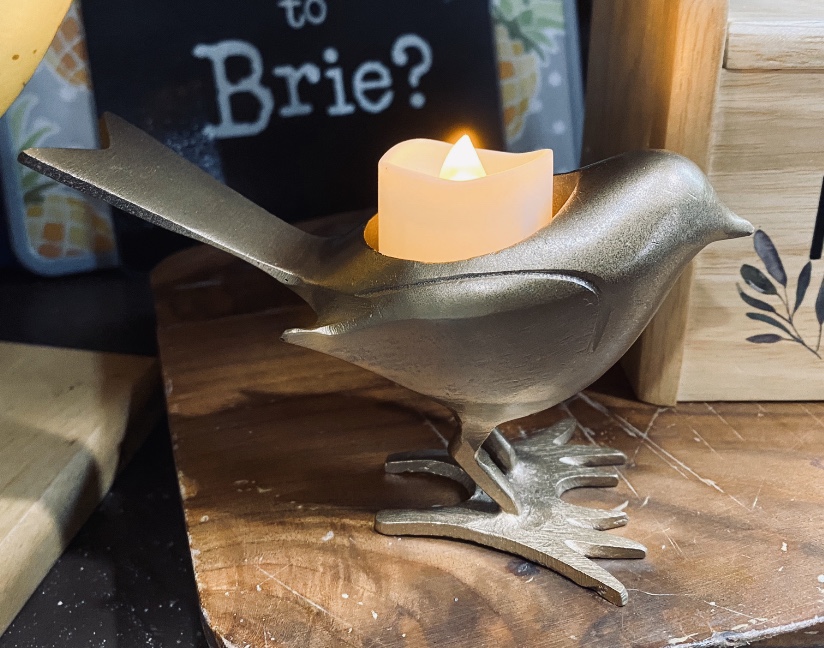
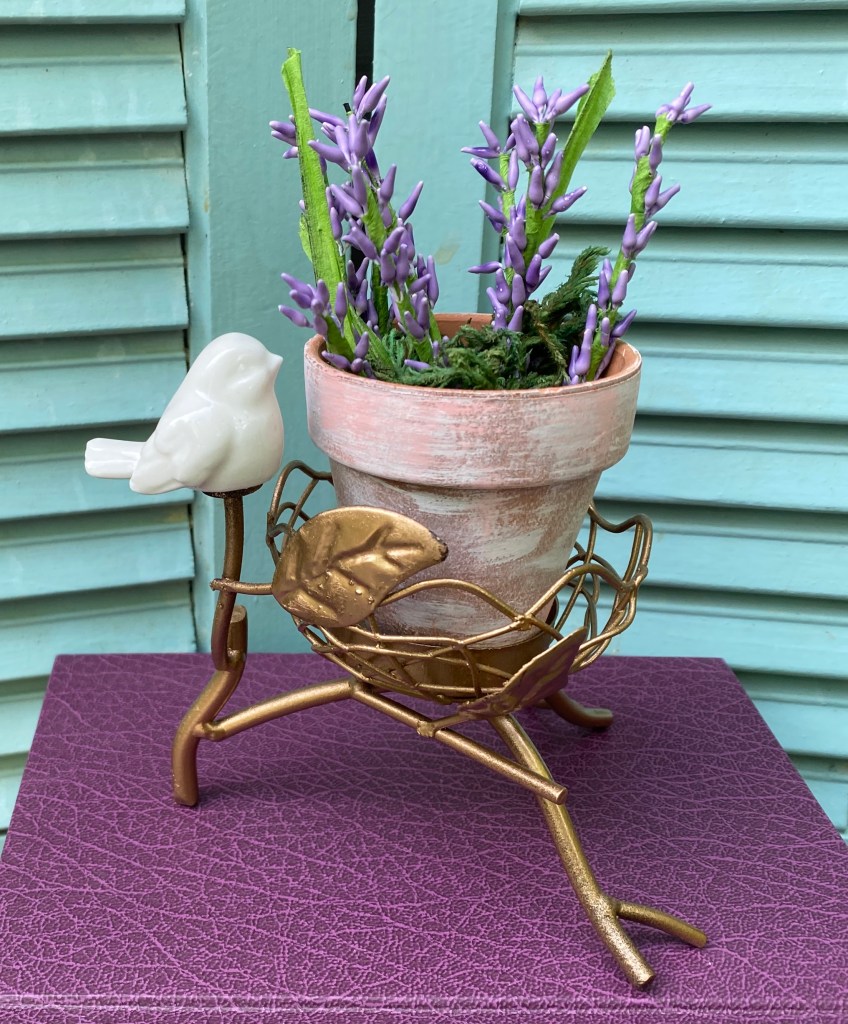
I also recently thrifted this solid metal bird tea light candle holder. After immersing myself in modern boho decor, I knew I had to spray paint him metallic gold. 🙂
Yesterday was definitely “A good day to have a good day!” And it quit raining, and the sun is shining, so today looks like it’s going to be a good day, too!
I’ve been seeing a lot of the “boho” (bohemian) style lately! As I looked into it more, I have come to the conclusion that I really like the contemporary boho style, also known as modern boho or boho chic. I love the eclectic feel of using many different styles together. Although my Beatles themed guest room has that vintage bohemian look that I love.
I think I have been leaning toward the contemporary (modern, chic) bohemian style for awhile now with my love of natural colors, wood, elements of nature, and color. I just didn’t know it had a name.
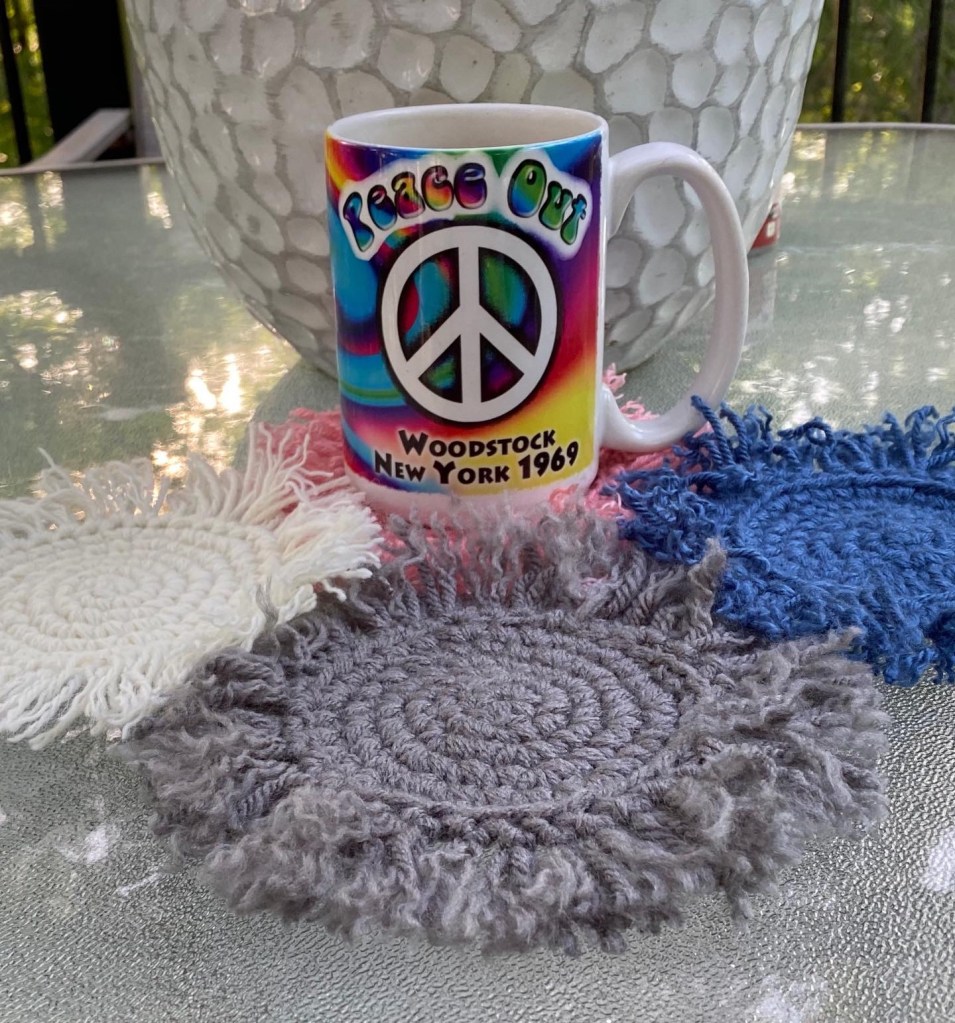
As a result of my research, I’m beginning to create some modern boho style projects in the coming days. I love that macrame and crochet is trending so I’m definitely going to making some coasters for sure.
This lady also explains boho really well. I think it is becoming very popular.
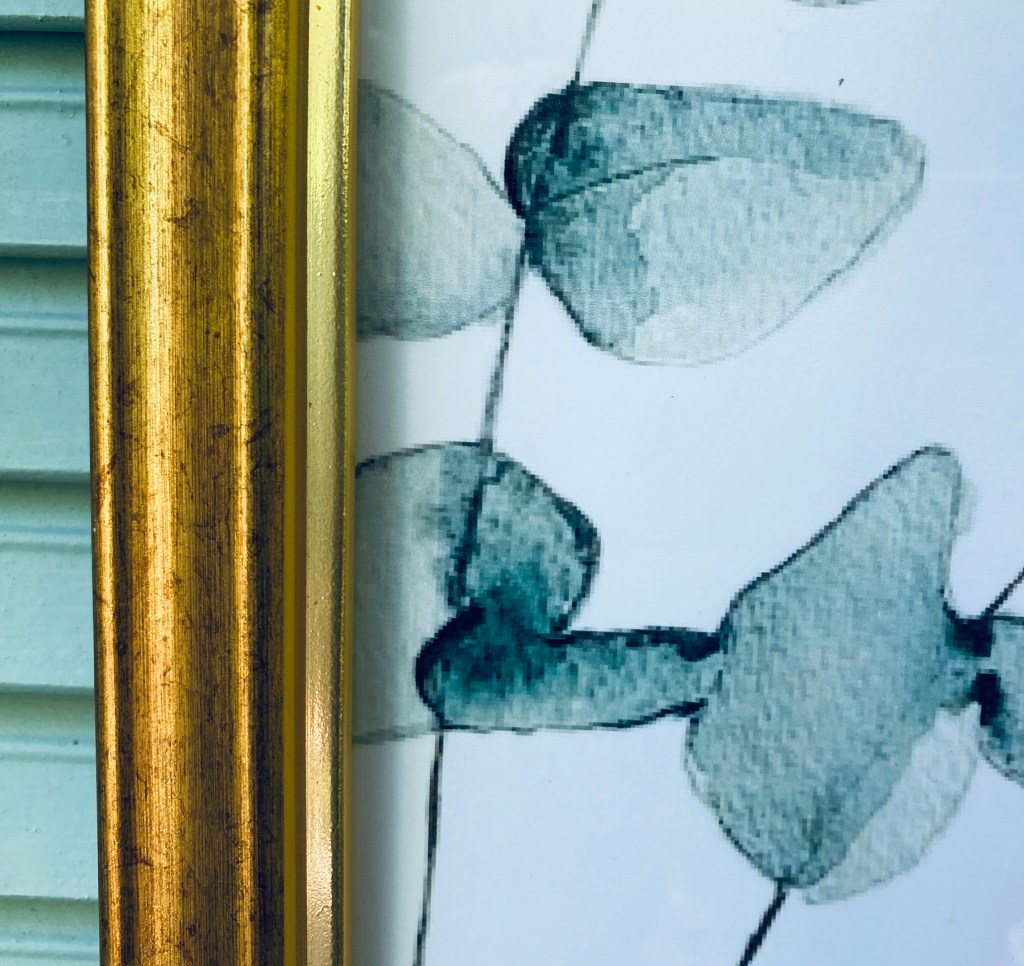
She gives away a free 8×10 print so I printed it out this morning and put it in a gold frame. Simple to do.
I printed her 8×10 botanical watercolor image and put it in a gold metallic frame. A simple project that will look great with any style, but especially with the modern boho (bohemian) Look I’m going for.
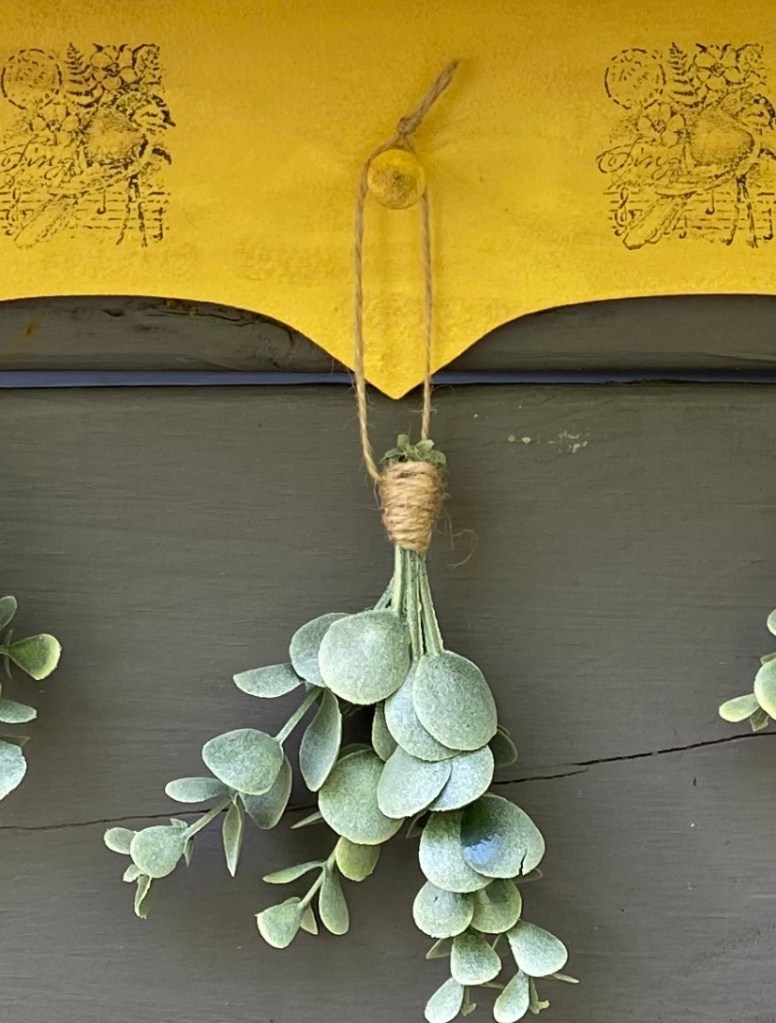
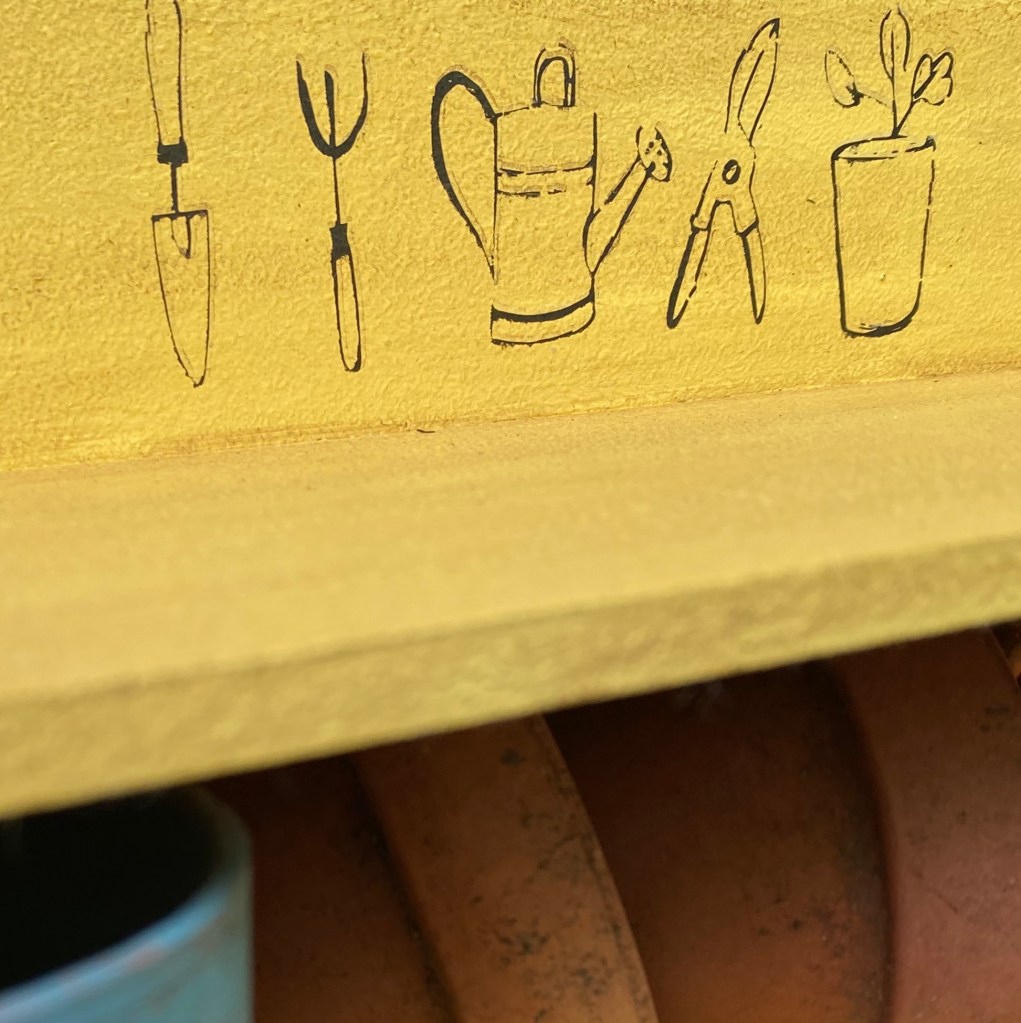
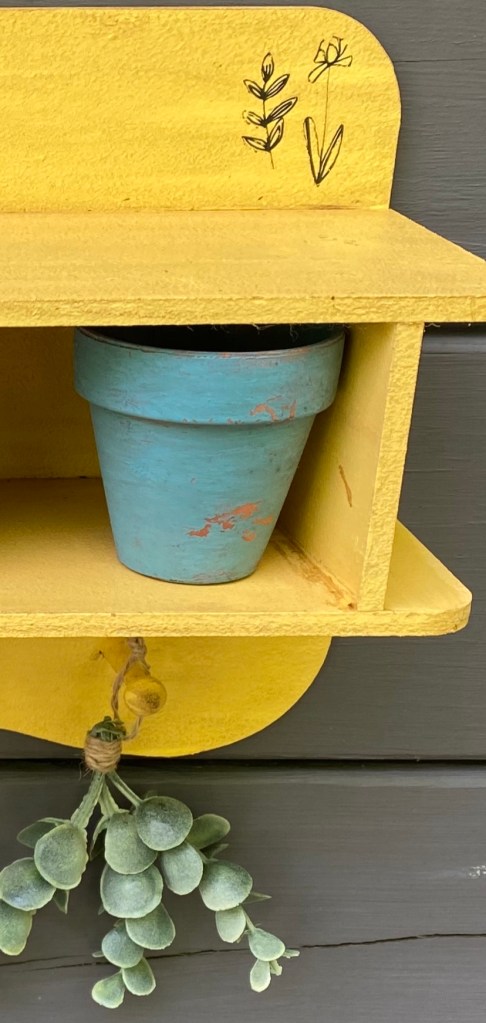
A garden shelf display that shouts “SUMMER”! This could easily fit in boho decor or any style.
Dimensions: 15” wide x 15” high (with greenery) x 5” deep
Transfers and bird stamps were applied to this cute yellow shelf. Stain was applied for a distressed vintage look. Small, well worn clay pots fit inside the 12” wide 3” high and 4” deep inside shelf. Faux greenery hangs from the pegs.
I had started painting these 3 storage cases with metal trim some time ago but was not sure how I wanted to finish them. When I realized they would make the perfect Boho display, I knew what to do.
I painted them lightly with black and distressed them. The top I opened and filled with greenery, a beautiful green silk sunflower and a cloche I made earlier from a light fixture. I added some boho looking transfers and put a coral rose inside. I also added a crocheted coaster for color.
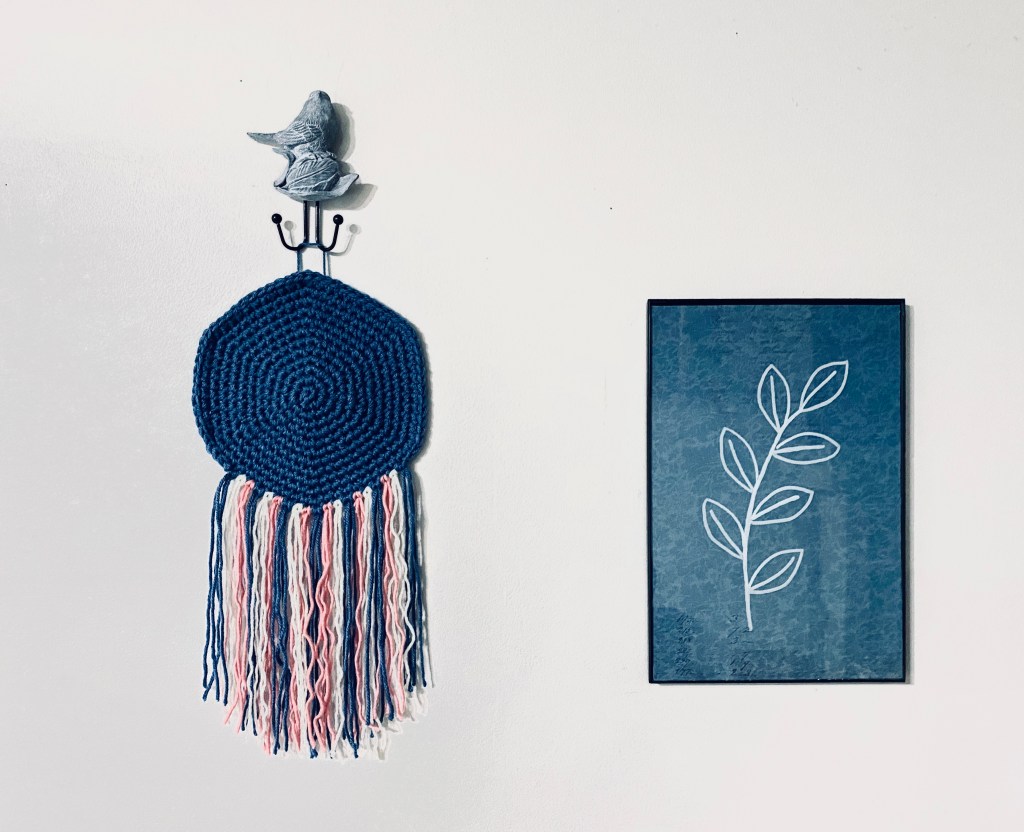
As I was crocheting boho coasters, I thought making a bigger one would look pretty cool as a wall hanging. So, that’s what I did.
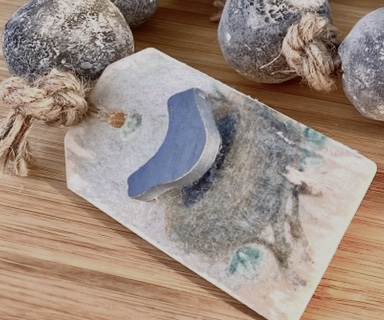
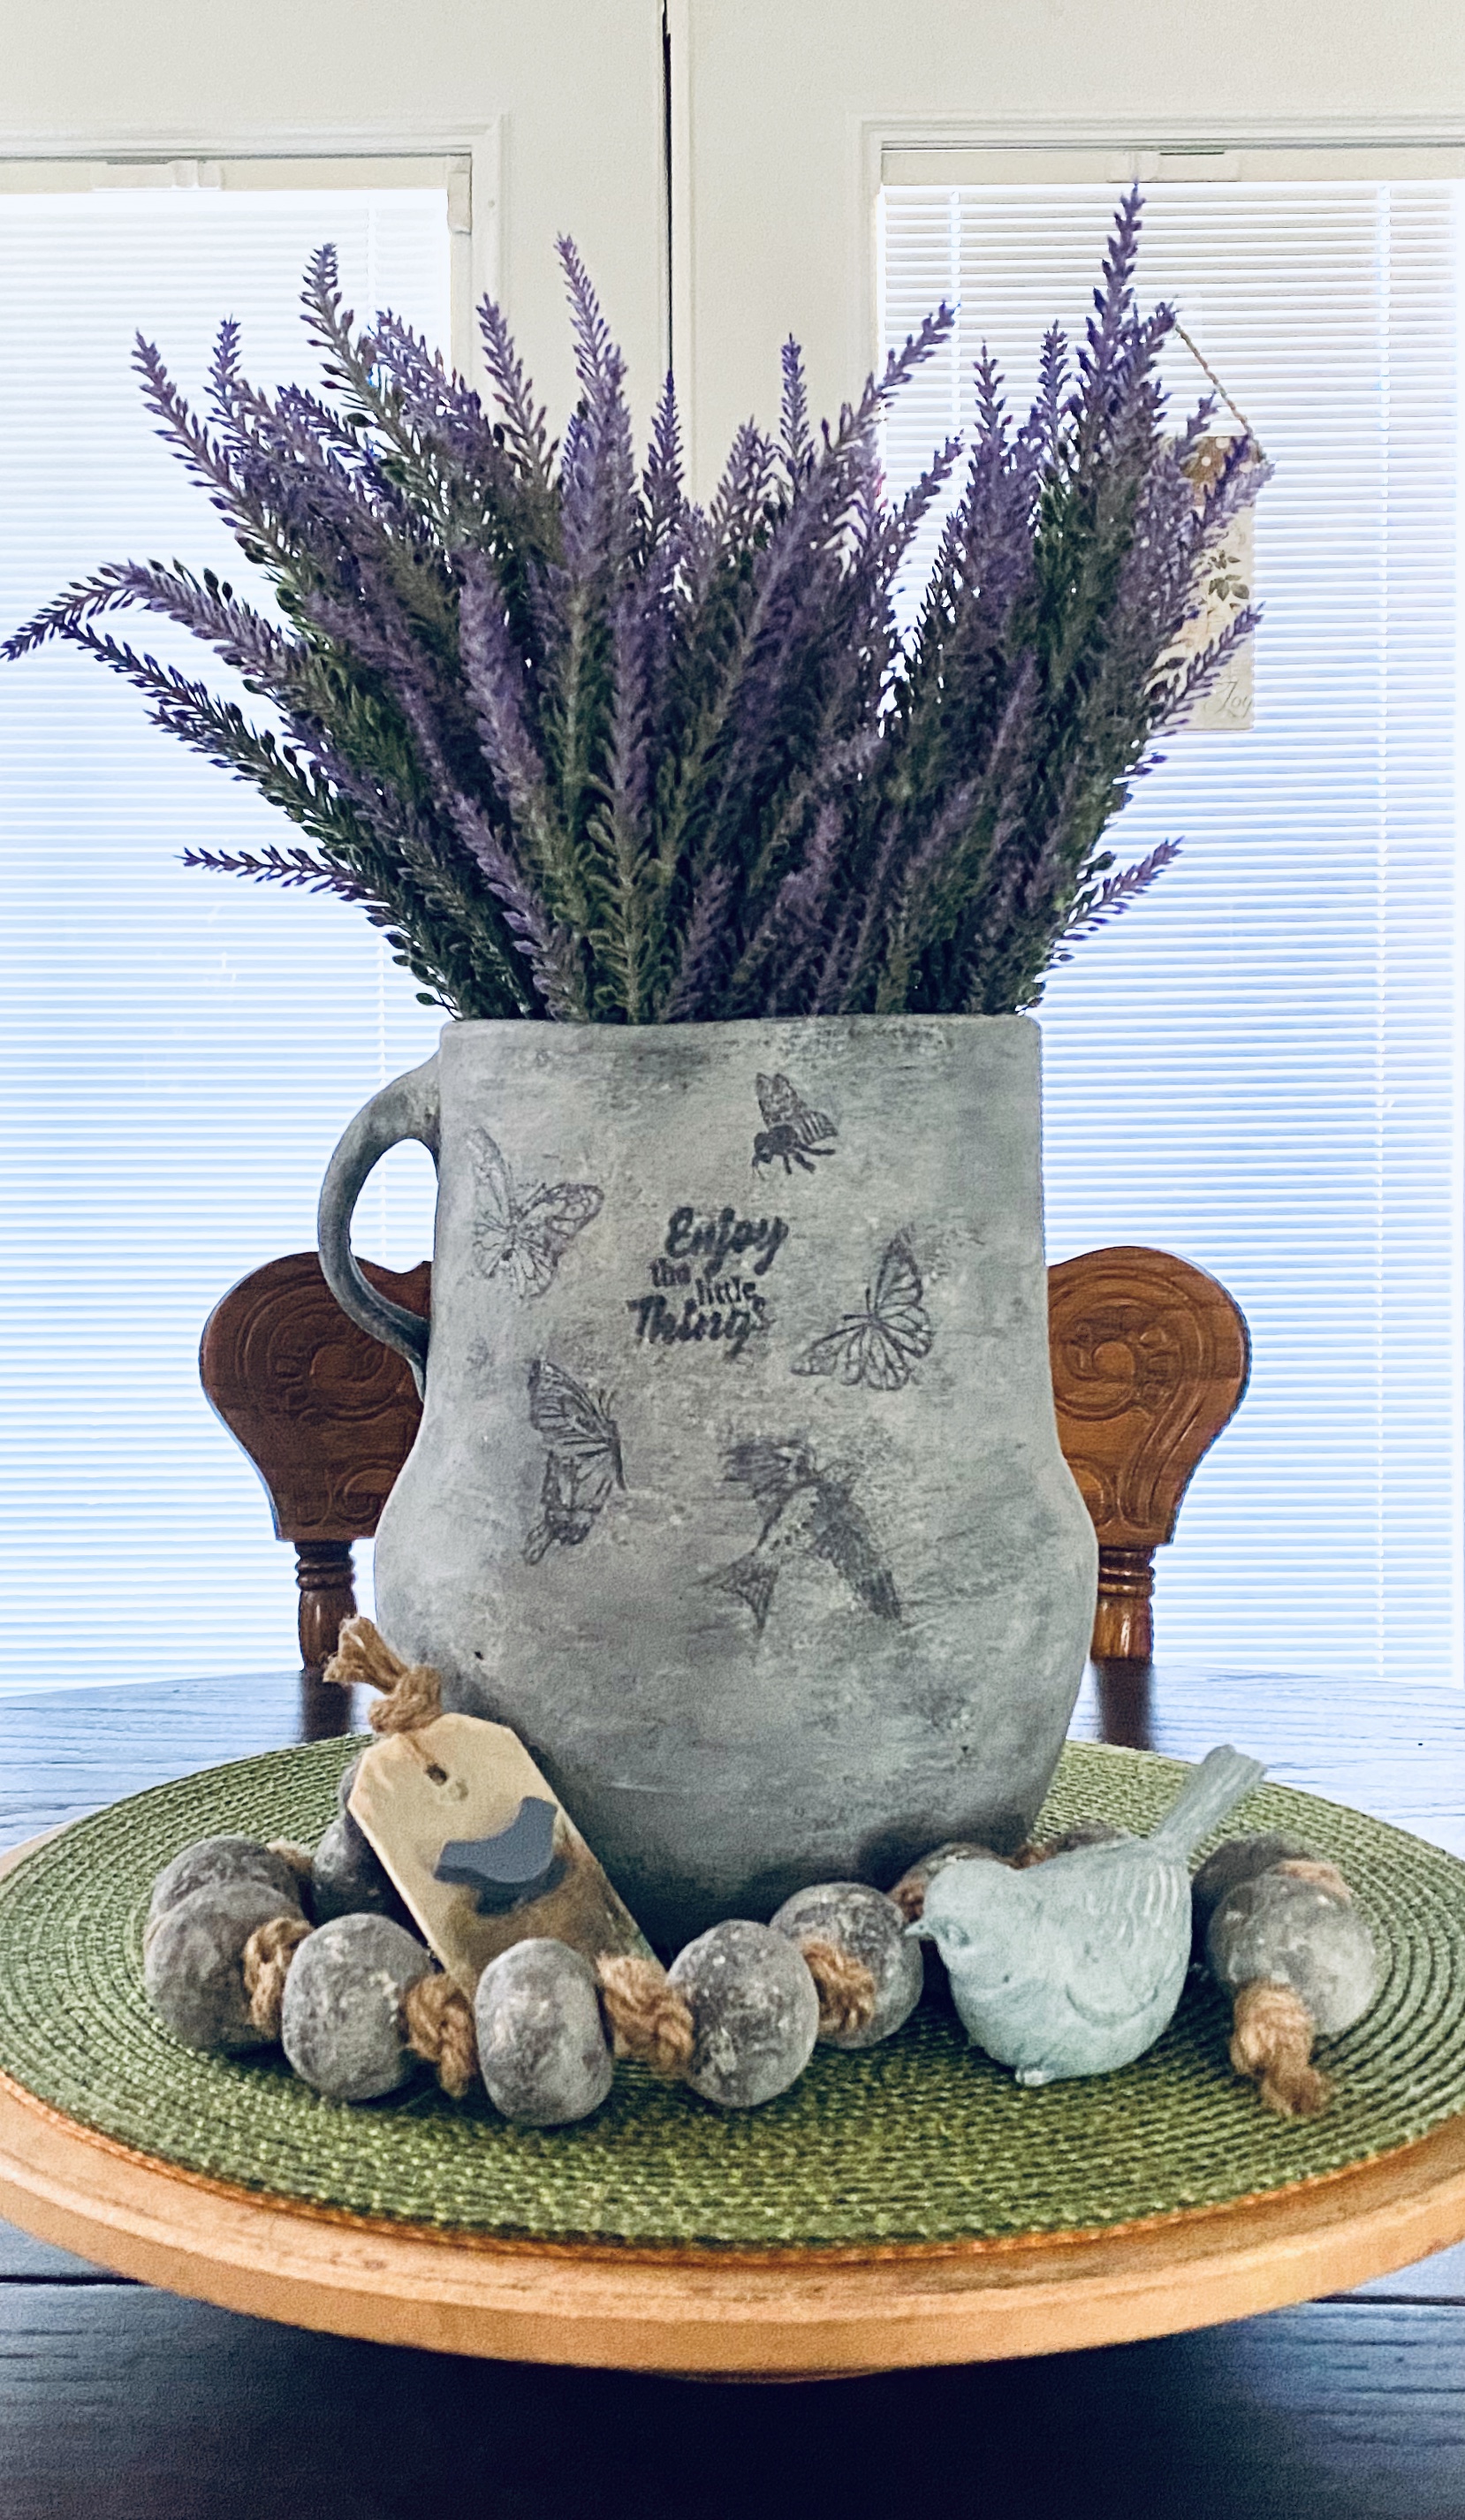
I had also thrifted a little votive holder with a tiny ceramic bird. Keeping in mind the boho look likes metallics, I spray painted the base a metallic gold and added a little clay pot with faux lavender.
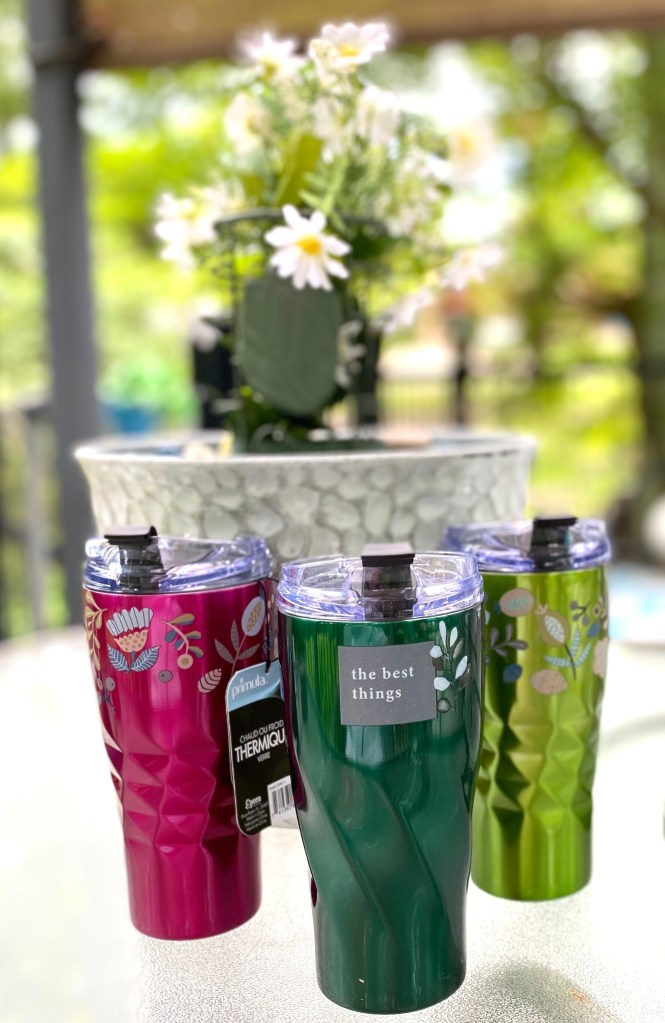
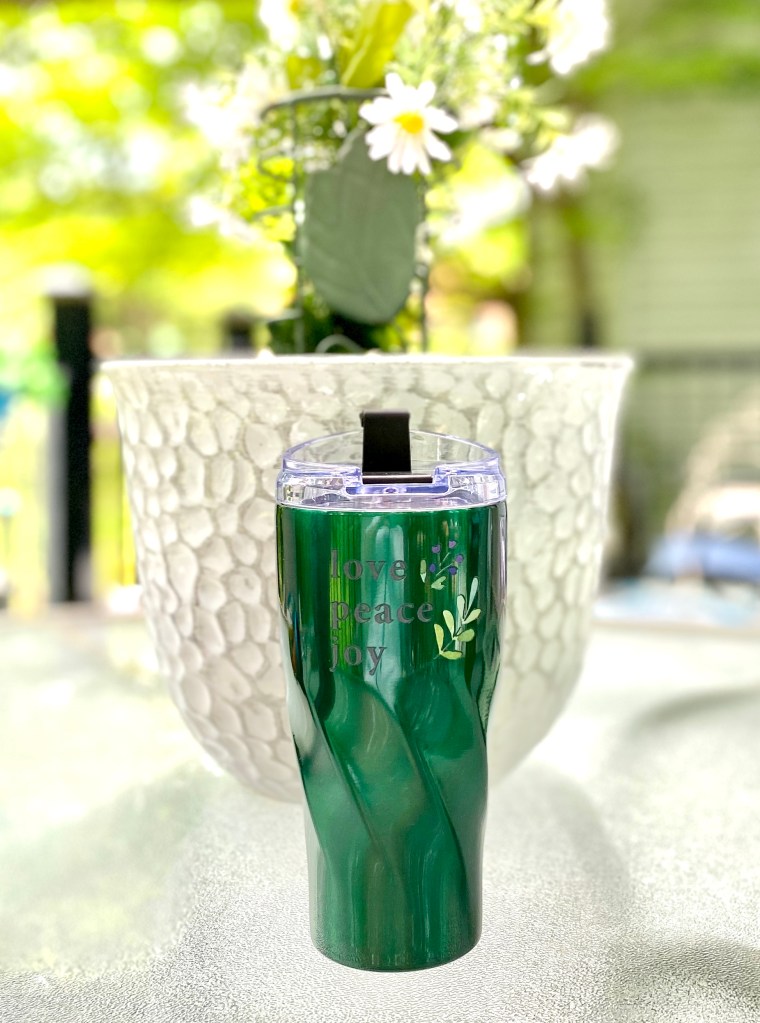
Yep, I’m obsessed with boho. I have 3 new Primula hot/cold tumblers. I had to boho them up a little with some transfers from Dollar Tree (sealed for protection). After all they are metallic and colorful!
That’s all for now. I’m sure I will have more coming up.
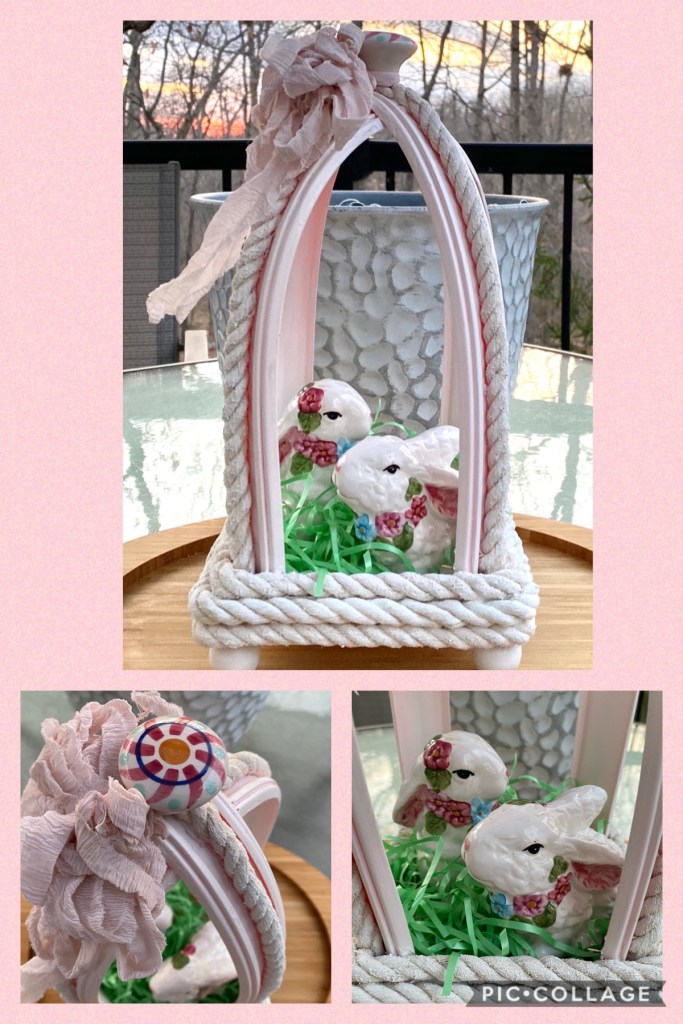
We had an old and chippy shutter. Danny cut it in half and sanded most of the old paint off the front so that what was left was a combination of natural and some old white paint. The back was painted brown and chipping off so he removed the big chippy pieces but let it as is.
Then, we had this iron vase holder. I learned it was from Southern Living At Home. He centered it and screwed it to the shutter.
We also had a tall wide mouth canning jar and a Bedspring. I put faux flowers and foliage into the Bedspring with the wider part on top and then placed it in the jar with the narrow part at the bottom. The flowers fit snugly into the spring and will not blow or fall out and the spring fit perfectly into the jar.
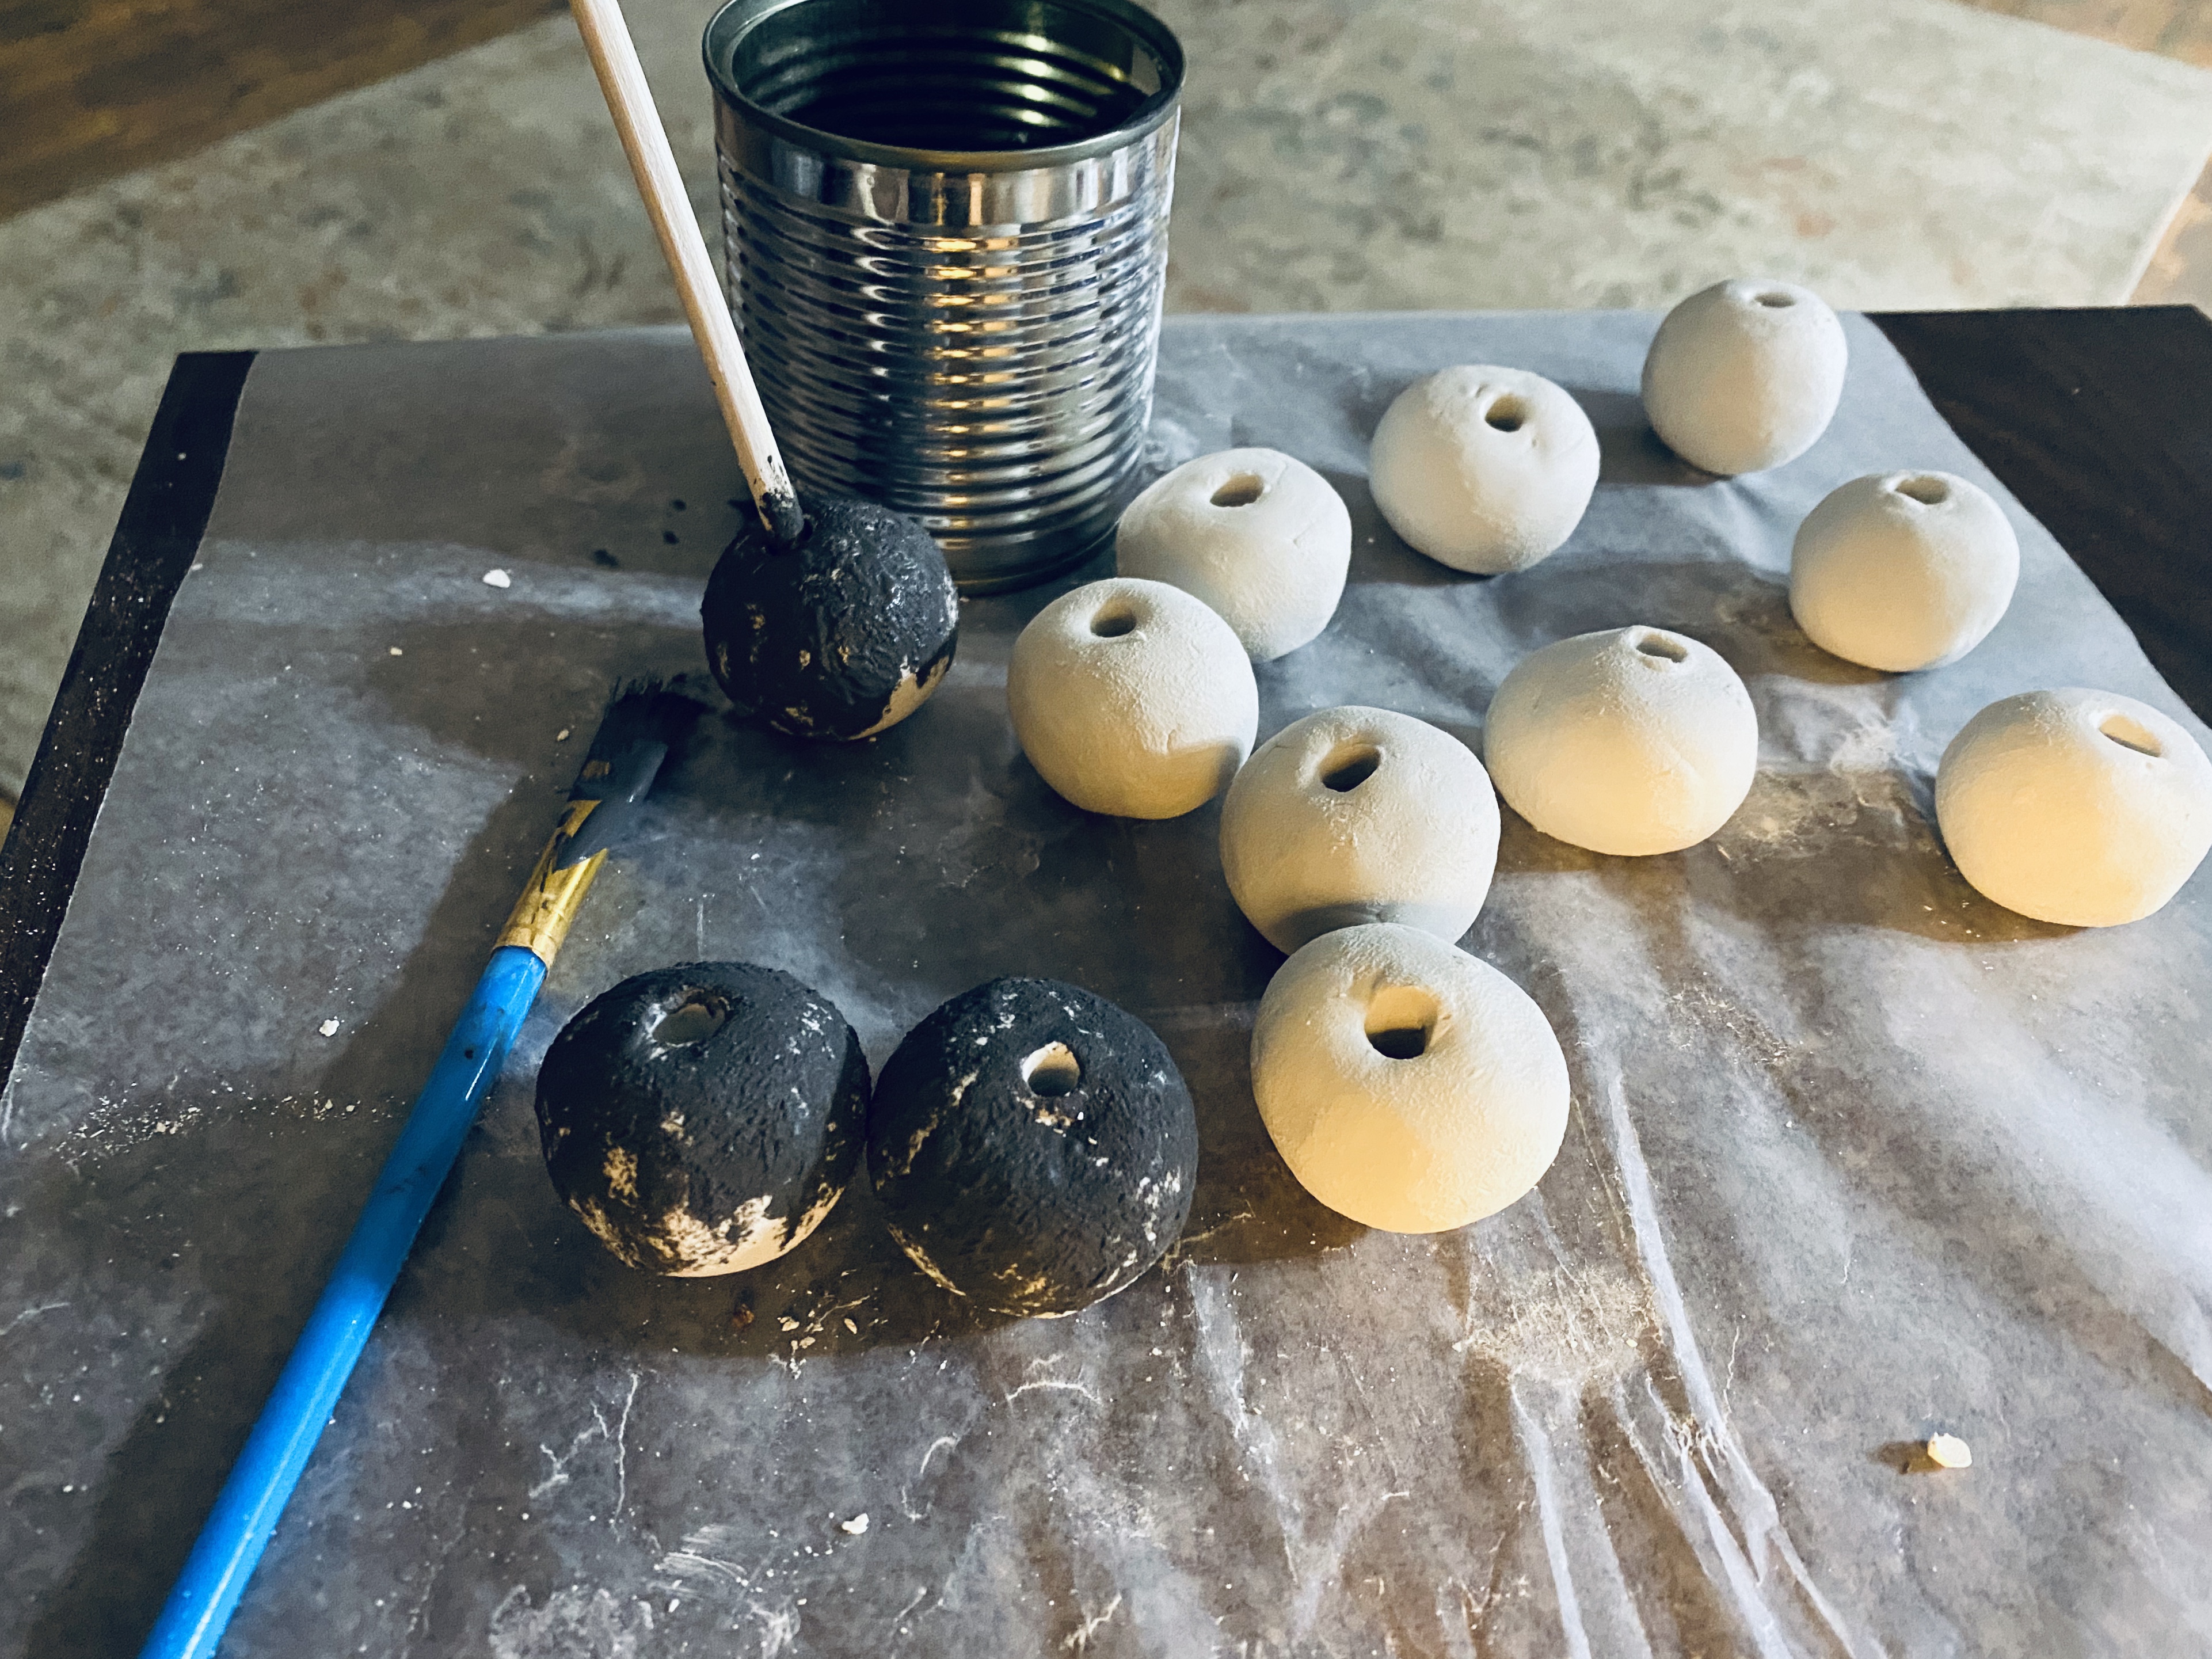
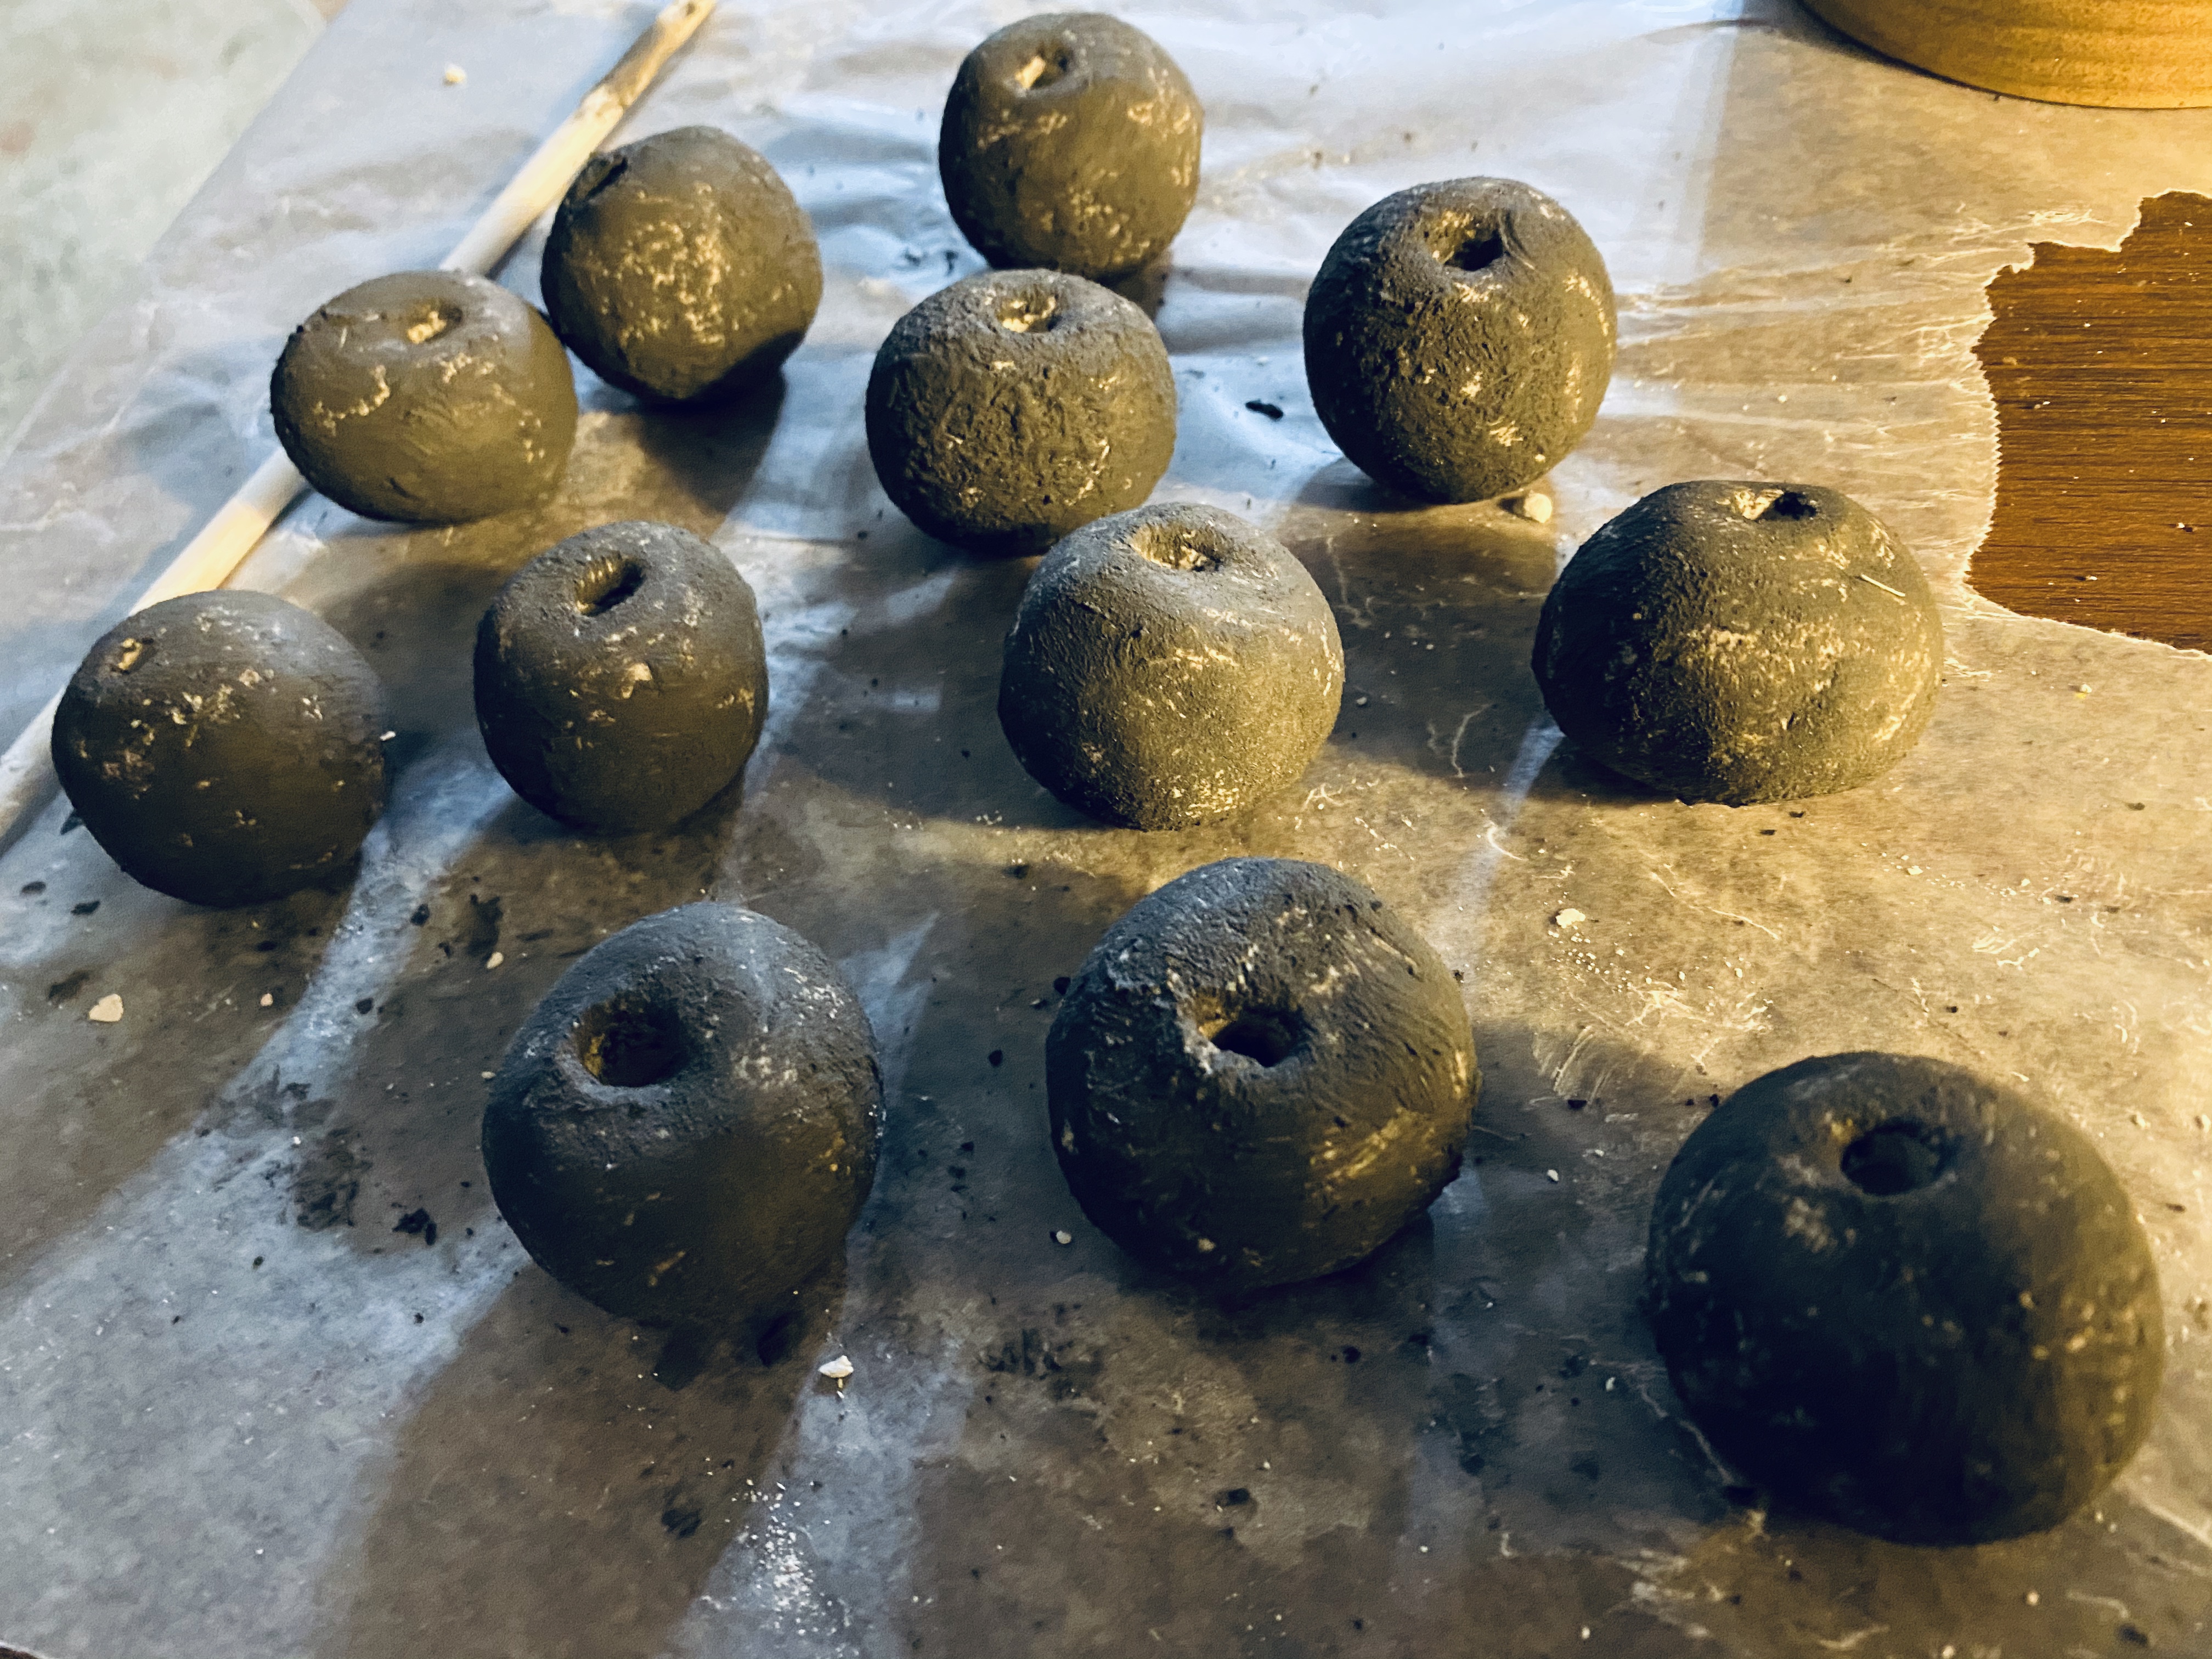
Ever since I saw a YouTube video on how to DIY the Pottery Barn knotted cement rope using air dry clay, I knew I had to do it.
Pottery Barn’s Knotted Cement Rope was priced at $89!
So…. last night while watching TV, I rolled some clay into approximately 1” balls and poked a hole through using a chopstick. This left a big enough hole for some thicker jute rope to go through.
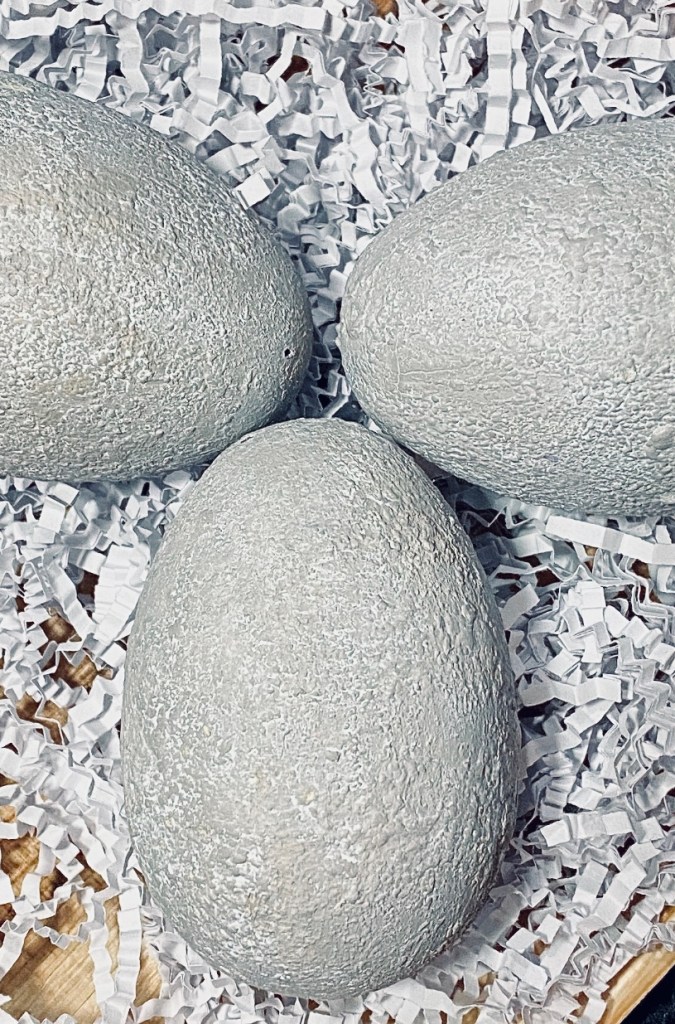
This morning it was dry enough to work with. Theoretically, it would take about 3 days to dry completely, but I have painted air dry clay before it was completely dry in the past so I knew I could. I will still let it air dry now for 3 days before doing anything more with it. I used my aged stone technique to make the clay beads look like they were made of cement. I painted the beads with our Missouri Limestone Painting Company chalk paint in “Gray Goose”. I added some baking soda and kind of pounced it on to give the clay the texture of stone. Once dry, I applied liming wax then wiped excess off.
I knotted mine similar to Pottery Barn but added a tag on one end I had made. I thought it fit perfectly with my cement rope.
Relaxing with my crafting. I can truthfully say I am going to be obsessed with white wax for a few days. I started yesterday and have already completed 4 projects.
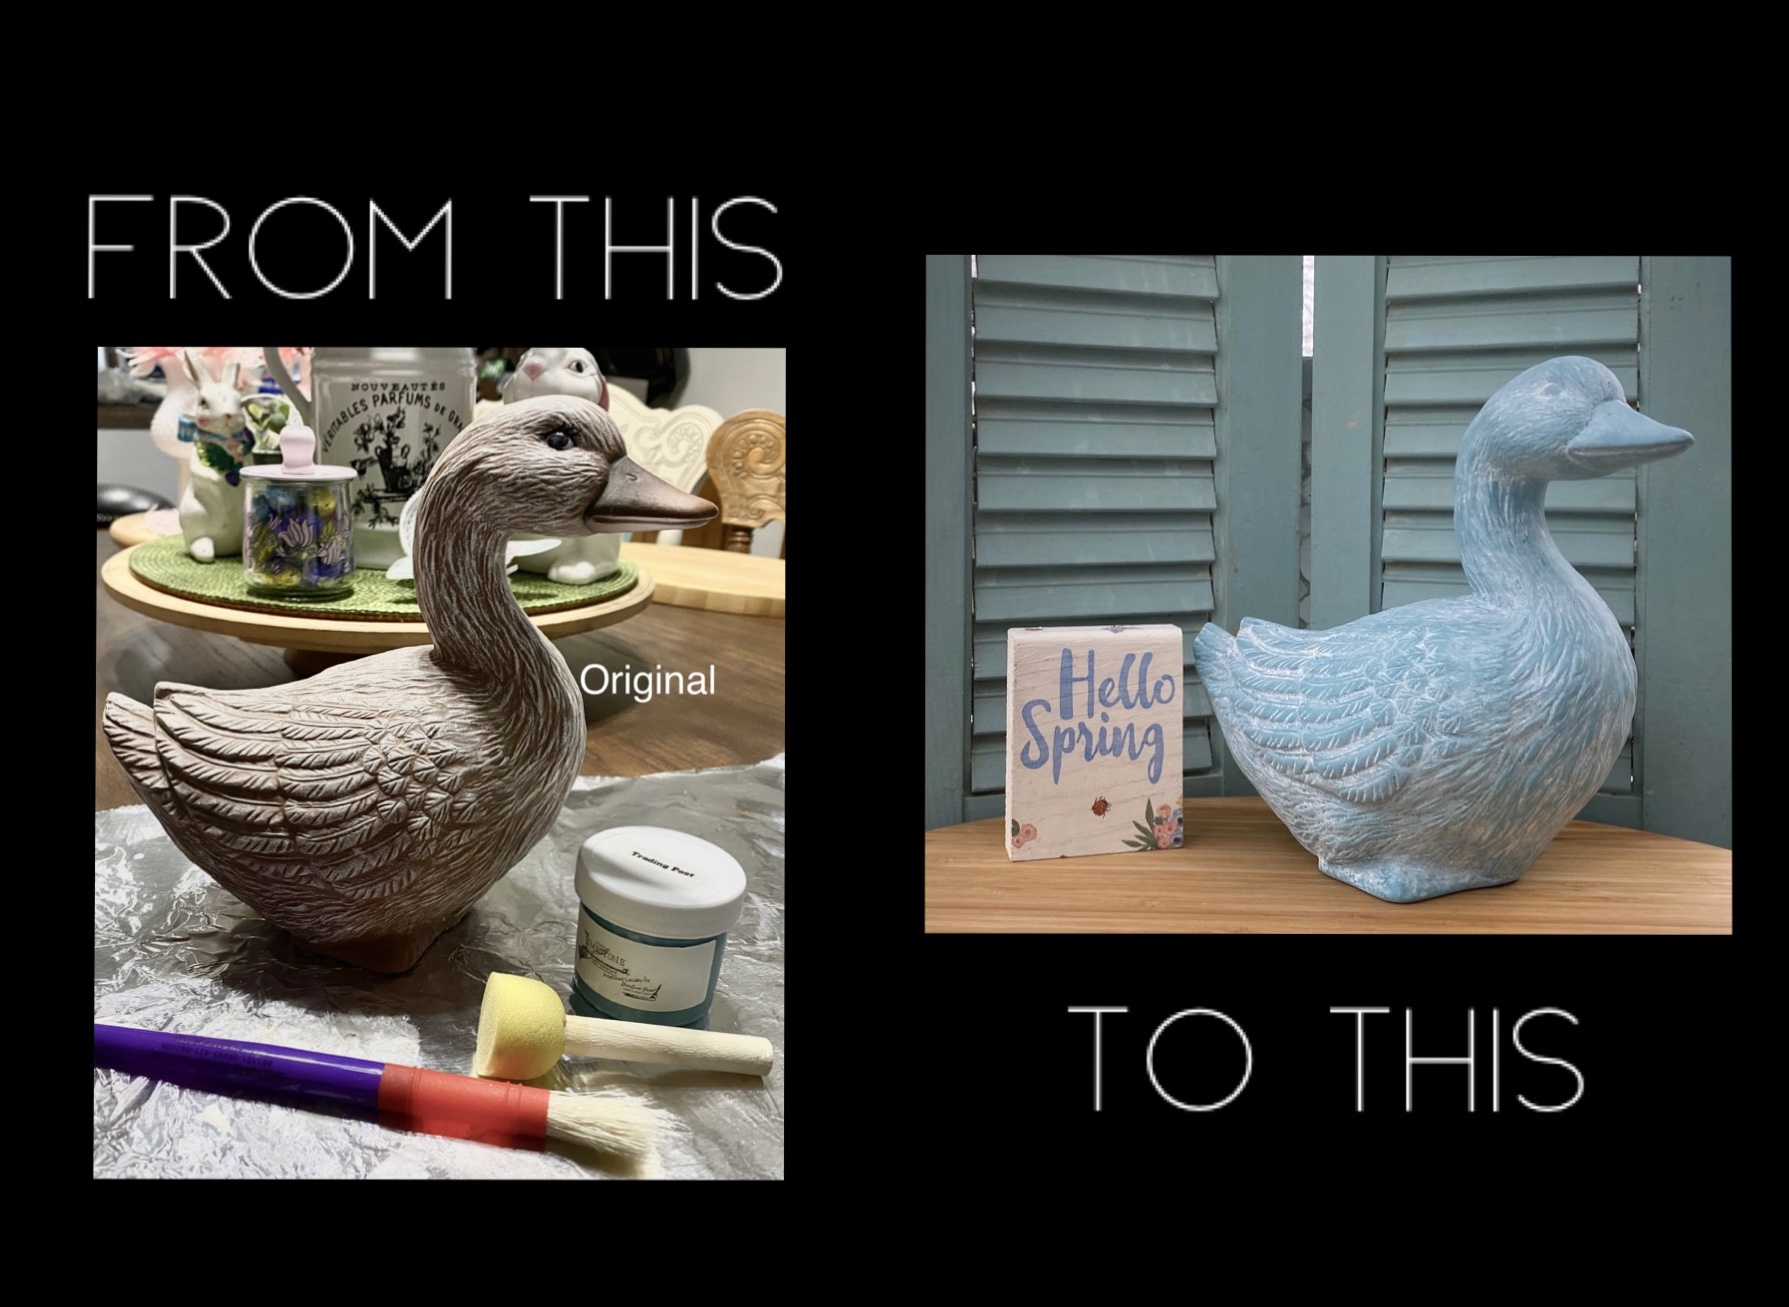
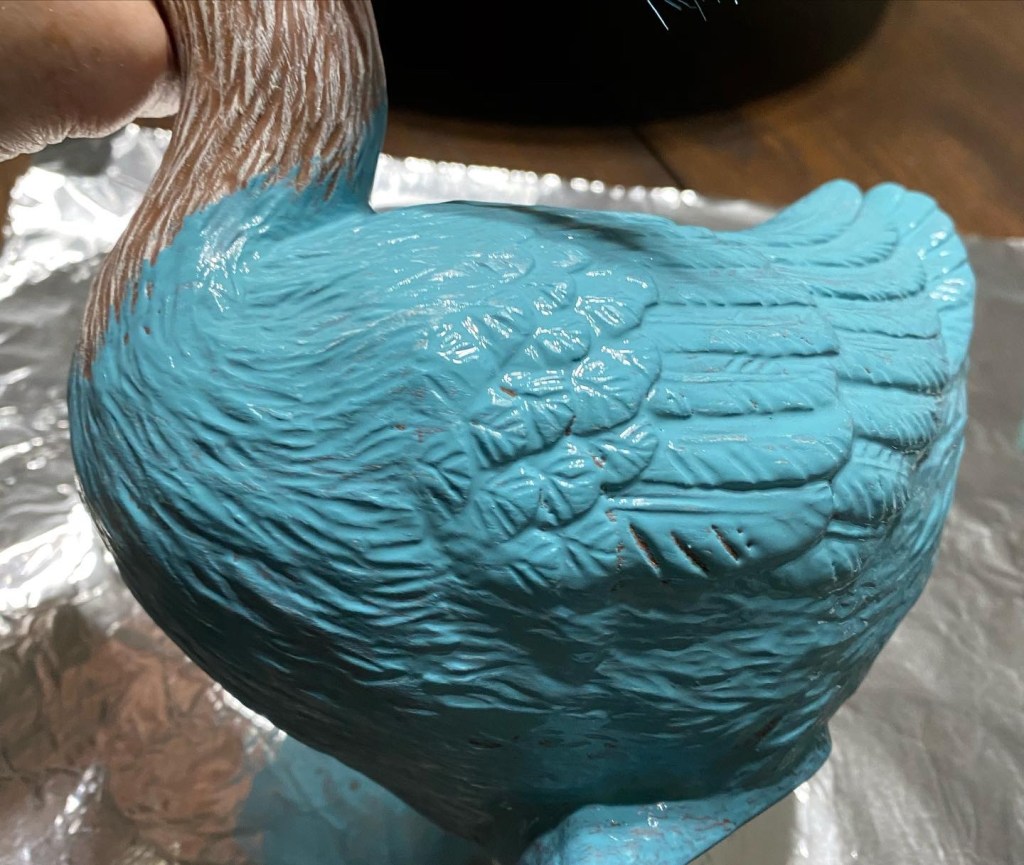
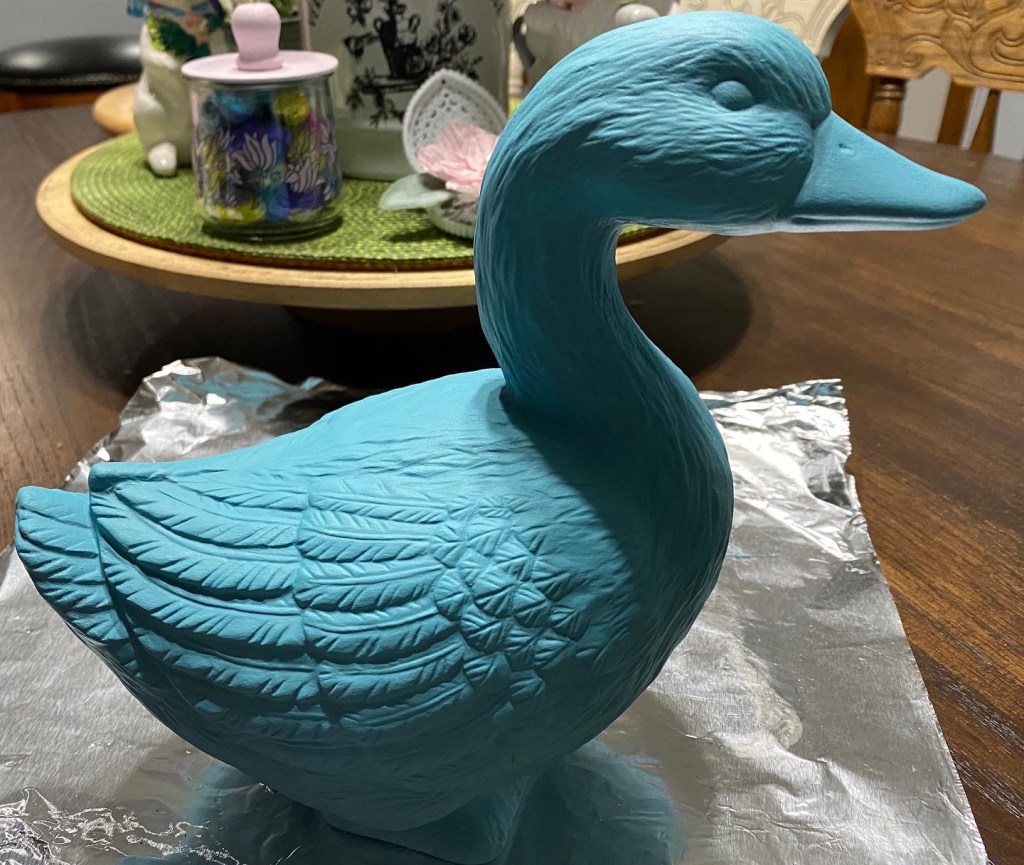
Project #1 – I updated a duck that already had a lot of detail.
I’ve been seeing many crafters updating vintage ceramic ducks. I bought this one several years ago. I think it was from the ‘80s.
I decided to finally update this one. What a difference a little paint and Briwax Liming Wax makes!
Julie’s Designs and Signs has a great tutorial on painting ducks. I think the ones she painted may even be from the same company, just a different design. I basically followed her tutorial. My paint was different and my wax, but the idea is pretty much the same.
I gave the duck two light coats of our Missouri Limestone Paint Company chalk paint in the color “Trading Post”. I didn’t want heavy coat of paints because I didn’t want to cover up the texture.
First coat2nd coat
Once both coats were thoroughly dry, I covered the duck in white wax. I use the Briwax brand white wax because I’ve had it forever. It works well.
Once the wax was on and pushed into the details well with a Dollar Store stencil brush I have, I took a soft paper towel and wiped it off.
I love the end result!!
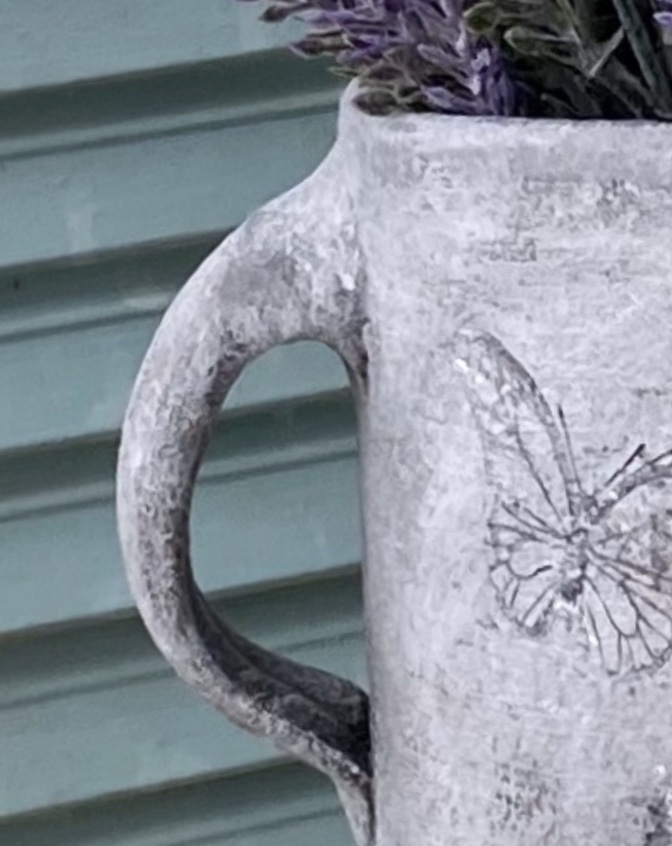
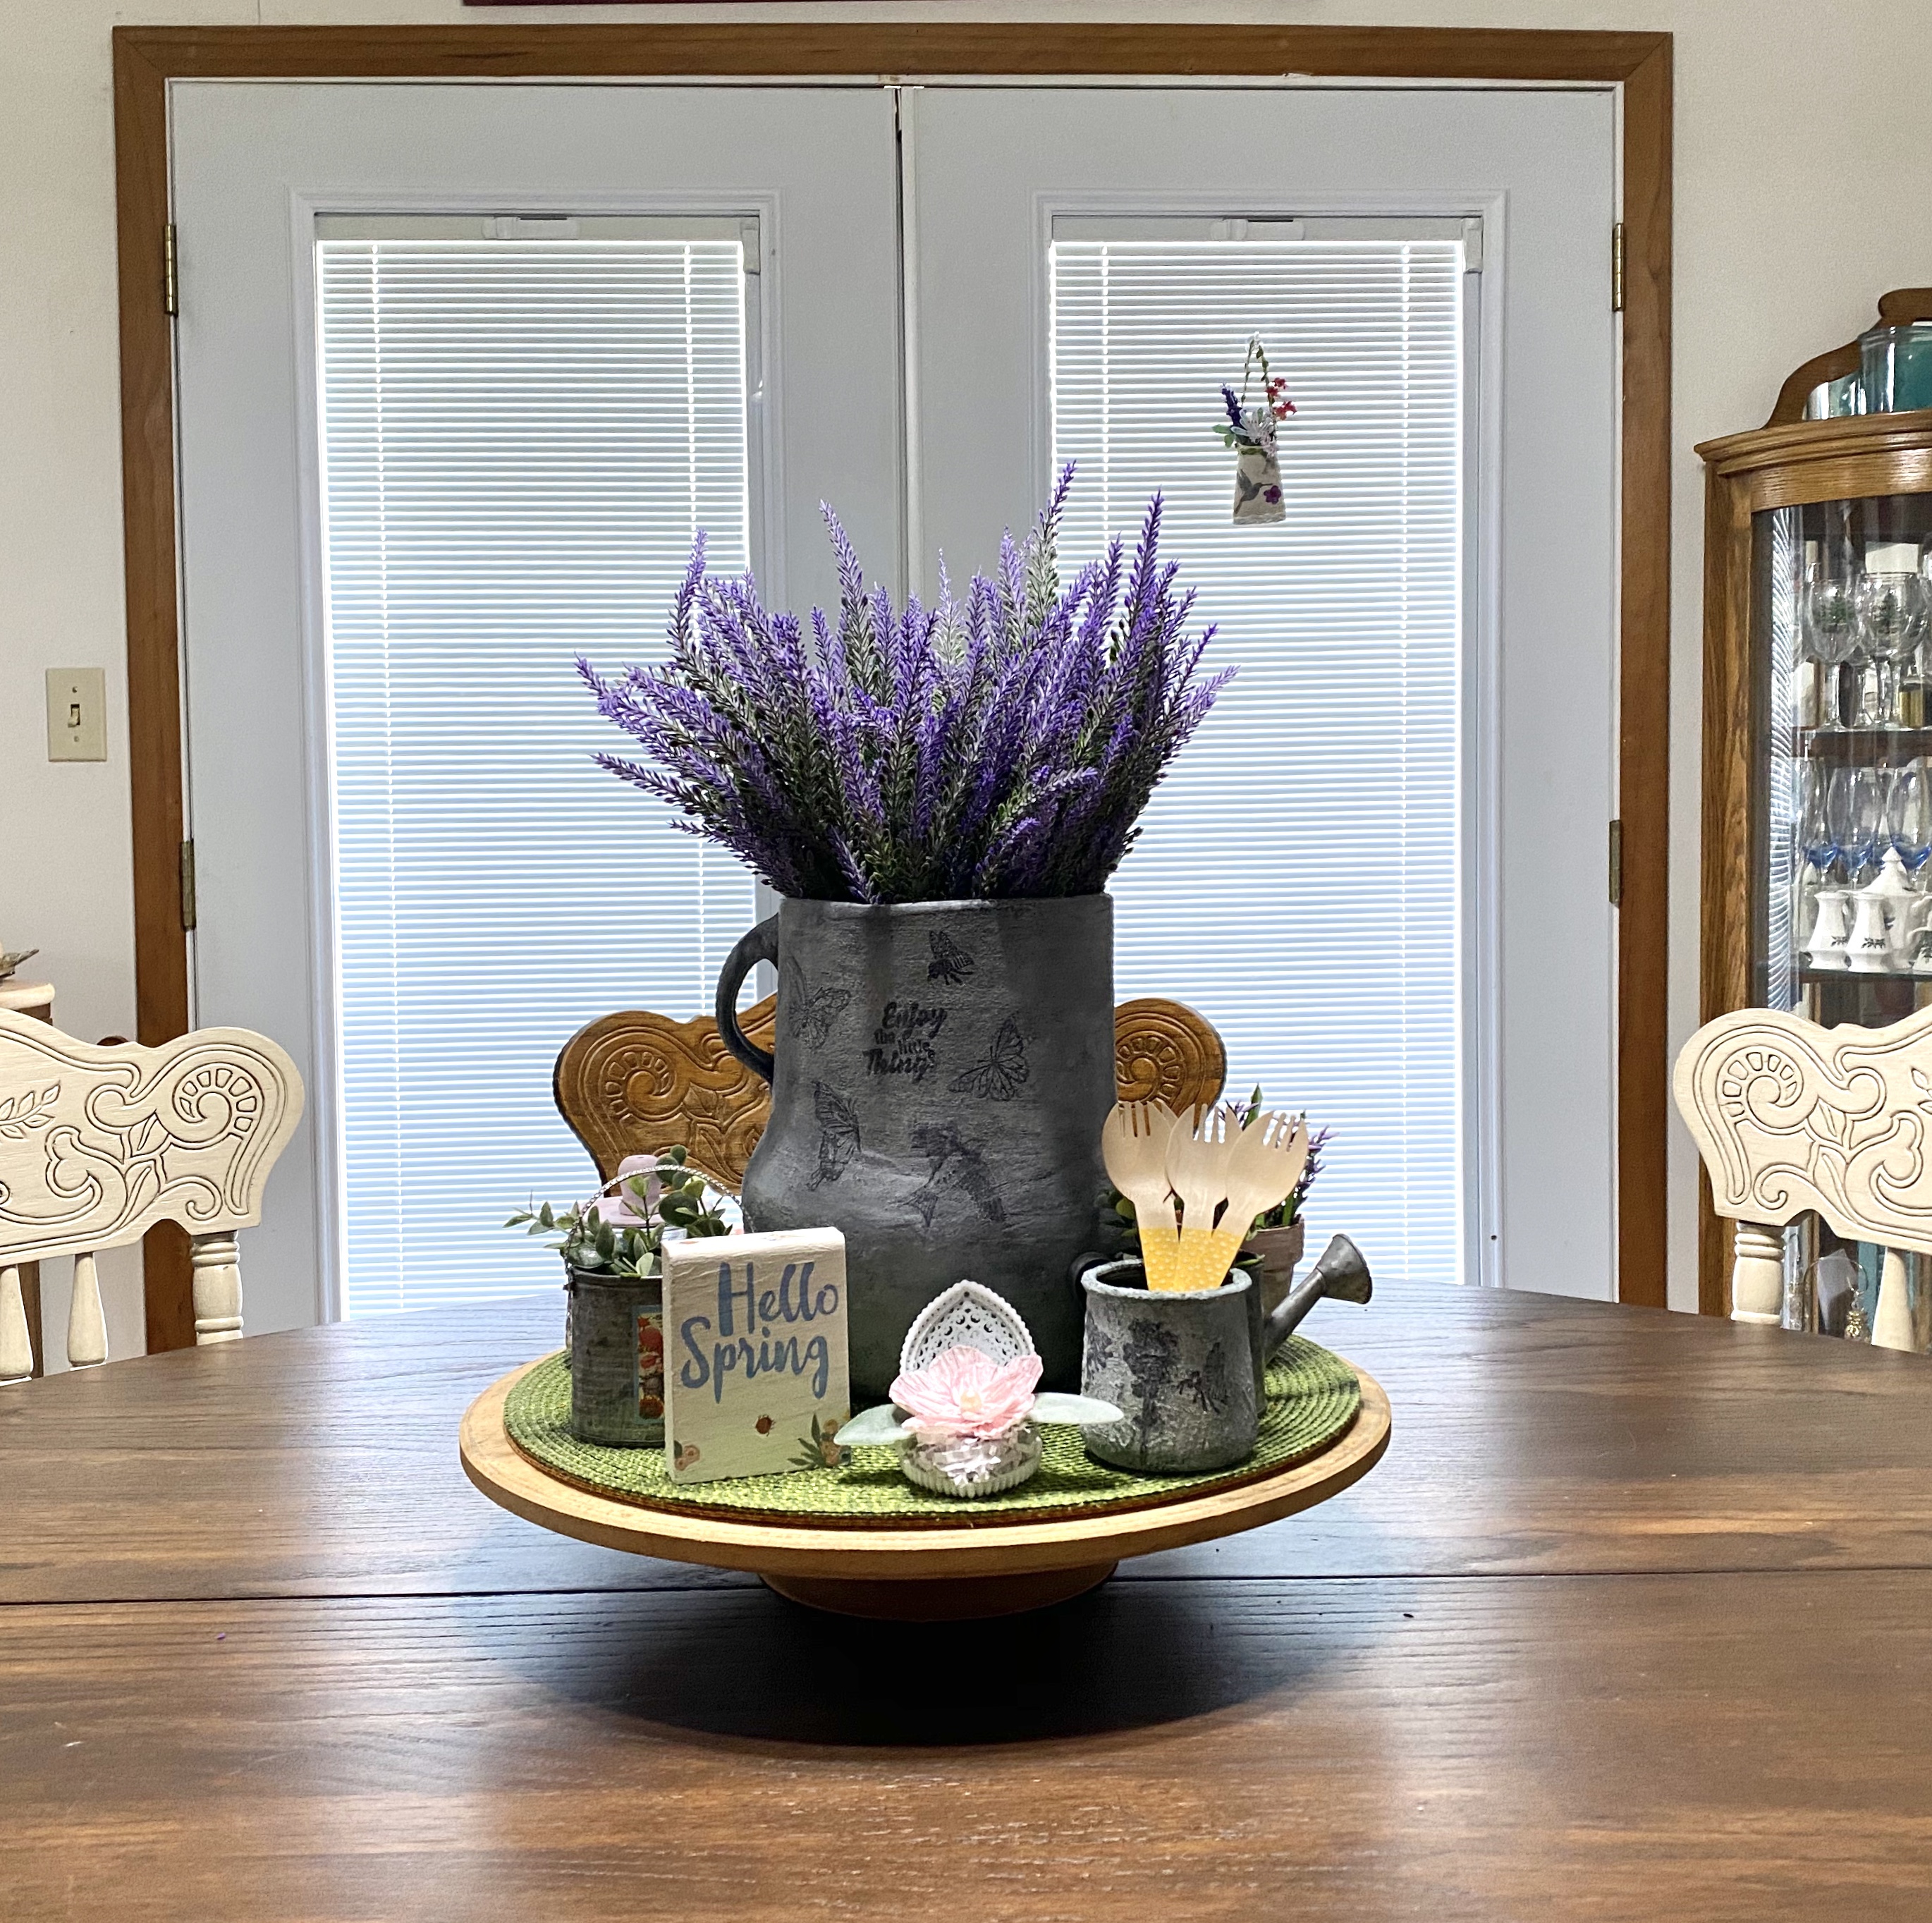
Project #2: Mexican pottery transformed to an aged stone look
After using the Briwax Liming Wax on the duck earlier, I started looking around. I have had this piece of Mexican pottery for a long time. The texture of it was perfect. If it wasn’t, from all the videos I’ve been watching, I could easily add some texture to my paint with baking soda to get the rough look.
By painting this piece with our “Missouri Limestone Paint Company “Gray Goose”, letting it dry, then applying the lining wax by dabbing it into the paint, making sure it got onto the crevices with a stencil brush , then wiping it away carefully, I was able to get this aged stone effect.
I thought I’d try some stamps on it after and they worked great.
I added a few more stamps and this one is going on my dining room table. I’m sure I will be making some more aged stone look vases, even if they once started out as glass jars. 🙂
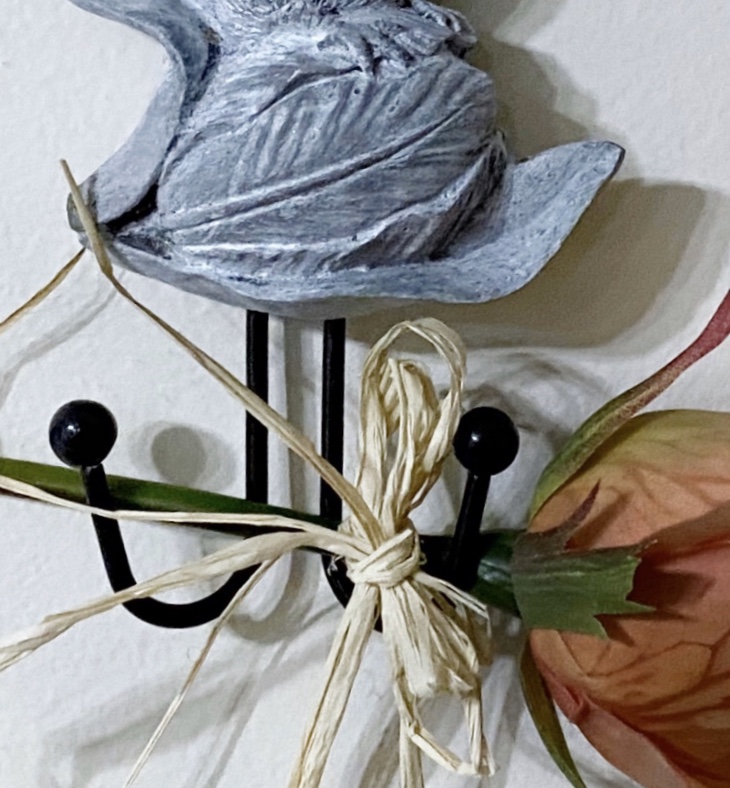
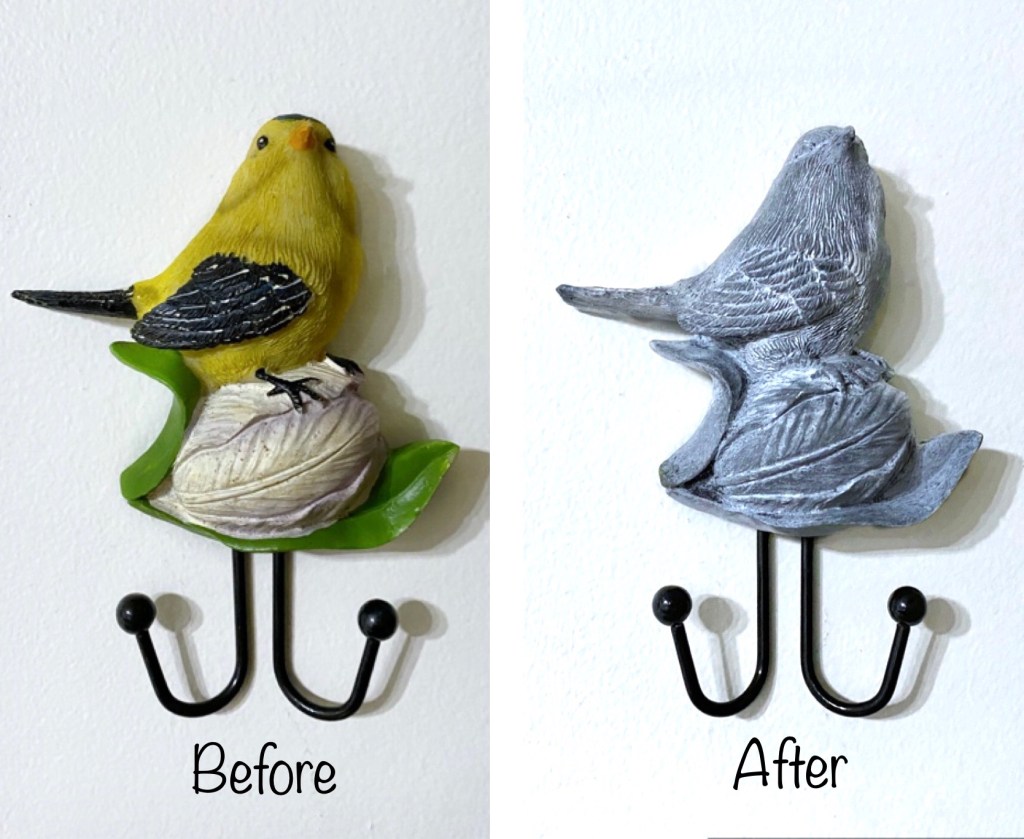
Project #3: An Aged Stone Look Bird Hook
I just had to do this aged stone look again. I knew this little 3 1/2” w x 5” high bird hook would work as it is a textured resin material.
I love how the dark gray paint and Briwax Liming Wax gave it a bluish tint.
Project #4: A Oui Jar transformed into a little aged stone crock
I’m still playing with Briwax Liming Wax. This time I took a plain Oui yogurt jar and made a utensil holder for some cute dessert “sporks”.
I wondered what dark green under the wax would look like. I loved the color it became.
But first I sprayed the Oui jar with a sealer so the paint would adhere well. I added several teaspoons of baking soda to my Missouri Limestone Paint Company “Evening Shade”, a dark green. The baking soda will make the paint nice and thick and grainy.
I painted and dabbed it on thick this time as I wanted a lot of texture that would be like concrete when finished. I let the first coat dry, then applied the second coat.
Once the jar was thoroughly dry, I added the white wax, then wiped it off. Love, love, love this look.
I added a couple of stamps and filled it with the colorful dessert sporks. 🙂
This turned out so well, it will be available, complete with the “sporks”!
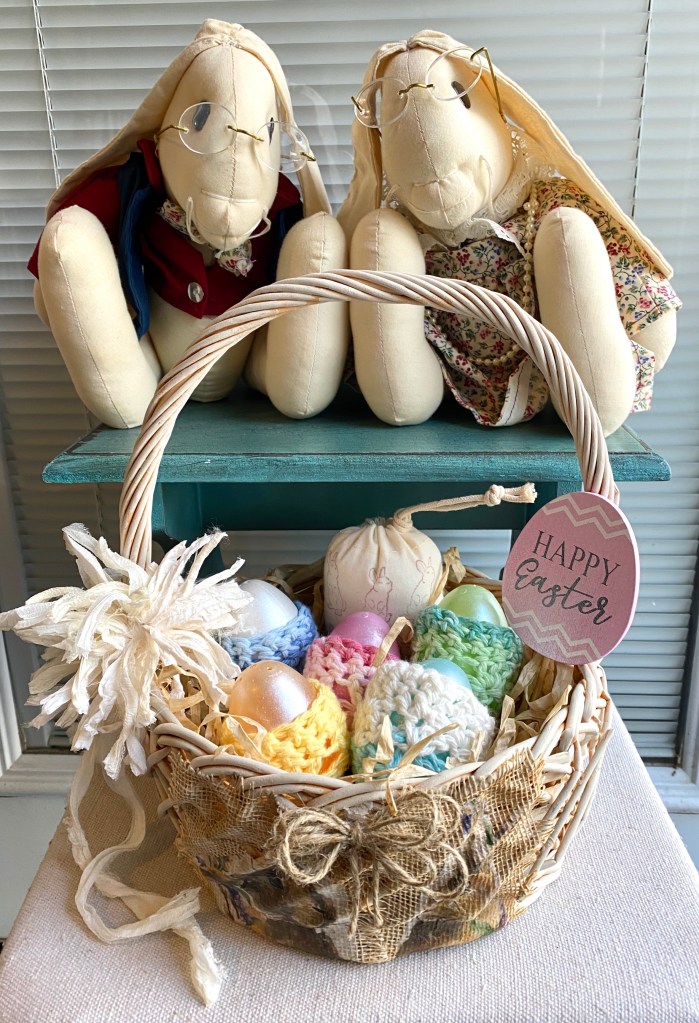
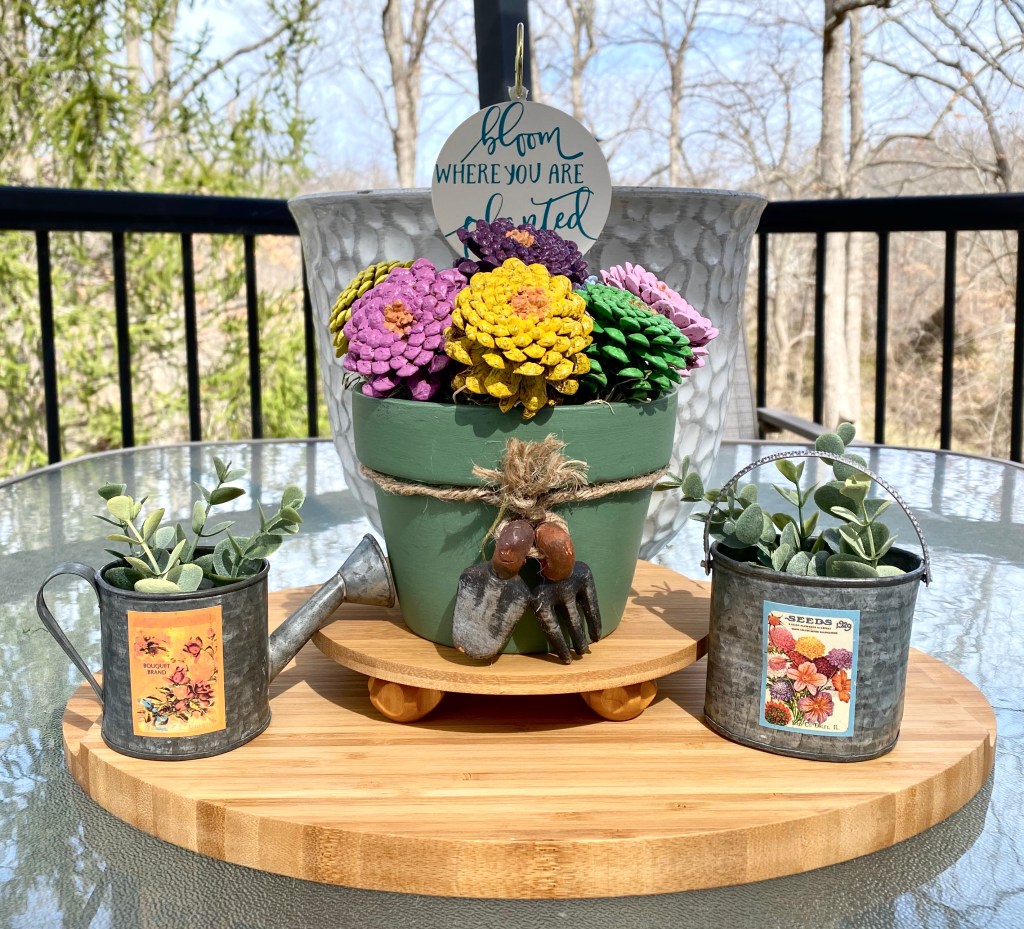
For the basket, I painted it an off white. I cut out and glued bunnies from a napkin to some burlap type fabric with spray adhesive, then Mod Podged them to the basket and added a little jute twine bow I made. I crocheted egg covers last year and I stamped and stuffed the little fabric bag last year, too. I sprayed plastic eggs this morning with Mod Podge pearlized spray to make a soft shimmer. I also sprayed the Happy Easter sign and attached a skewer stick to the back. I made the bow with some awesome fabric yarn I have.I had a Dollar Tree tinsel rabbit face and purple yarn. I wanted to see if this yarn would work. I started at the bottom and made sure the loops lay so that I covered them all the way to the neck when I wrapped the yarn around. Then I did each ear individually and started from the top, making sure the loops lay so that I covered them and ended up meeting the other loops at the neck. I think it gives her a French Poodle haircut. 😁 I reused the eyes and mouth and used felt for the nose and inner ear pieces. I had purple ribbon the exact color. I wired it on and added a jewel in the center. She turned out pretty cute, I think.I’ve had several friends over the last couple of years shared with me examples of crafters that have painted pinecones to look like zinnias. I got out that bag this morning and the pinecones it held were the exact kind I needed, so….. I painted and planted some. I also had the little sign so I cut the “bloom where you are planted” out of vinyl and added to the sign. I also had these cute little tin containers so I planted some faux greenery in them.You can bring this sweet girl out year after year. She looks good enough to eat, doesn’t she? But she is just a styrofoam bunny. I gave her two coats of a dark chocolate brown – Missouri Limestone Paint Company “French Roast”. I even gave her candy/like eyes using white and pink paint pens. I then sprayed her with a clear gloss spray to seal in that rich color. I added a bow around her neck and stuck in and glued a skewer stick in her bottom, cut to fit the bowl, to help her stay upright in the white shredded filler. I painted, distressed, sealed and waxed a wooden bowl for her and she is now complete.I made the Dollar Tree racetrack cloche. The interesting thing is that the white and orange gave it a pretty pinkish cast, so I left it like that. I sealed it with clear matte spray and a coat of Pearlized Mod Podge. I also added nautical rope all around and painted it, too. I added a pretty ceramic drawer knob to the top and paint dyed some gauzy fabric ribbon to put around it.I used paperback books and covered each book with this cool vinyl wallpaper I thrifted. Made a messy bow, spray painted some keys, added a Dollar Tree wood cut out bird, and tried to used the Dollar Tree Transfer words. They didn’t want to cooperate with the uneven vinyl, so I did the best I could then hand wrote the letters over the glittery gold with a metallic gold marker pen.I think I could easily become addicted to making these flowers. I did a lot of searching and finally started finding some using some of the vintage twisted paper I thrifted. Even the tutorial by Artful Affirmations I found on this flower was from 2016. It was very popular in the 80’s but not so much now. It looks like crepe paper, but is much sturdier. This paper, and the little heart shaped plastic box came from the grab bag I got at a thrift store. The flower adhered inside the box is sitting on a napkin. Tutorial found on Pinterest by Artful Affirmations.I saw a technique to use hairspray when you were wanting small crackles. It works! 🙂 I cleaned a 40 oz. tomato juice can and then sprayed it with a clear sealer to help the chalk paint adhere. I let it dry and then sprayed a heavy coat of hairspray all over. I dried it with a blow dryer then put on a thick coat of chalk paint, painting in one direction and did not go back and forth or overwork it or the crackle won’t happen. I then used a hair dryer and the crackled appear. The hair dryer seems to make better crackle. Do not use screws to attach the handle of you want it to hold water.This was the first can I made. I had this old chippy handle I wanted to use. I attached it with screws (not a good idea if you want it to hold water. It didn’t matter on this one because I cut both ends out of the can! What was I thinking!!! I guess I thought I was going to make a smashed can basket. It holds faux flowers, nicely, though. I ended up putting a fake bottom on it because every time I picked it up, the flowers dropped out. Lol
I’m at my son Trevor’s helping out with the kids while Lydia is at a conference, but I brought along enough supplies to keep me busy while they are at school. 🙂
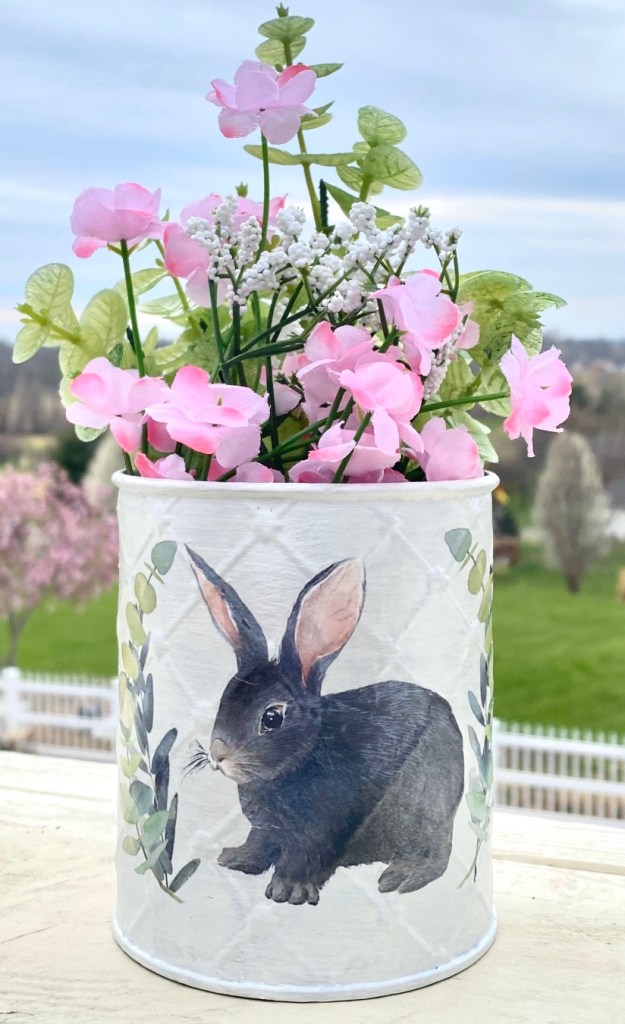
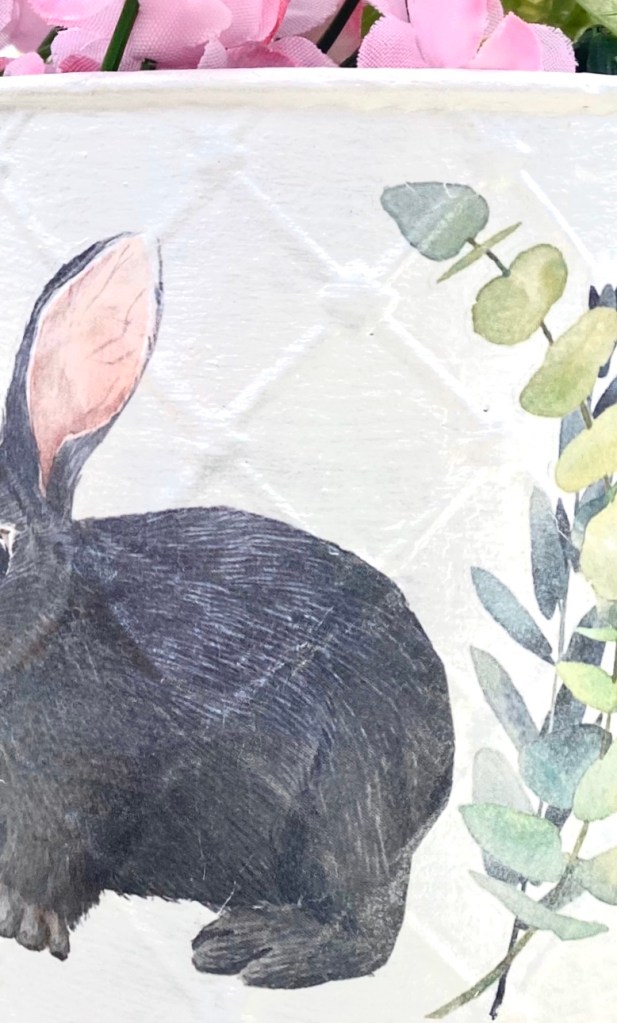
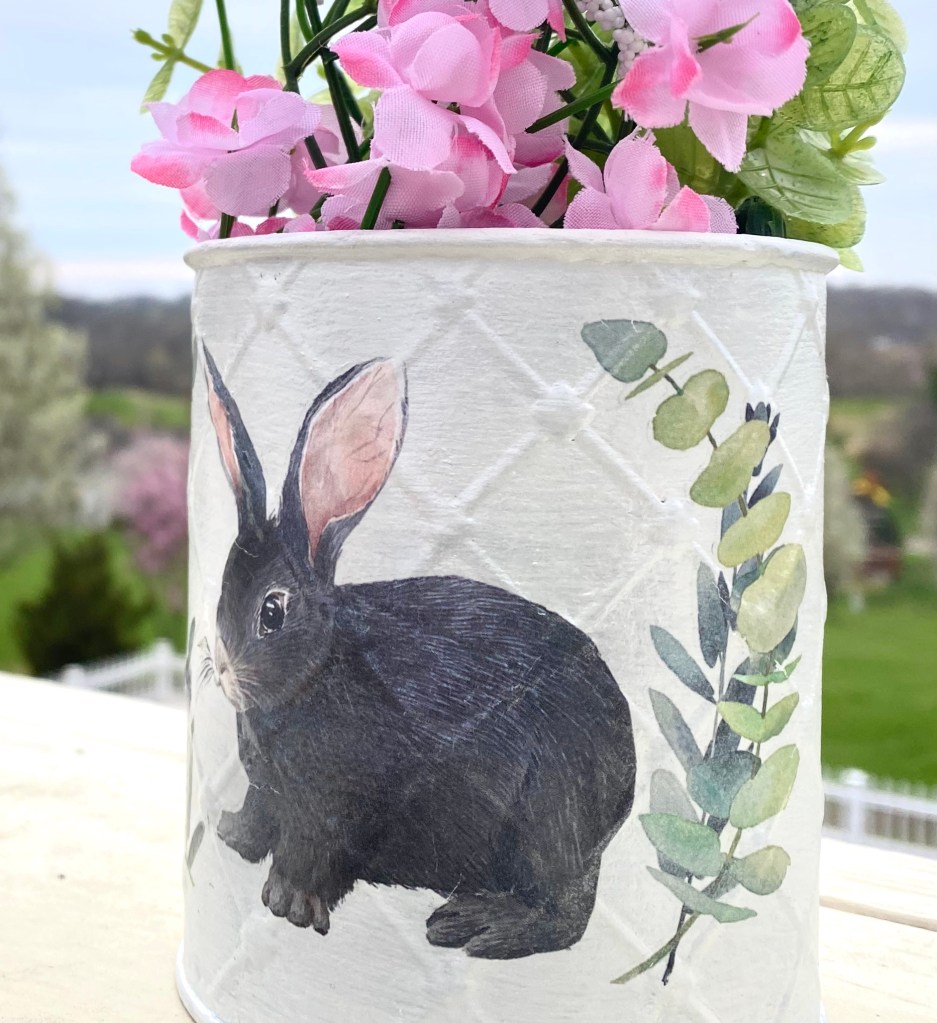
I was going to paint a duck today, but instead decided on painting this little 4 1/2” tall by 3 1/2” round embossed galvanized tin. I brought the perfect bunny framed with greenery Prima transfer I bought at The Gray Wall to go on it.
I’m so glad I did! It’s a little overcast today but the lighting seemed perfect when I used their beautiful view as a background for photos.
I usually spray a clear coat on metal or glass first but this tin was not shiny and the Mod Podge sprays I used uusially create a nice hard finish.
I painted the tin with 3 coats of our Missouri Limestone Paint Company “January” and let it dry. Then I gave it a coat of Mod Podge clear matte spray, followed by Mod Podge Pearlized Glaze spray.
I then applied the transfer. I sealed the transfer with another coat of the clear matte spray and a very light coat of the pearlized spray. I didn’t want to use too much as I really wanted the details in the transfer to show up. I just wanted a little shimmer. It’s hard to see on the photos, but it is there.
I love how it turned out and love how the photos show it off!
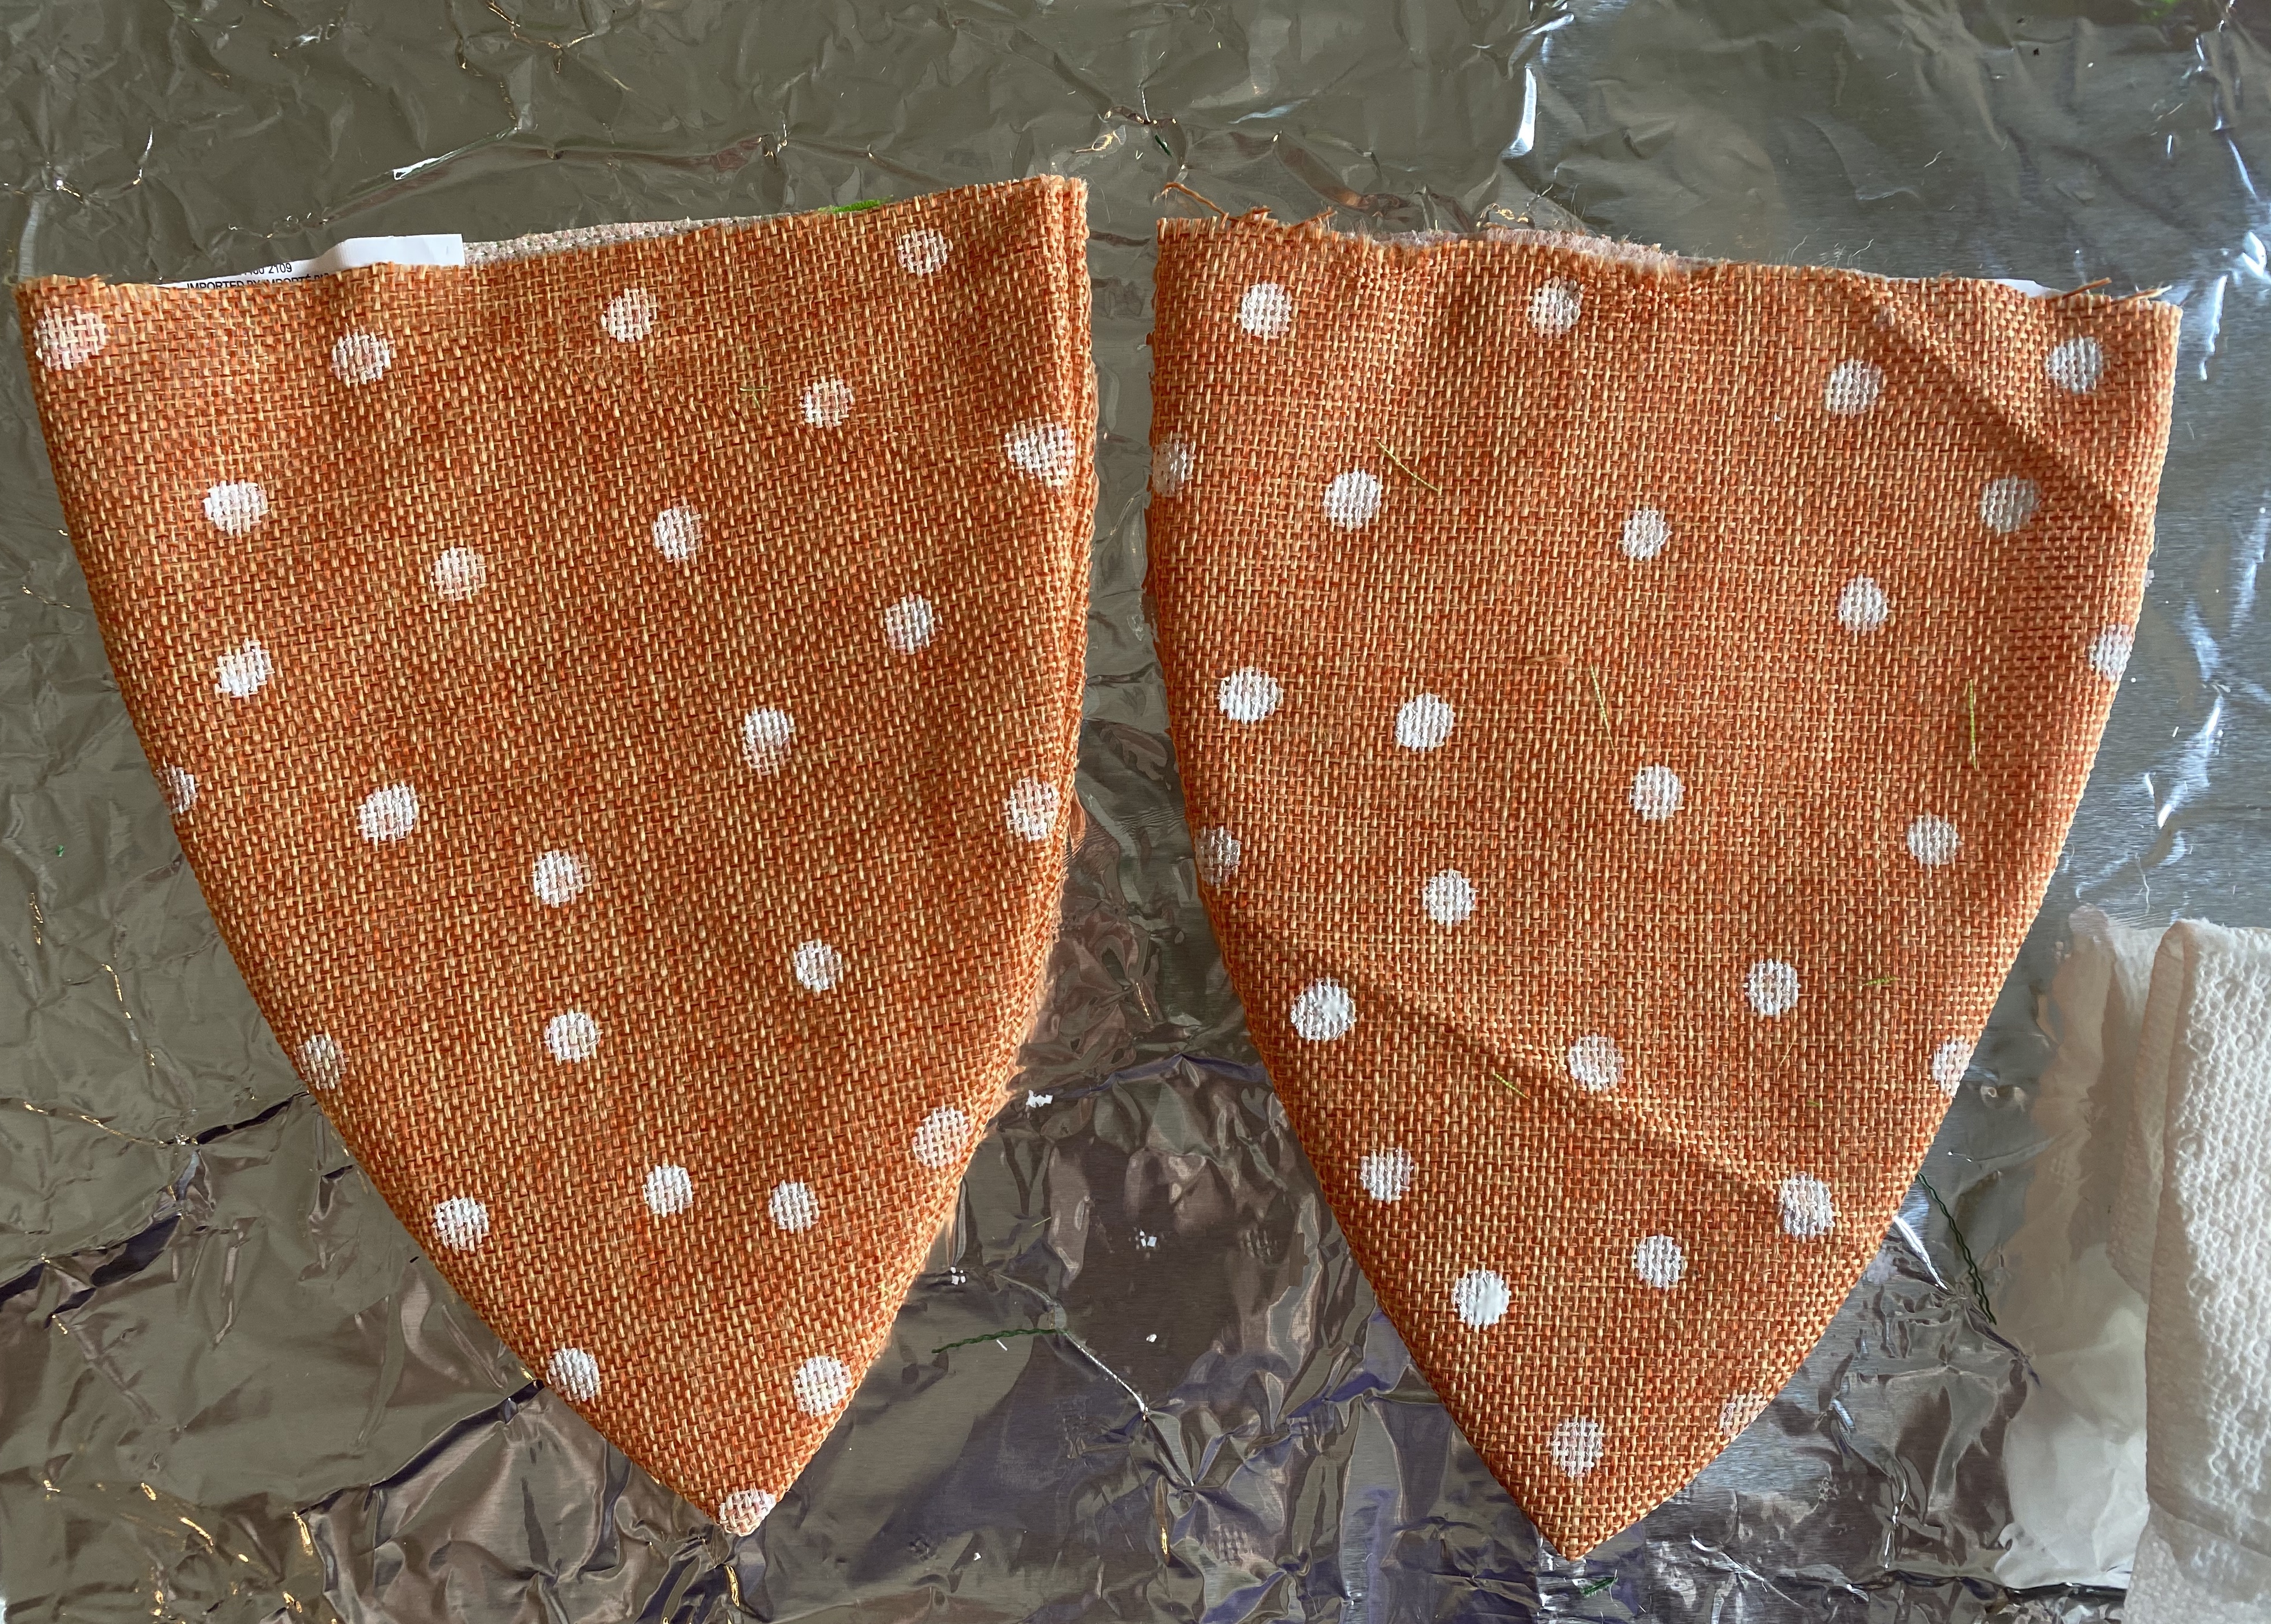
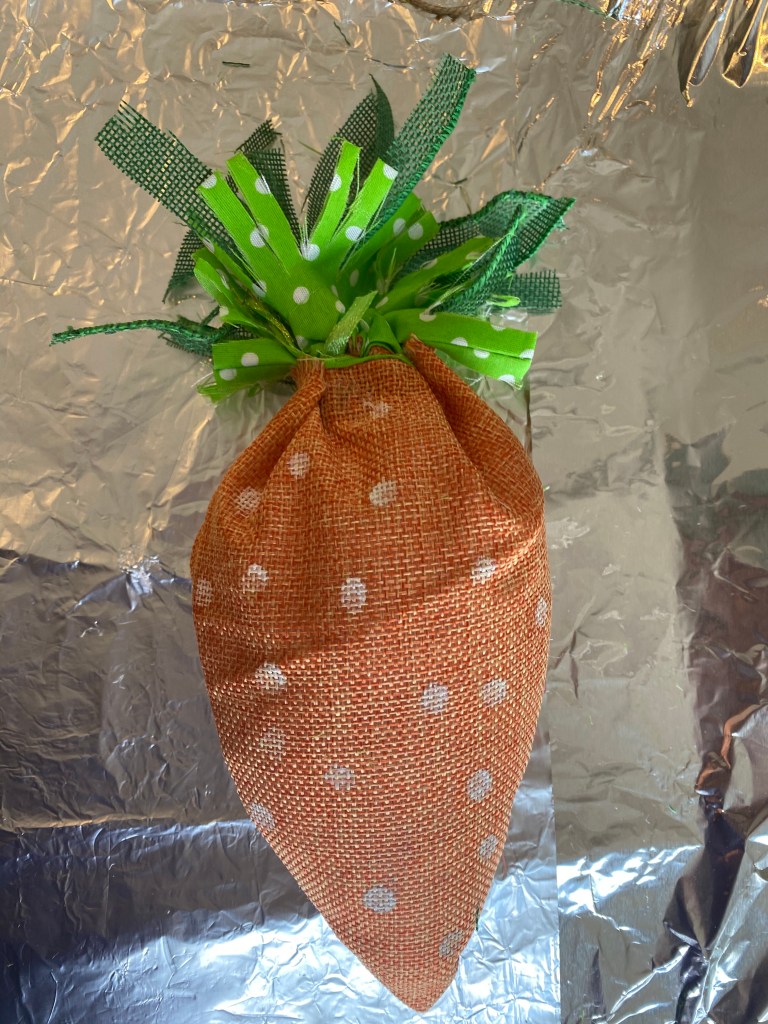
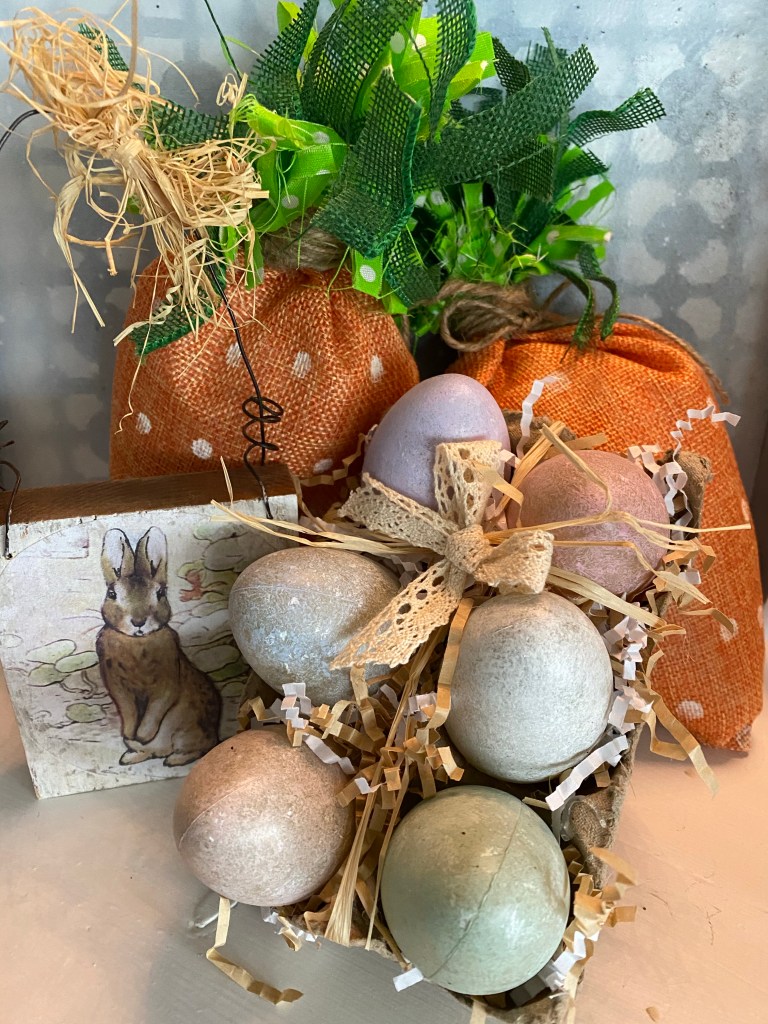
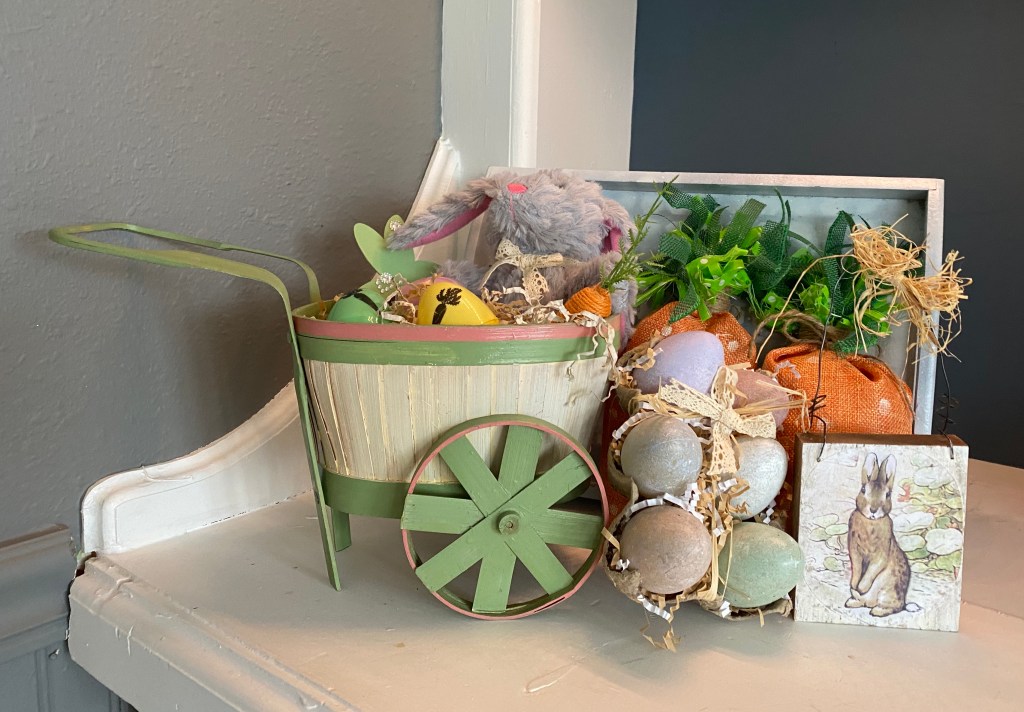
I made a couple of carrots for Easter. They turned out pretty cute and made a great back drop for the little stand up bunny!
They were easy to do. I saw the carrot treat bags at Dollar Tree and bought a package of two, thinking I would do something with them.
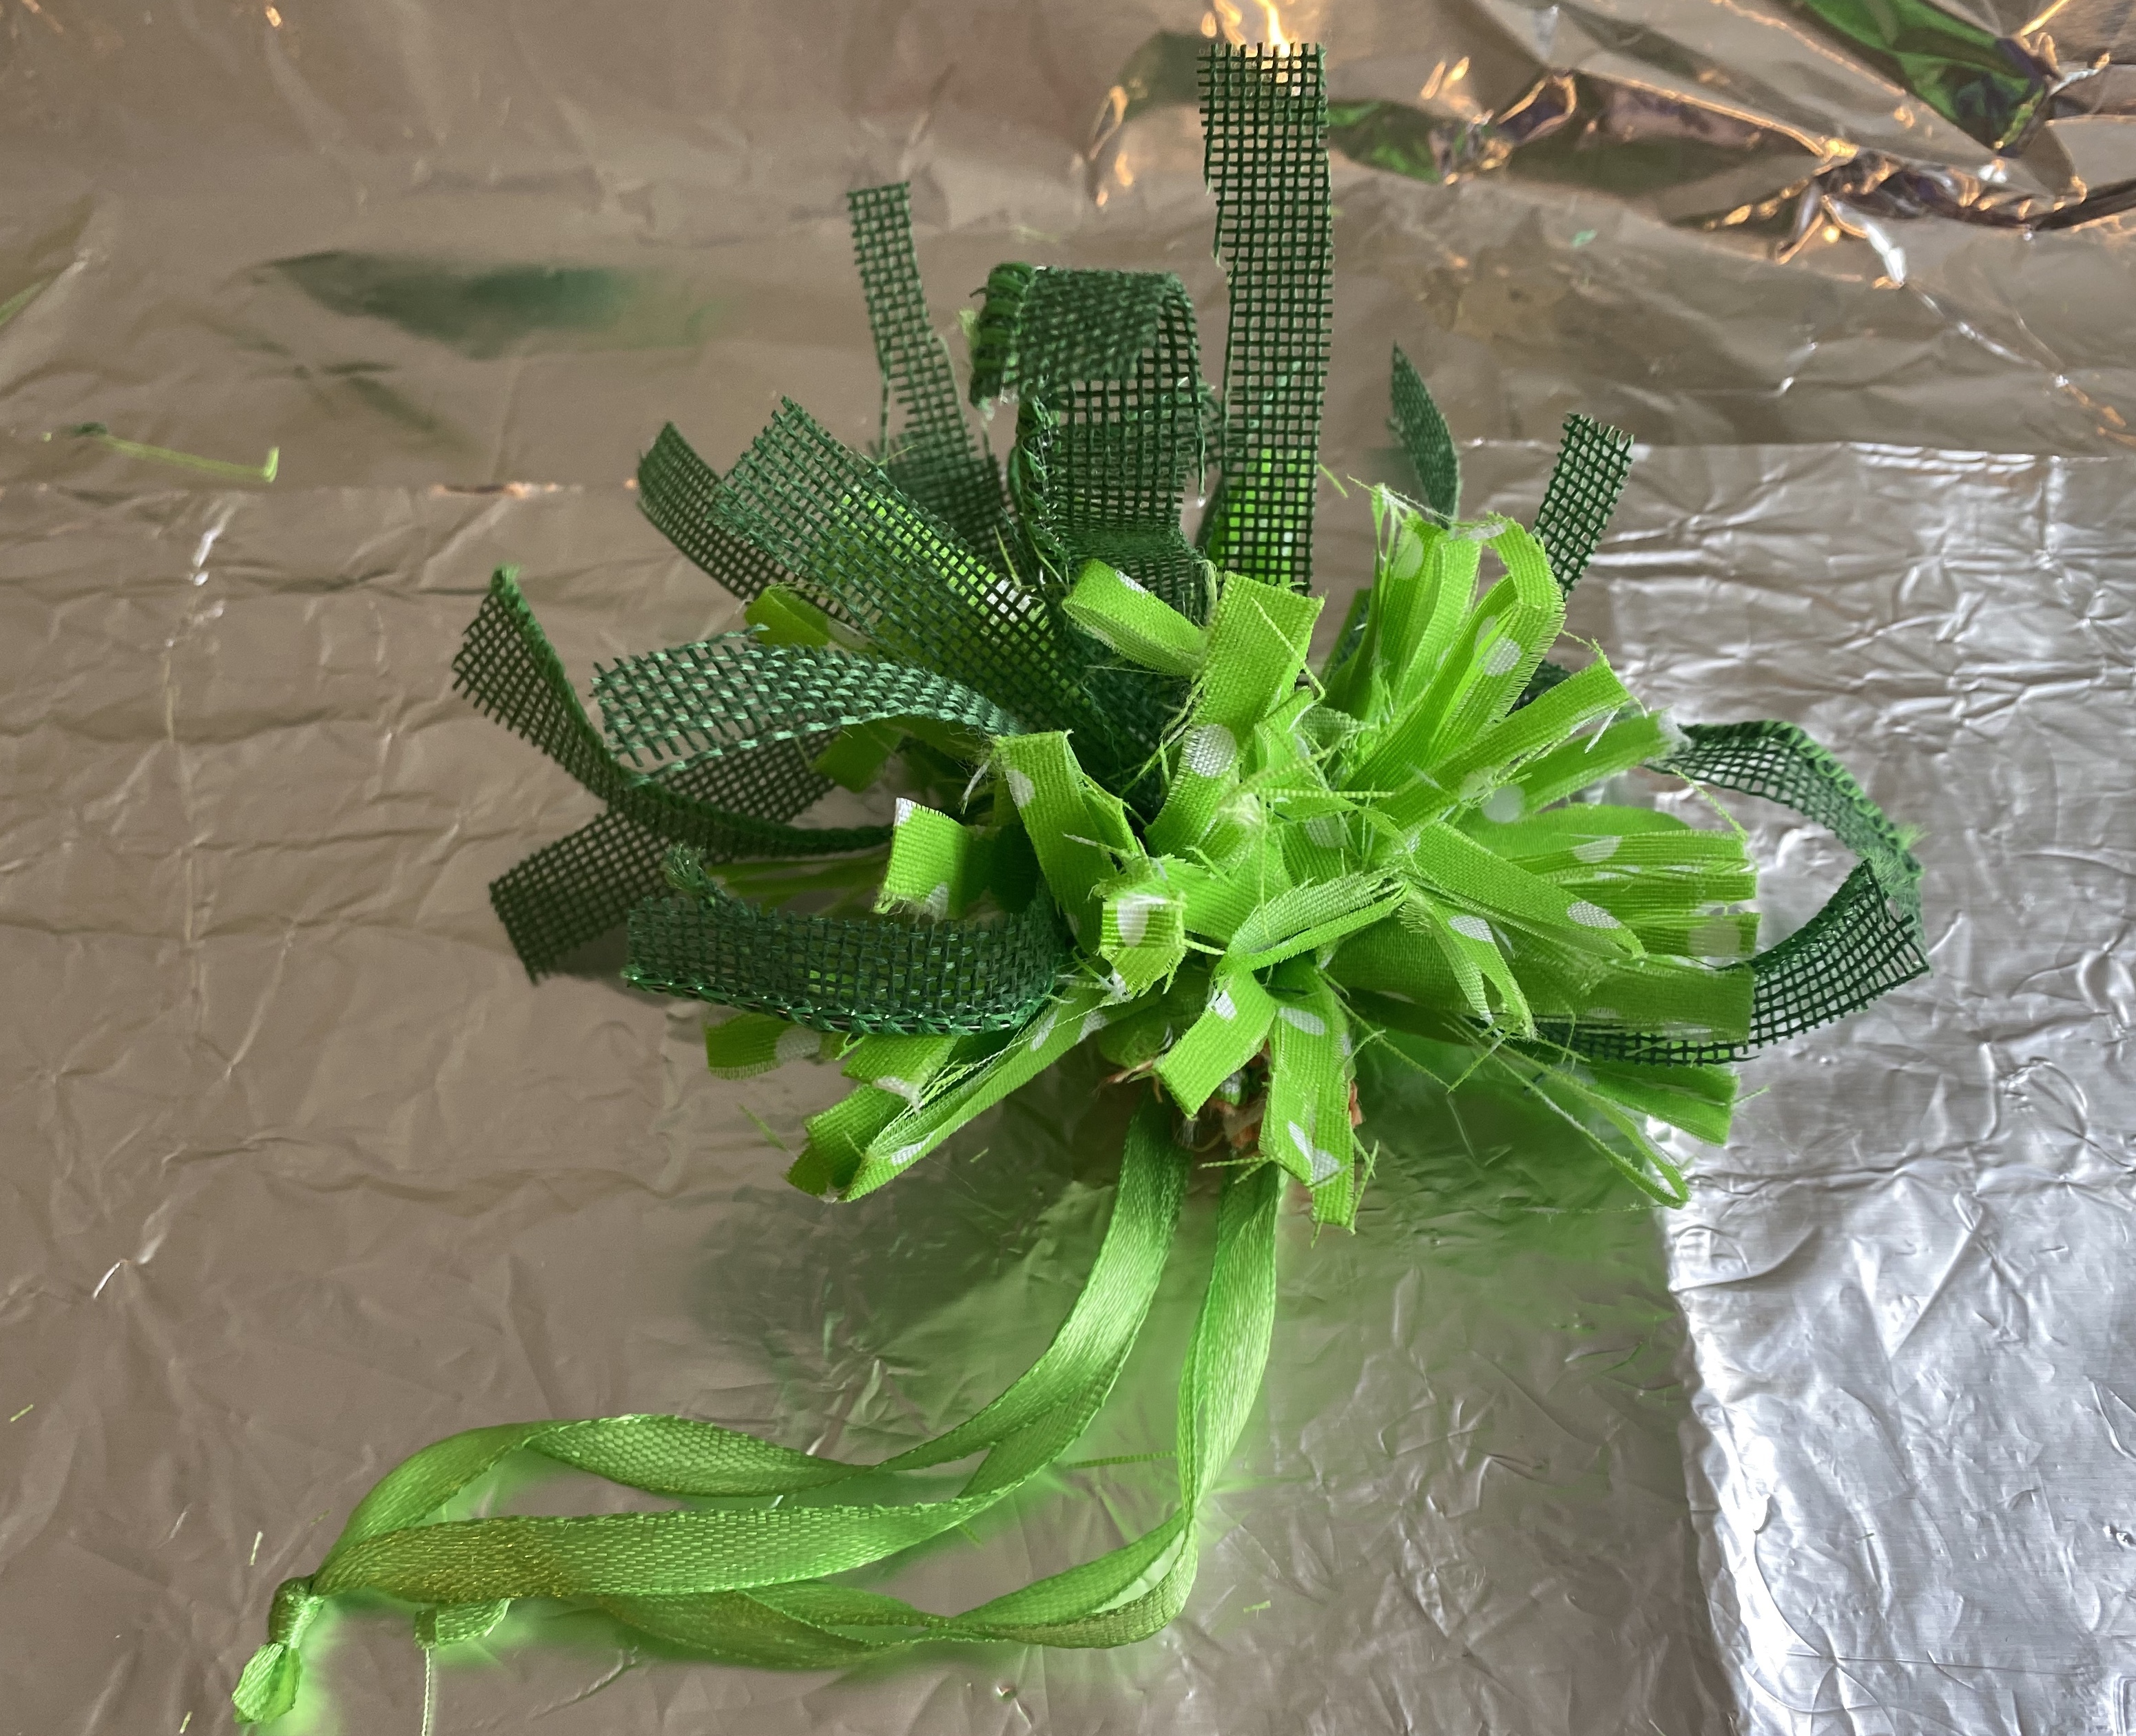
The first thing I did was cut off the green polka dot tops.
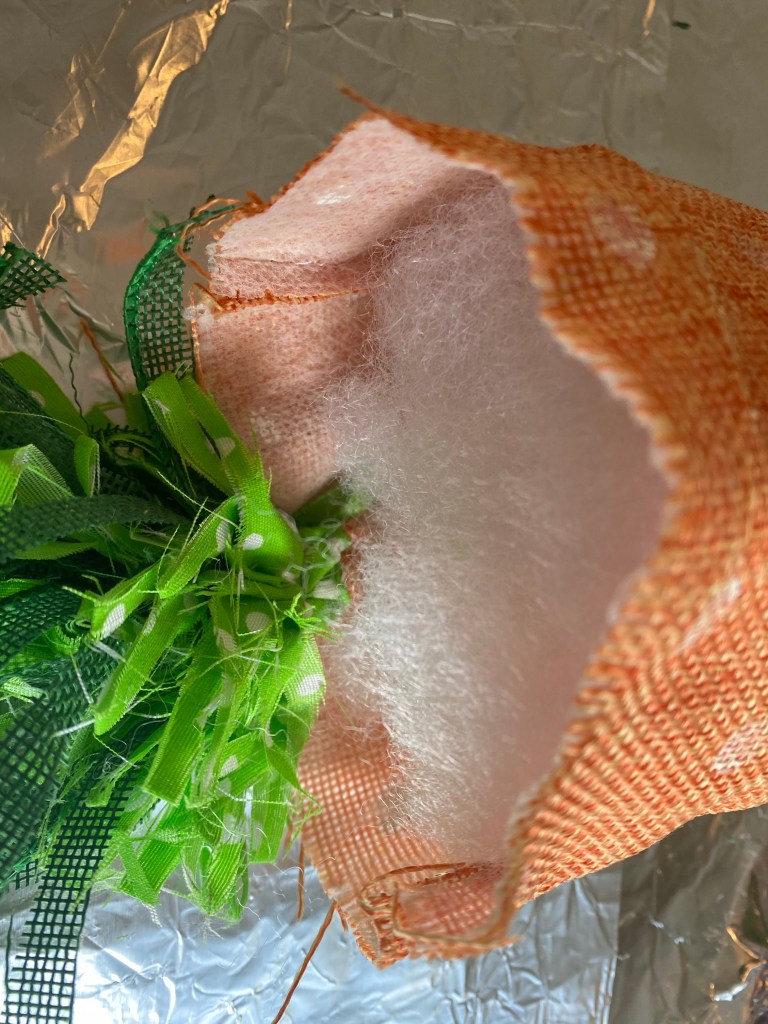
Next, I used a pencil eraser and white paint to make random polka dots on the front and back of the orange fabric.
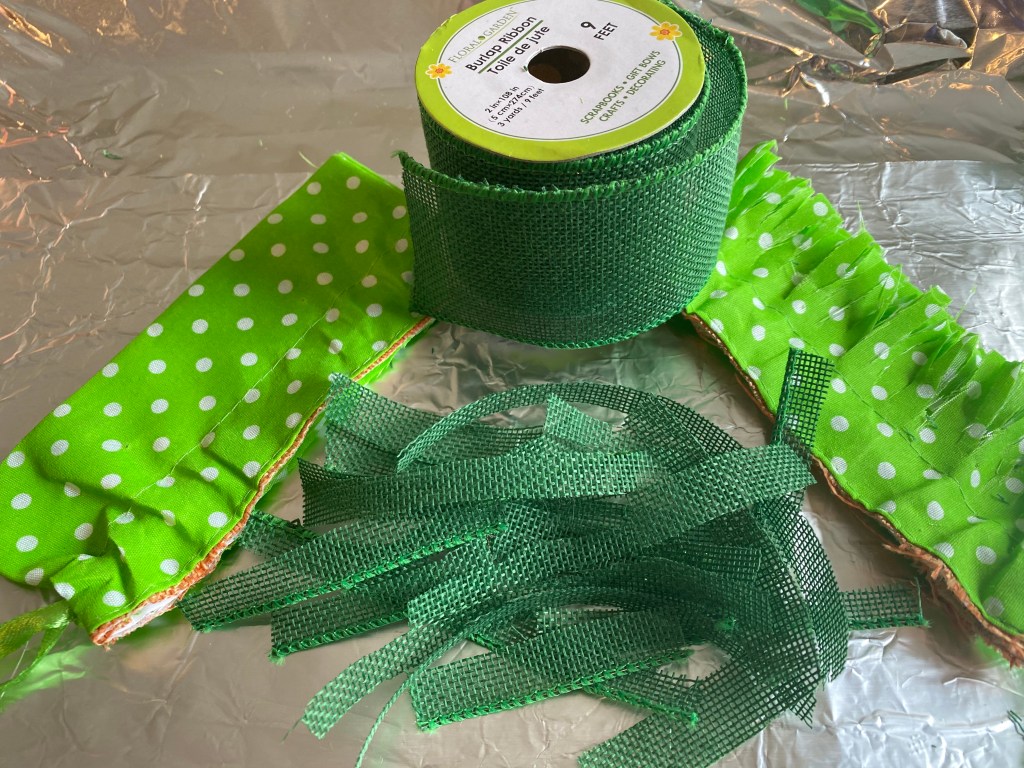
I had some green Dollar Tree wired ribbon. I cut thin strips of various lengths, using both the wired pieces and the plain ones.
Next, I glued the strips randomly across the inside, both sides.
I pulled the drawstrings together very tight and hot glued around to keep it tight. I fluffed all the greenery and bent the wired pieces in place.
Then, I stuffed my carrots.
I glued the greenery to the inside on one side of the carrot, and then glued the other side to it.
I then glued the edges to it and anything sticking out I gathered and glued that, too.
As a final touch, I glued some jute twine to the front, leaving about a 3” length, then wrapped it around the top several times, ending back at the front, tyed a bow and glued it in place.
The final project, displayed with other items I have crafted, just in time for Easter.
Yesterday was a snow day (in public school terms) so as a retired teacher I respected the tradition of doing nothing but play. I discovered a new painting technique in the process.
Earlier I painted plastic eggs to make some egg bunnies, but that’s another tutorial. Basically, I glued them shut, scuffed them up, gave them a coat of chalk paint, dabbed more paint along with picking up at the same time with my brush some Howard’s Chalk-tique
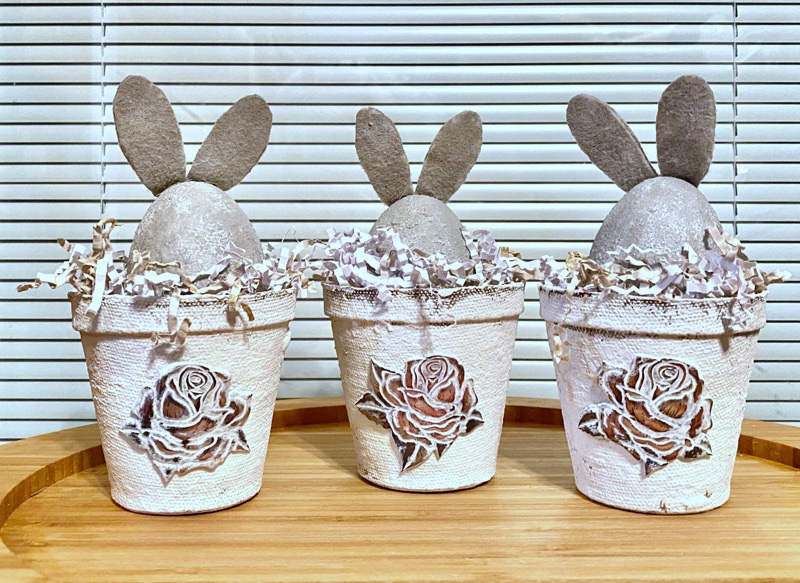
After I made ears for them I decided they needed to be in their own egg cups.
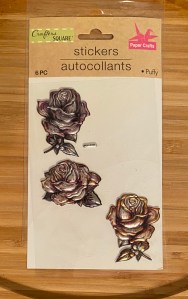
So I painted some peat pots and tried out an idea I’ve had since I bought some plastic puffy stickers at Dollar Tree. My thought was I could glue the rose stickers on, paint over them, then distress them. They had a metallic finish on them and so I was hoping the metallic finish would come through, and Oh….yes it did!!! I found these at Dollar Tree. I also found keys and butterflies and now can’t wait to use them, too..
I used a fast drying glue called Quick Hold. It is made by E6000 but sets up much quicker. It sets in about 45 de ones and cures within 4-6 hours. It has been working great on almost everything I’ve used it on. It was holding well on these attaching to the peat pot but they were a little stiff and the ends kept popping up. I wasn’t concerned as I thought I’d reglue them after I painted over them.
I then painted over them and used a mini heat gun to dry them. An amazing thing happened. The heat must have softened the plastic and did something to the glue (possibly reactivating it) because I was able to easily push down and press them for a few seconds and they stayed put! Not sure why or how, but they lay down now. Just fine!
Then I took a damp towel and rubbed away the paint on the raised part of the roses…..and there was the metallic finish coming to life right before my eyes. To really enhance it I rubbed a bit of clear wax over it and Wow! As you can see in the photo above, my idea worked! I’m so happy!
I could do snow days every day (for awhile anyway. Lol)