More Contemporary Boho

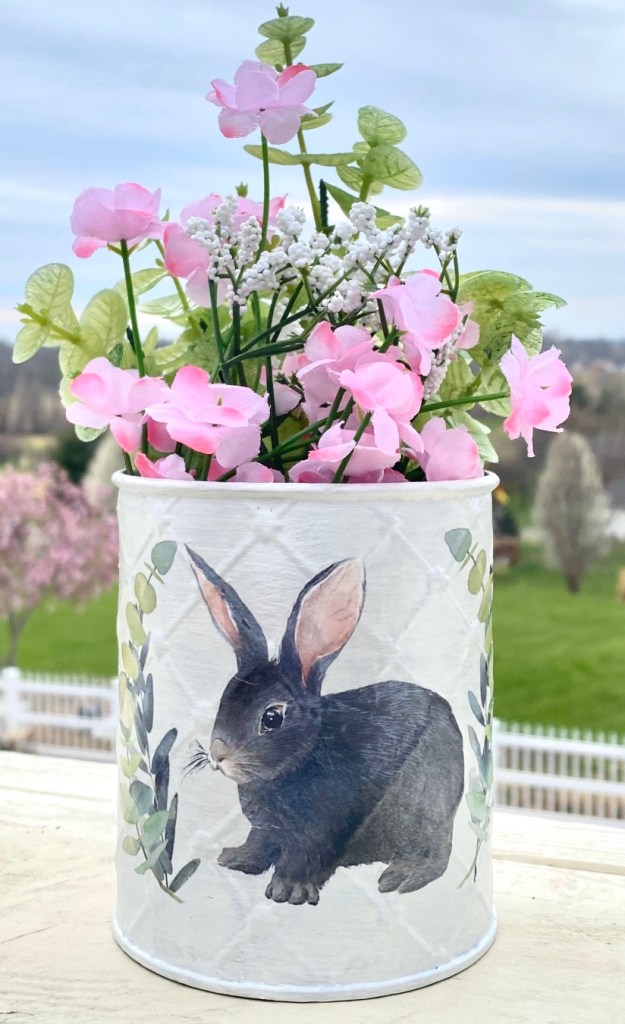
This is line art I created on glass – by tracing a print out with a metallic paint pen . 🙂 This YouTube channel video has many great ideas that think fit right in with this modern boho style. This project I saw on the video, by Katie Bookser, in particular caught my eye.

I printed an image from the site of free images she shared and placed it under the glass of the photo frame I was using. Then with a white metallic paint pen from Dollar Tree, I simple traced the image.

Once the paint was dry, I turned it face down on a unique piece of blue scrapbook paper I placed in the frame. In the close ups, you can see a bit of writing on the paper. With the painting face down, you can easily clean the glass.

This 8”x 12” frameless photo frame is very unique. The glass and contents pop in and out from the front. You press on the edges to release them. There is also a fun surprise under the scrapbook paper. I used a snowflake picture I made this winter. Repurposing are its finest. 🙂

Photos were a little challenging due to glass reflection.

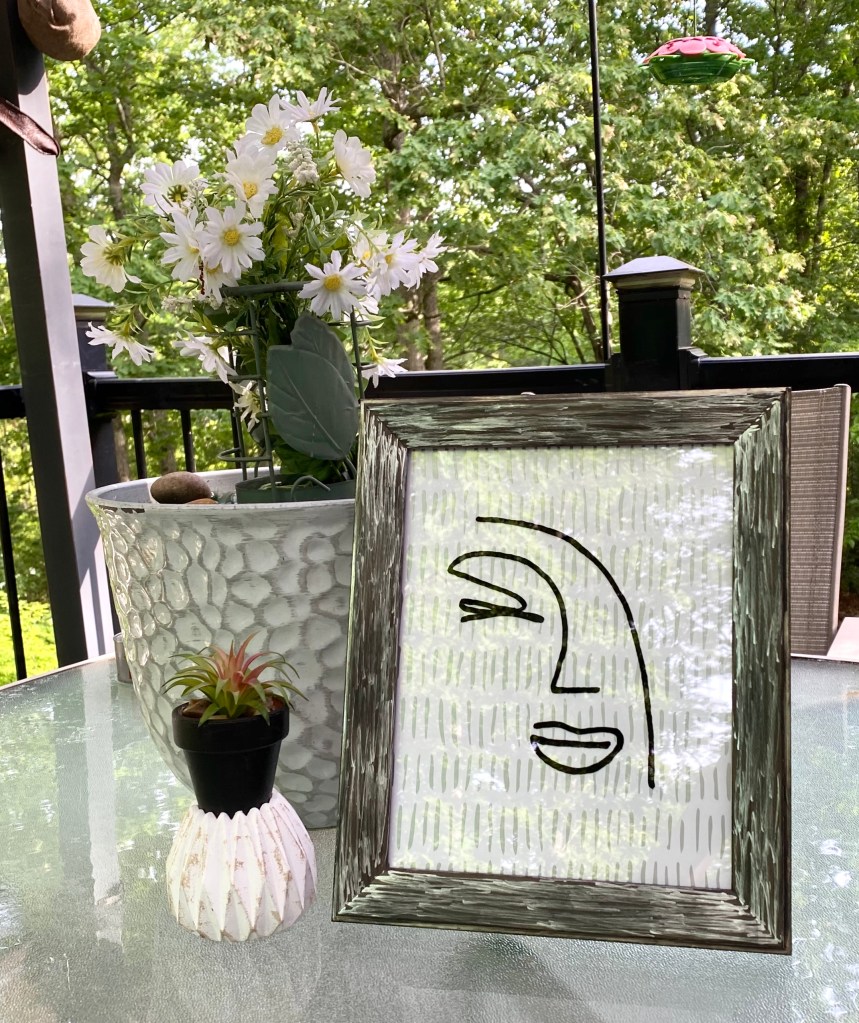
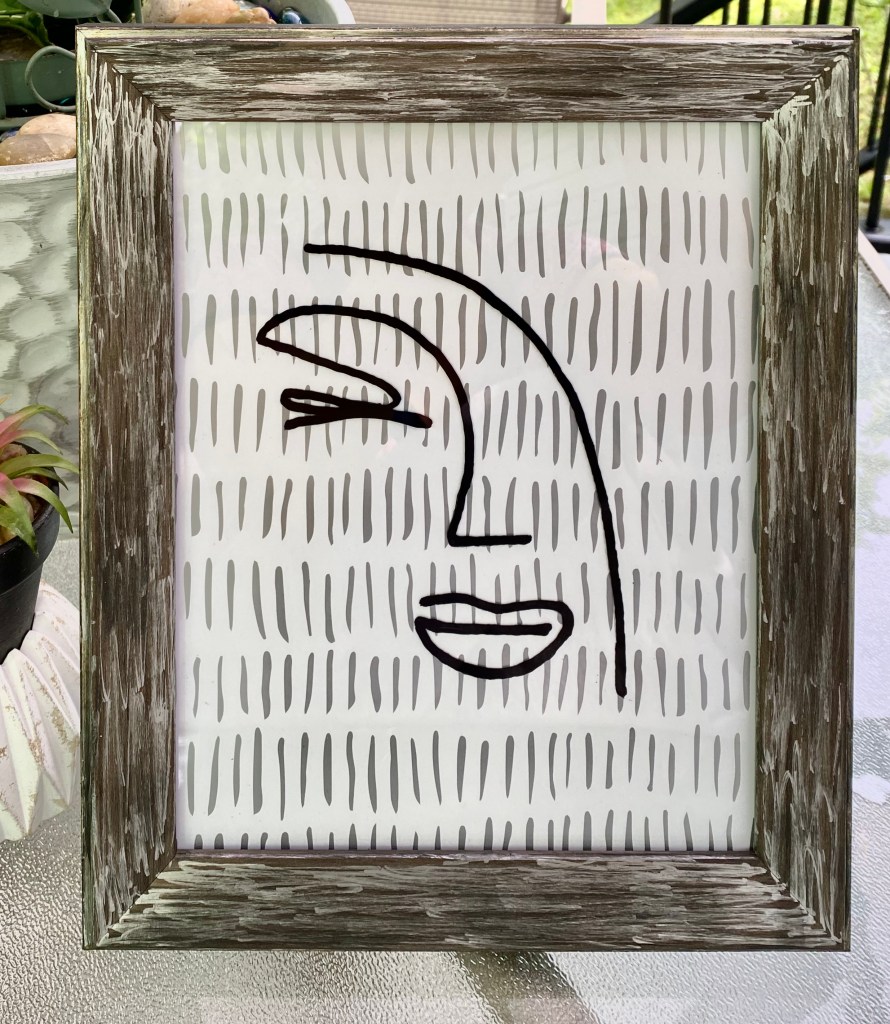
I had so much fun with tracing line art on glass yesterday, I just had to play around with another one this morning. I’ve discovered I love to do this!

The graphic is from a free vector site called vecteezy. I did a search for face line art. I traced this graphic on glass with a black permanent ink Sharpie.

The tribal peel and stick wallpaper came from Dollar Tree. The nice solid frame is a Hobby Lobby one I thrifted from somewhere.

I painted the lines on the front with a silver metallic pen and the sides with black chalk paint.

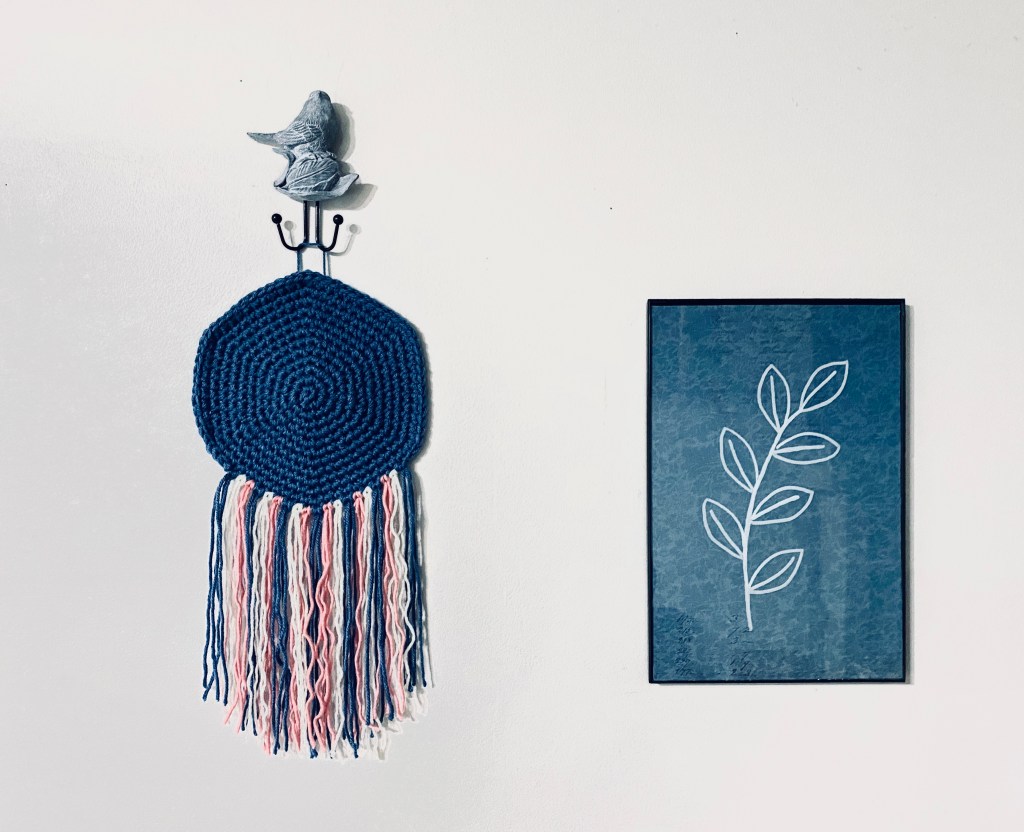
This one is true bohemian style. So cool!

I was fighting reflections on the glass, but I actually love the reflection of the leaves in the first photo. And it’s a beautiful morning on the deck for taking photos. Honeysuckle must be blooming because I can catch a whiff of it every now and then.☺️

It was a rainy day yesterday and since rainy days are made for crafting, I had a couple more projects in me.

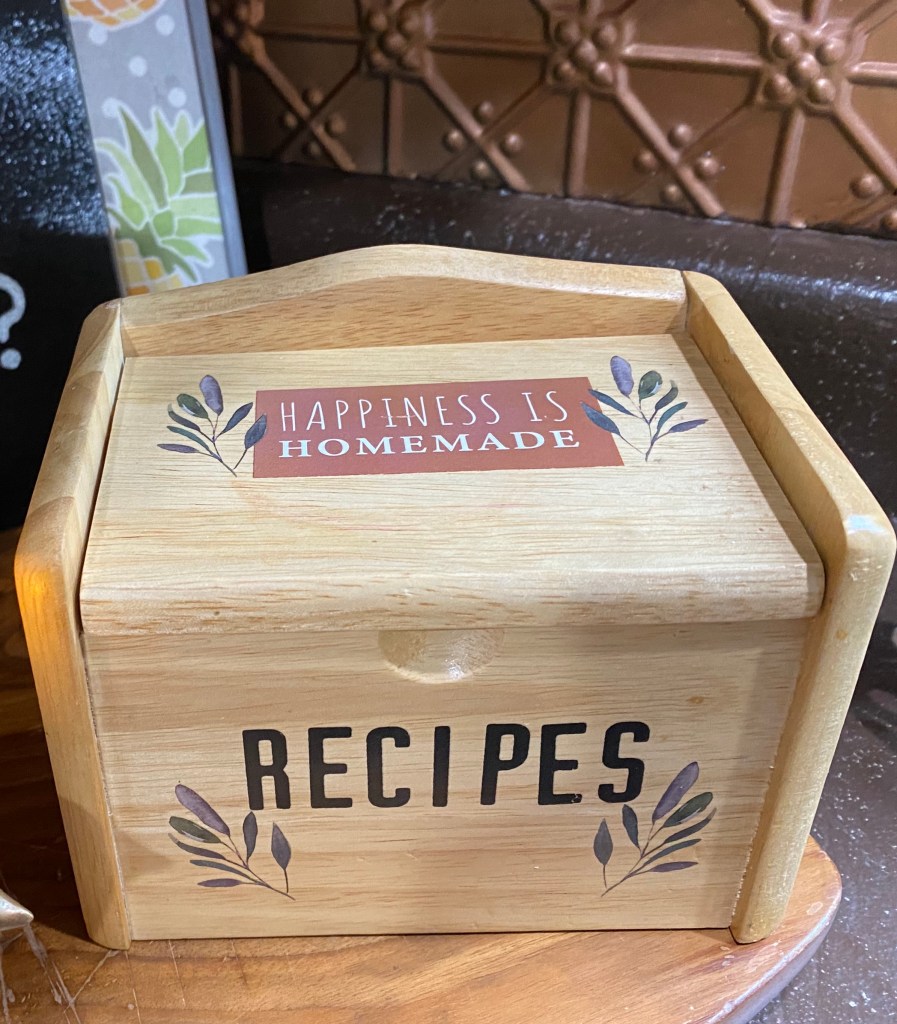
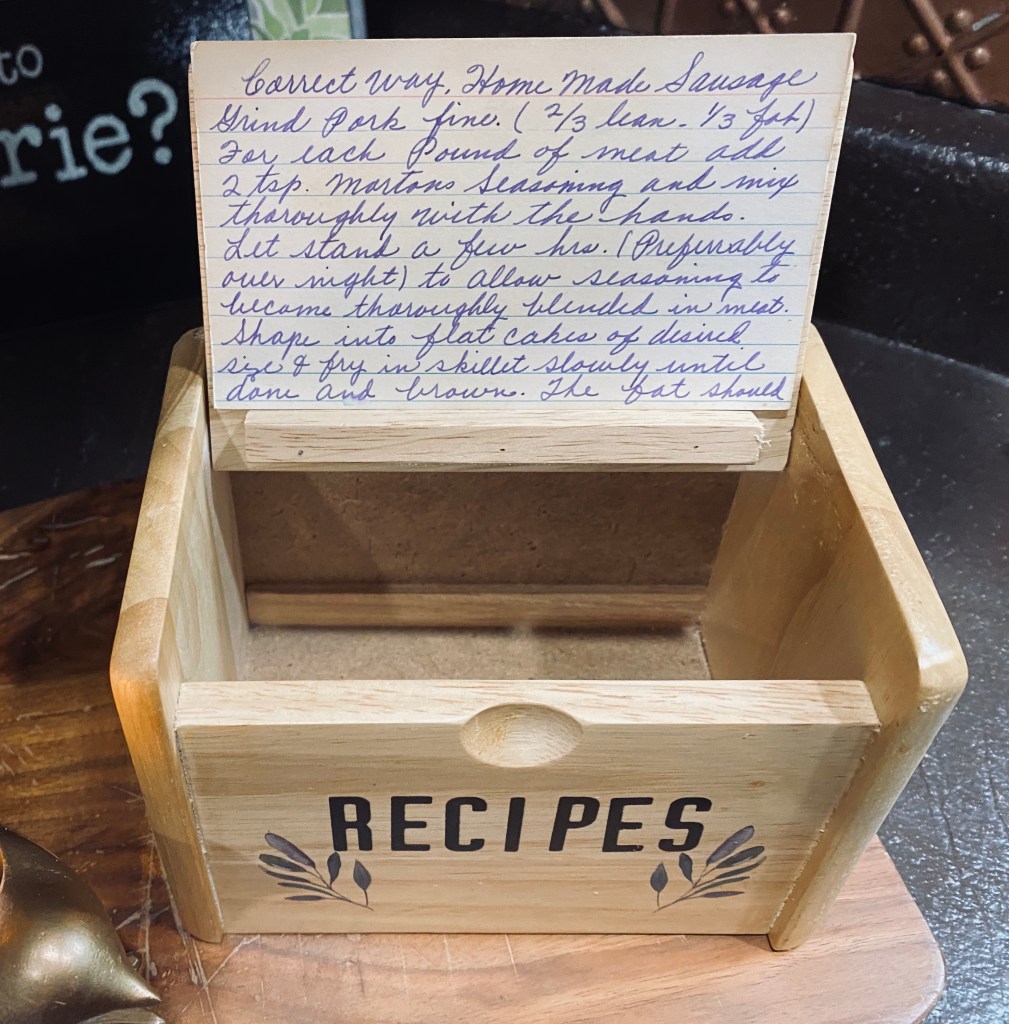
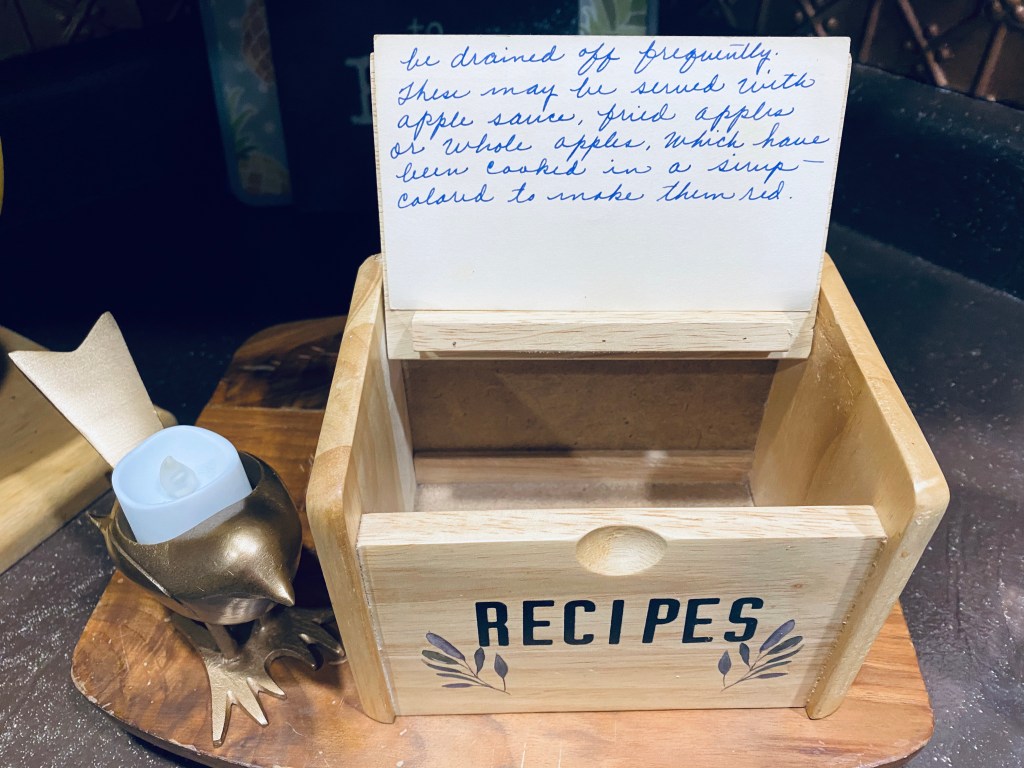
I was in Danny’s workshop area and happened to see this cute recipe box I thrifted so long ago I didn’t even remember it. Who knows why it was in there. 🤷🏼‍♀️

I opened it up and the lid has a little shelf inside to hold a recipe card. How cool is that! The wood was natural and I decided it was the perfect thing for a modern boho decor as well as many other styles.

I immediately knew I was adding some transfers to it and knew just which ones to use from some small ones I got at Dollar Tree.

Aunt Ada’s recipe card for homemade sausage seemed like the perfect recipe to display. I love how she titled it “Correct Way” and how beautiful her handwriting was. 🥰

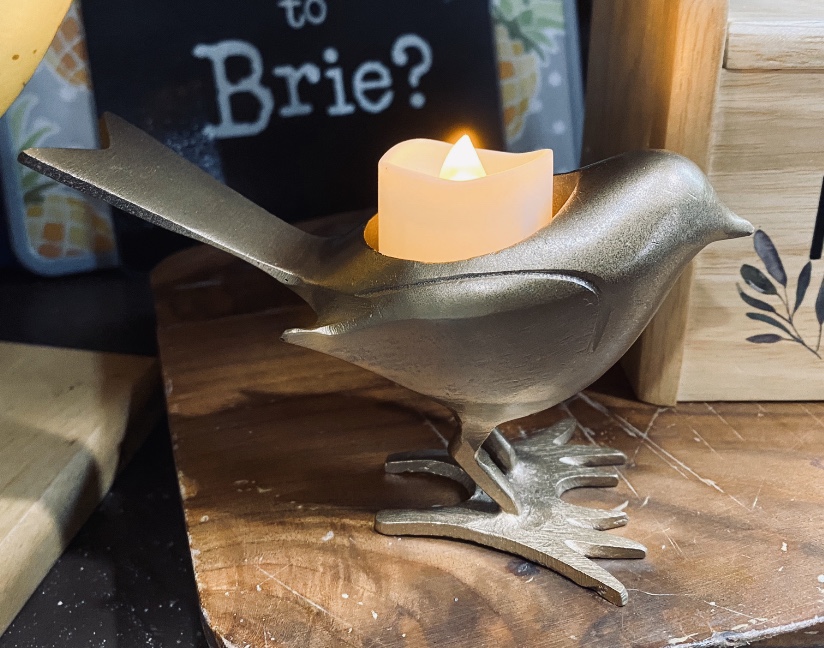
I also recently thrifted this solid metal bird tea light candle holder. After immersing myself in modern boho decor, I knew I had to spray paint him metallic gold. 🙂

Yesterday was definitely “A good day to have a good day!” And it quit raining, and the sun is shining, so today looks like it’s going to be a good day, too!

Pottery Barn Inspired Knotted Cement Rope

Ever since I saw a YouTube video on how to DIY the Pottery Barn knotted cement rope using air dry clay, I knew I had to do it.

Pottery Barn’s Knotted Cement Rope was priced at $89!

So…. last night while watching TV, I rolled some clay into approximately 1” balls and poked a hole through using a chopstick. This left a big enough hole for some thicker jute rope to go through.

This morning it was dry enough to work with. Theoretically, it would take about 3 days to dry completely, but I have painted air dry clay before it was completely dry in the past so I knew I could. I will still let it air dry now for 3 days before doing anything more with it. I used my aged stone technique to make the clay beads look like they were made of cement. I painted the beads with our Missouri Limestone Painting Company chalk paint in “Gray Goose”. I added some baking soda and kind of pounced it on to give the clay the texture of stone. Once dry, I applied liming wax then wiped excess off.

I knotted mine similar to Pottery Barn but added a tag on one end I had made. I thought it fit perfectly with my cement rope.

I am so pleased with how it turned out!

A Farmhouse Table and Chair Set

The farmhouse table and chair set we have been working on this week is finished!!

The top, which Danny stripped, sanded and bleached, has 5 thin coats of Varathane crystal clear water based matte polyurethane, yet it looks like nothing is on it. It has character marks but so pretty! The legs are painted white with 3 coats of the polyurethane.

He stripped and sanded the chairs and they also have 3 coats of the polyurethane. The chairs go well with the table.

It was a little difficult taking pics in the middle of the living room at night, but I couldn’t wait to take pics of this cute set! 🙂

Update: I’m still obsessed with the little farmhouse table and chair set we just finished transforming yesterday. Last night I thought it needed a farmhouse centerpiece so this morning I put it together.

I had made a white vase with a design on it some time ago using a clear glass vase. I first sprayed it with a clear matte sealer to help the paint adhere, then put rubber bands around it. I then sprayed it with a frosted spray paint. When dry I removed the rubber bands.

Today I arranged hydreangas I had dried. Some of the blooms on these hydreangas were huge! They are very fragile and need handling with care, but I have had them awhile and they are still beautiful. I love how drying them preserved the beautiful green and pink of the big blooms.

I am so in love with everything about this. I wish I could keep it. However, it takes up quite a bit of space in the middle of my living room and I have nowhere else for it. I would love to put it in a Four Seasons room …. if I had one. 🙂

Creating Aged Stoneware

Relaxing with my crafting. I can truthfully say I am going to be obsessed with white wax for a few days. I started yesterday and have already completed 4 projects.

Project #1 – I updated a duck that already had a lot of detail.

I’ve been seeing many crafters updating vintage ceramic ducks. I bought this one several years ago. I think it was from the ‘80s.

I decided to finally update this one. What a difference a little paint and Briwax Liming Wax makes!

Julie’s Designs and Signs has a great tutorial on painting ducks. I think the ones she painted may even be from the same company, just a different design. I basically followed her tutorial. My paint was different and my wax, but the idea is pretty much the same.

https://youtu.be/MN8eWuiwbNM

I gave the duck two light coats of our Missouri Limestone Paint Company chalk paint in the color “Trading Post”. I didn’t want heavy coat of paints because I didn’t want to cover up the texture.

First coat
2nd coat

Once both coats were thoroughly dry, I covered the duck in white wax. I use the Briwax brand white wax because I’ve had it forever. It works well.

Once the wax was on and pushed into the details well with a Dollar Store stencil brush I have, I took a soft paper towel and wiped it off.

I love the end result!!

Project #2: Mexican pottery transformed to an aged stone look

After using the Briwax Liming Wax on the duck earlier, I started looking around. I have had this piece of Mexican pottery for a long time. The texture of it was perfect. If it wasn’t, from all the videos I’ve been watching, I could easily add some texture to my paint with baking soda to get the rough look.

By painting this piece with our “Missouri Limestone Paint Company “Gray Goose”, letting it dry, then applying the lining wax by dabbing it into the paint, making sure it got onto the crevices with a stencil brush , then wiping it away carefully, I was able to get this aged stone effect.

I thought I’d try some stamps on it after and they worked great.

I added a few more stamps and this one is going on my dining room table. I’m sure I will be making some more aged stone look vases, even if they once started out as glass jars. 🙂

Project #3: An Aged Stone Look Bird Hook

I just had to do this aged stone look again. I knew this little 3 1/2” w x 5” high bird hook would work as it is a textured resin material.

I love how the dark gray paint and Briwax Liming Wax gave it a bluish tint.

Project #4: A Oui Jar transformed into a little aged stone crock

I’m still playing with Briwax Liming Wax. This time I took a plain Oui yogurt jar and made a utensil holder for some cute dessert “sporks”.

I wondered what dark green under the wax would look like. I loved the color it became.

But first I sprayed the Oui jar with a sealer so the paint would adhere well. I added several teaspoons of baking soda to my Missouri Limestone Paint Company “Evening Shade”, a dark green. The baking soda will make the paint nice and thick and grainy.

I painted and dabbed it on thick this time as I wanted a lot of texture that would be like concrete when finished. I let the first coat dry, then applied the second coat.

Once the jar was thoroughly dry, I added the white wax, then wiped it off. Love, love, love this look.

I added a couple of stamps and filled it with the colorful dessert sporks. 🙂

This turned out so well, it will be available, complete with the “sporks”!

Decoupage a Dollar Tree Makeup Bag

I have been discovering all sorts of things to decoupage. This idea of decoupaging a makeup bag is the latest and greatest.

I ran across this Decoupage Queen’s youtube channel – Joan-Marie Domino. She has many great ideas, but the one I saw and had to try was decoupaging a makeup bag.

I was so inspired when I watched her tutorial. I had just bought 3 makeup bags. I knew I could find an idea on line and Wow! I sure did.

I found three beautiful napkins in my stashe I knew would look beautiful with the pink and gray on the bags. Friends had given me these napkins so I have no idea where they came from originally.

Her makeup bag was canvas. These Dollar Tree bags were kind of a brushed fabric and were plastic lined. Good for makeup that might leak, but…..not for the iron on decoupage she used on hers. I was afraid the hot iron would melt the plastic liners.

So I ended up doing regular decoupage, using Saran Wrap to help me push the napkins down onto the fabric. Here are the steps I used.

Step 1: Buy a makeup bag. These plastic lined makeup bags came from Dollar Tree.

Step 2: Place parchment paper inside just in case the decoupage medium goes through. I didn’t think it would being plastic lined, but didn’t want to take any chances.

Step 3: This step is important, according to Joan-Marie’s tutorial. Make sure you use Fabric Mod Podge. I assume it helps with not only adhering well, but also makes the napkin supple and keeps it from cracking.

I applied one coat of the Fabric Mod Podge over the top area of the bag. DO NOT apply to the zipper area. I let that coat dry well.

Step 4: I then applied a second coat and lay the napkin over it. I used Saran Wrap to help press the napkin (cut a bit longer on all sides) into the fabric. I tried to have a very straight line on the bottom edge of the napkin so that it went right up to the edge of the pink area. I let that coat dry thoroughly.

Step 5: Next, I trimmed the napkin a bit more then used a nail Emory board (sandpaper would work) to get a clean edge on the sides and top.

Step 6: Once dry, I added a second coat of the Mod Podge. Note: It will be tacky after both coats even after fully drying.

Steps 7 and 8: It is now ready for TWO coats of a clear matte water based LIQUID sealer. Make sure you use a liquid and not a spray. Let the first coat dry thoroughly before applying the second. I happened to have some wise owl clear matte one hour enamel, but any clear matte water based sealer will work.

Once dry the bag will no longer be sticky and the napkin will very supple. You can wad it up and smooth it out and it will not crack.

And …. just look at the beautiful makeup bags now!

A Bunny Tin Filled with Flowers and Greenery

I’m at my son Trevor’s helping out with the kids while Lydia is at a conference, but I brought along enough supplies to keep me busy while they are at school. 🙂

I was going to paint a duck today, but instead decided on painting this little 4 1/2” tall by 3 1/2” round embossed galvanized tin. I brought the perfect bunny framed with greenery Prima transfer I bought at The Gray Wall to go on it.

I’m so glad I did! It’s a little overcast today but the lighting seemed perfect when I used their beautiful view as a background for photos.

I usually spray a clear coat on metal or glass first but this tin was not shiny and the Mod Podge sprays I used uusially create a nice hard finish.

I painted the tin with 3 coats of our Missouri Limestone Paint Company “January” and let it dry. Then I gave it a coat of Mod Podge clear matte spray, followed by Mod Podge Pearlized Glaze spray.

I then applied the transfer. I sealed the transfer with another coat of the clear matte spray and a very light coat of the pearlized spray. I didn’t want to use too much as I really wanted the details in the transfer to show up. I just wanted a little shimmer. It’s hard to see on the photos, but it is there.

I love how it turned out and love how the photos show it off!

Forget Making Moulds – I Had An Idea and it Worked!

Yesterday was a snow day (in public school terms) so as a retired teacher I respected the tradition of doing nothing but play. I discovered a new painting technique in the process.

Earlier I painted plastic eggs to make some egg bunnies, but that’s another tutorial. Basically, I glued them shut, scuffed them up, gave them a coat of chalk paint, dabbed more paint along with picking up at the same time with my brush some Howard’s Chalk-tique

After I made ears for them I decided they needed to be in their own egg cups.

So I painted some peat pots and tried out an idea I’ve had since I bought some plastic puffy stickers at Dollar Tree. My thought was I could glue the rose stickers on, paint over them, then distress them. They had a metallic finish on them and so I was hoping the metallic finish would come through, and Oh….yes it did!!! I found these at Dollar Tree. I also found keys and butterflies and now can’t wait to use them, too..

I used a fast drying glue called Quick Hold. It is made by E6000 but sets up much quicker. It sets in about 45 de ones and cures within 4-6 hours. It has been working great on almost everything I’ve used it on. It was holding well on these attaching to the peat pot but they were a little stiff and the ends kept popping up. I wasn’t concerned as I thought I’d reglue them after I painted over them.

I then painted over them and used a mini heat gun to dry them. An amazing thing happened. The heat must have softened the plastic and did something to the glue (possibly reactivating it) because I was able to easily push down and press them for a few seconds and they stayed put! Not sure why or how, but they lay down now. Just fine!

Then I took a damp towel and rubbed away the paint on the raised part of the roses…..and there was the metallic finish coming to life right before my eyes. To really enhance it I rubbed a bit of clear wax over it and Wow! As you can see in the photo above, my idea worked! I’m so happy!

I could do snow days every day (for awhile anyway. Lol)

And here’s the final project. 🥰

A Well Dressed Cheese Box

I found this cheese box (15” round x 5 1/2” tall) when thrifting this summer while on vacation. I knew the glued on flowers had to go, but hadn’t decided how I was going to upcycle it….until today.

It’s getting cold out and that cheese box needed a sweater. I just happened to have a new red sweater that came in an Ugly Sweater kit I thrifted last year.

The first thing I did was sand off those flowers as much as I could and then I cut the sweater in half about 4” below the armpits. Then I covered the outside of the box and down the inside. The lid still fits fine around the sweater.

I glued the seams first, inside, outside, and underneath. Then I glued all around, securing the sweater to the box.

I was left with a lot of fuzz, which was hard to remove on that rough wood. I didn’t want to get out a vacuum, so I used rolled up masking tape to pick it up. It worked like a charm.

Next, I finished the rough edges by gluing sisal rope around the sides and bottom.

And then came the image I downloaded and adapted to cover up the old flowers I had mostly sanded away. This is a technique I’ve used several times now. I found this image, free on The Graphics Fairy Site. I had to do several things to get it the way I wanted, though. First, I had to make the image transparent and I cut it into a round shape using the free app Pro Knockout. But I wanted it to have a more vintage look so I uploaded it to the free website Lunapic and saved it as a pen drawing.

All of this is free, so I’m sharing my image I created here. Please credit The Graphics Fairy and this blog post if you do use it. Thanks.

Pen drawing created in Lunapic.com from a free image found on The Graphics Fairy.

I then inserted the image into a Google Document, enlarged it to fit the paper, and saved it as a pdf file. Next, I used a product called Pixi Spray to temporary adhere a piece of drop cloth to a sheet of printer paper. I trimmed the drop cloth to the size of the paper, then printed it on my personal black and white laser printer.

I am always blown away how cool this look is on drop cloth. I cut around the circle and adhered the image to the box using Elmer’s Craft Bond.

I cut the neck off and used what I learned from the wise words of all mothers, “Don’t pull on the neck of your sweater, you will stretch it out!” They are right! I pulled and pulled and stretched it enough so that it would fit around my image and then hot glued it in place. It is on there forever. 🙂 And while I was at it, I used a red paint pen and colored in the berries on his hat for just a bit of color.

This finished my cheese box. I posted it for sale on my Facebook page and it sold almost immediately!

Now, what to do with the sweater arms?? I’m thinking my early morning project will be dressing a few Oui yogurt jars. 🙂

Birch Tree Risers and Logs

We’ve been making birch tree risers. Leonard Butts, Robin Holmes Butts, and Kathy Strothcamp thanks for the contribution from your fallen trees and limbs. Leonard, your big branch we saved from your tree became the risers, and Kathy, your branches and Leonard and Robin’s smaller branches became the birch log bundle.

Danny cut them into the sizes I wanted and made me hold the saw down while he got the right measurements. Personally, I think he could have done that himself, but the couple that works together, stays together, right? 😂 Plus, I could make sure he was doing it correctly if I helped. 🤪

The resulting projects are all natural and beautiful just as they are. Some have peeling bark, some have bark that peeled off. Some bark may still peel, but that’s what birch trees do.

We made several sets of (1/2”, 1” and 1 1/2”) risers and several sets of (1”, 1/2”, and 2”) risers.

We also made a bundle of 10 birch logs. They fit perfectly on the MCM magazine rack we turned into a log holder.

I researched how bundles of logs are tied for carrying so gave Danny that task after I told him how they did it.

The look on Danny’s face in the first pic says, “Hurry up and take the picture, Pierre. These are freaking heavy.” 😂😂 The second one was a little better after I let him rest his arm. 🤪

The name Pierre is brought up every time there is a photo being taken around here. Ed Pierre was our local photographer for many, many years. He was meticulous with his photography and posing positions and it took forever it seemed until he was satisfied it was the perfect shot. And they always were.

Storing Faux Flowers – Problem Solved! A baby gate!

Do you struggle with faux flower storage in your craft area? I do!

I’ve tried several things, but nothing was working well. I’ve searched Hoogke and Pinterest. I’ve watched organizational videos and even tried some of them, but nothing worked for me.

Until today. As we were decluttering the basement we came across several baby gates. Since the grands are no longer babies, Danny wanted to know if I wanted to sell them. I’ve really had the flower problem on my mind and all of a sudden, I saw not a baby gate, but a rack with holes that could hang on a wall or door and I could stuff stems through the holes!

We had an over the door hanging rack. I had to leave then so Danny tried it out and it works perfectly with room to spare for more. I can see at a glance what I have (I may reorganize by color 🤪) and it is space saving, too! I even have room for more on this one, plus I have two more gates if I need more room. 🤪

And it looks pretty, too!