4 Awesome Projects from Thrifting Finds This Week

#1 – I have a French Country look going on in this first thrifted find – a bird cage item which needed some repair and a metal basket. I painted a Dollar Tree peat pot and decoupaged with tissue paper.

The metal finial on the birdcage was just hot glued on and popped right off after I got it home. Not only was hot glue alone not good idea but there was hardly any surface area for gluing. I used E6000 and hot glue to attach a small wood round to the birdcage and I painted it white. Then I used E6000 and hot glue to attach the finial. I added jute around the wood round where I had glued it together. I also stuck my hot glue inside and upside down dropped some hot glue along the inside. It is on for good now.

The birch round came from a fallen branch and that cute bird I found in a thrift store. The faux flowers came with the birdcage.

I love putting this kind of thrifting together.

#2 – Next up is this awesome cutting board/serving board. I love cutting and charcuterie boards. When I found this wine bottle shaped bamboo cutting board, I knew immediately that I wanted to add a stencil to one side for decor purposes. The other side could still be used as a cutting board or both sides could be a specialty charcuterie tray that would make a beautiful cheese and fruit spread serving board.

I stenciled just a part of the board and then seasoned both sides with food safe Howard Cutting Board 0il.

Dimensions approx. 21″ x 7″ x 1/2”

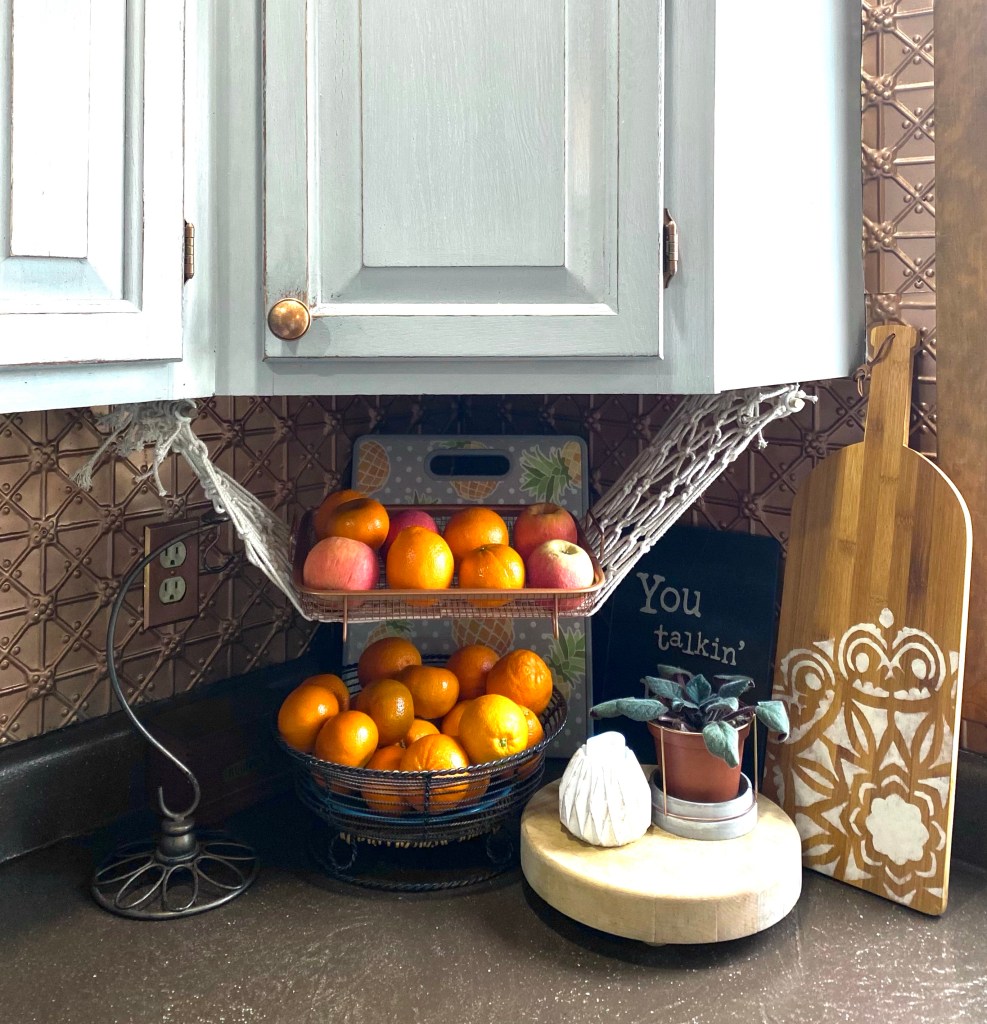
#3 – I like thrifting, but I really like it when I find something just for me. I don’t have a lot of storage space in my pantry so things like cereal and crackers and chips, etc. always seem to end up on top of the refrigerator.

I found these awesome Harry and David copper colored metal baskets at Goodwill yesterday for $7.87 each. I knew they would go perfectly with the copper colored tin on the wall behind them. The one on the left holds snacks and the one on the right, cereal and crackers.

I saw them listed online anywhere from $14 – $46 each so these were a pretty good price. Yay!

#4 My final thrifted item project for the week came about because of the stalk of dried wheat I found at Goodwill. They had just put out several bunches of these. I only bought one bunch but now wish I had gotten more. I used several pieces in this beautiful tall vase a friend gave me. It will be going on the floor next to my fireplace. I do have enough left over for several future projects. so that’s good.

That’s all for now. I thrifted more things, but haven’t decided yet how I will use them. So keep checking back. I will be sharing when the inspiration comes.

Stenciled Cutting But add Book Stand

Another morning project. I paid more than I usually do for a thrifted item, but this piece was in perfect condition.

This book stand is perfect for propping your phone, your iPad, the book you are reading, or an old fashioned cookbook.

I added the Dollar Tree stencil, using a light gray chalk paint. One trick for getting crisp lines with no bleeding is to use a clear sealer first. Let that dry and then paint over the stencil with your color of choice. The front is sealed with Wise Owl Salve.

Microfiber Stenciled Coasters

While waiting for my visiting grandson to wake up, I strolled around my basement wondering what I could declutter first. Then I happened upon a package of terry cloth coasters called “Thirsty Coasters”.

I bought several packages of these at one point, thinking I could do something with them sometime. Another time I bought several cool little coaster holders. Same. Lol

Forget decluttering for now. I started wondering if I could stencil a design on them. I had a little boho mandala stencil that fit perfectly and I had lots of chalk-style paint from our brand we produce and sell Missouri Limestone Paint Company, so I chose “Gray Goose”.

They stenciled beautifully. Once they have had a good 30 day cure, our paint will be indestructible no matter how many sweaty glasses or hot coffee cups are set on it as the paint becomes part of the fabric.

This will make an awesome Christmas gift – just thinking ahead. 😂

So, I have done a bit of decluttering, too! Lol

I gathered my supplies and my coffee and was ready to begin.

I like using the makeup sponges I get at Dollar Tree for stenciling and small projects. I off load a little of the paint onto the paper plate so that when I stencil, it doesn’t seep under.

The terry cloth took the stenciling beautifully. I love how they turned out!

They fit perfectly in the coaster holder I had.

What a cool boho look!

Gnomes on a Clipboard. Why not?

I am a teeny bit obsessed with gnomes. It started last Christmas. I made quite a few of them. They sold really well.

So, of course, I couldn’t help myself. I have gnome fever again this year. I decided to change up the look a little.

Here are a few more gnomes I’ve made …. so far.

Refrigerator magnet
Bean bag type gnome
Paint brush gnome – just had to do this! Lol

My latest project is the reason for this post. I purchased the image of the 3 gnomes from the Silhouette Design Store with a commercial license. I knew I would be using them quite a bit, they are so darn cute.

So last night, I cut a larger stencil from contact paper with my Silhouette machine. I used it, a chalk paste mesh stencil of snowflakes, and my own DIY chalk paste to create this cute design on a clipboard from Dollar Tree I had painted with chalkboard paint.

I could have wiped it off with a damp cloth and used the clipboard again, but it turned out so cute, I sealed it with an acrylic clear coat and made it permanent.

It can now be used as decor or as a clipboard …. or both!

Stencil over Burlap – love it!

I was inspired by another crafter to paint and stencil over burlap sooo…

  • Dollar Tree 6”x 6” sign with beaded hanger (Love these – they come in natural wood and black)
  • Christmas tree wood cut out – come in a pkg. of 5, I think)
  • I have a stash of burlap bag so used a piece of one
  • Missouri Limestone Paint Company chalk-style paint “January” (or any brand of white chalk paint will work)
  • Farm cow image printed on card stock

I hot glued the burlap on the back side of the sign. Worked well but next time I think I will use Emer’s adhesive spray. You could turn the sign back around later and have a different sign so I might glue burlap on both sides next time and do a reverse stencil of some kind in the natural burlap for a different look.

Update: I did do the back, too, stenciling a farm cow. I now have 2 signs in one!

I used the natural frame. I dry brushed a bit of white paint over it and the beads for a little different look.

I then used scotch tape and taped the Christmas tree onto the burlap to help hold it and daubed white chalk paint all around the stencil and the burlap.

That’s it! How cute! You can hang on the wall or even on a tree. These would make cute stocking stuffers Zoe Christmas gifts. Great project to do with kids.

Wedding Invite on Canvas – Using a Silhouette Machine and Annie Sloan Paint

I created this project in July 2014.

Standard

Wedding Invite on Canvas W/SilhouetteI love my Silhouette Portrait machine and all it can do. I scanned Katie and Richard’s wedding invitation and saved it as a jpg. Then I put the image into my Silhouette software and traced it. I copied and pasted each section into a new design, making sure I welded the lettering. I then turned each section sideways and enlarged them to fit on a large stretched canvas. I cut each section using contact paper.

Next I painted the canvas with Old White Annie Sloan chalk paint. I applied the contact paper lettering and painted over everything in Old white again. This is to make sure there is no bleed through with the final color.

Once dry, I used Annie Sloan Graphite and when that dried, I peeled off the contact paper lettering. As a final step I will add a coat of Annie Sloan clear wax and now Katie and Richard will have a large vintage look wall hanging with the exact fonts from their wedding invitation.

I’m still amazed that you can trace and cut lettering from an image with the Silhouette. 20140706-125426-46466661.jpg

Continue reading

Family Rules with a Silhouette Machine and Annie Sloan Paint

I created this project June of 2014.

My daughter-in-law, Daphney, wanted one of those Family Rules signs on a board.  I’d been on the lookout for some old barn wood but wasn’t having any luck.  Then my neighbor mentioned a board he had that might work.  It was actually more like a box with a frame around two boards stapled together, so I removed the frame (OK-Danny removed the frame added more staples to the boards) and now I had the old board thing I was looking for.   Continue reading