I’ve been wanting to update my bathroom for quite awhile now. We had already put down a different floor back in March 2014 (See that post on my personal blog) and I had put a new shower 
curtain on my Amazon birthday wish list for July of this year. It has been sitting in my closet waiting. Note: This curtain needs a  liner and I researched and found the coolest shower curtain hooks that allow you to leave the curtain on and just remove the liner for washing. These work great! I know because even though I’ve not finished my bathroom, I have hung the shower curtain for incentive. : )
The only thing I had left to do was replace the vanity and paint the walls. I knew what I wanted. I wanted to paint the walls a rather dark gray (but lighter than my floors). They are going to be Silver Liberty by Glidden. For the vanity, I wanted to use a vintage buffet and paint it a soft, buttery yellow. I am passionate about the chalk-type paint. If you follow my blog at all you know I have painted many items with Annie Sloan Chalk paint and love it. I had every intention of finding an old buffet and paintin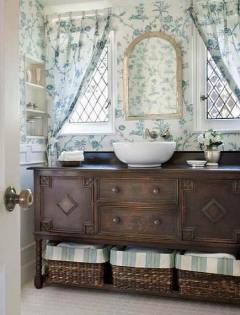 g it with Annie Sloan and adding a vessel sink.
Here is my inspiration photo – found when doing a Google Search for turning vintage buffets into bathroom vanities.
I found a buffet I fell in love with at a local flea market. Isn’t it beautiful?

I almost felt guilty painting over this refinished piece, but, upon closer inspection, there were some flaws and cracks in this one that we needed to repair so that made me feel better about painting over it.
It is very tall to use with a vessel sink, though, so we knew we would have to cut the legs off some. The way this one was made, that was easily done. The refinishing looked to be a linseed oil finish and I knew from experience using the chalk-type paint, I would need to give it a coat of shellac before painting to stop any oil bleed-through. I’ve also been told that oak has tannin and that might seep through if I didn’t shellac it first, so that’s what we did.
Here it is, repairs made and the shellac applied. I use the Zinsser Brand. It is fast drying and easy to apply. I actually applied it with a rag. My husband also cut out and reinforced the drawers to accommodate the plumbing.


We had purchased from IKEA (what I thought was a vessel sink) and had cut a hole for it. I realized, though, it wasn’t truly a vessel sink as it was unfinished on the back and made to attach to the wall. Darn! We took it back and I looked high and low for a shallow vessel sink reasonably priced. Most store fronts do not carry them in stock. Hoods had a good variety, though. Unfortunately, they were not shallow enough. I really needed no more than 3-4″ depth due to the height of the vanity. Otherwise, my husband and I might need a step stool to wash our hands. : ) We finally found what we were looking for on Amazon. The depth for this one is 4″.  Hopefully, we will be able to work around the hole we already made. I really liked this vessel sink as it came with the faucet. The faucet stand was also part of the sink like the original one was and I liked that.
Annie Sloan did not have the color yellow I was wanting, so I mixed several colors together and thought I had the color. I painted my mirror with it and hung it up, but the more I looked at it, the more I decided it was much too bright and was not feeling the love. : ) Then, we took a short trip and I discovered Missouri Limestone Paint Company. I fell in love with this paint and the colors. Right now they are featuring 27 different colors, too! We loved this paint so much, we now hold a franchise for selling it in our area. See our website: http://sharsumpaint.com or follow us on facebook.
 I decided I just wasn’t going to be able to live with the other color and purchased the yellow and a blue/green color for some nightstands I bought on the trip, too. The nightstands will have to wait for another day. : )
  You can see the difference in the two colors as I started repainting my mirror. The top color is the new paint. I absolutely loved working with this non-toxic chalk-type paint, which uses limestone as an additive! You’ll be hearing more about this company in a future blog, so stayed tuned!
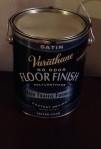
I also discovered, when researching how to finish a vanity in a bathroom, that waxing is not a good option. In my research I came upon a blog post from Painted Vintage that led me to finish my vanity with a water-based floor finish from Varathane! Another tip I learned from this blog was to sand between coats with a crumpled up paper bag! Really! It was a great idea!
Click on image to enlarge
This floor finish was awesome to work with and dried very quickly! I used a sponge brush to apply it. I did a practice board and after curing overnight, I tried in many ways to scratch it with a paint can opener. I finally was able to produce a few scratches, but it still didn’t penetrate to the wood underneath. I think this is going to be a very durable and water-resistant finish. I did have trouble finding it anywhere locally, but did finally find it on Amazon!
A little “just-saying” humorous note here: To give you an idea of how long it took to start and finish and finish the painting and final finish of this piece – I was able to paint two coats on the whole vanity (I had applied the first coat the night before) for a total of 3 coats of paint and applied two coats of floor finish over the whole vanity with a third coat on the top for even more protection, in the amount of time it took Congress to question Hillary Clinton. As one friend noted, “Maybe if Congress had hobbies, they could be more productive”. Sorry, but it just tickled me to realize this really illustrated just how quickly you can finish a project like this…in less than 10 hours. I love, love, love it!!!!

One of the most exciting parts of this project came when I started cleaning the drawer pulls and knobs. I figured they were brass plated or something, but when they came clean they were a lovely copper! I love them! I used a mixture of vinegar and salt and soaked them for several hours. That loosened some of the dirt. Then I used a toothbrush to scrub as much gunk away as I could. I used a toothpick to get into some of the smaller areas. I then tried a Mr. Clean Magic Eraser and Wow! That took the rest of it off. What a fun find!

Even using a thin coat of shellac, the old oak really soaked up the paint. I love how the grain of the wood still shows through, as you can really see in the drawers.

Now, it is onto painting the walls and waiting for the sink to arrive. Final pics will be posted as soon as that happens. The sink should be here no later than November 3. I can’t wait to finish this project.
Update: LOVE, LOVE, LOVE my bathroom! And to finish it off, see our Lowe’s Pull-down Shade hack. And what the heck….see how I crocheted my rug in front here!