Paint a Patio Chair Cushion with Chalk-type Paint? Yes, Please!

I was with a friend at dinner the other night and she was mentioning how faded and blah her patio chair cushions were.  She wondered if she could paint them with Missouri Limestone Chalk-type paint.  I said, “Sure you can!”  But then we both wondered if you would need to seal them and if so, what you should use.  I told her I’d check it all out and let her know.  I’m so glad I did, and you will be, too.

paintedcushion1

First, I did some research and here are my findings:

Painting Tips:

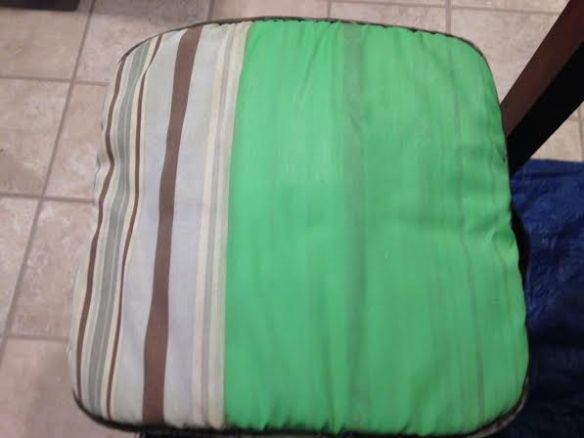
  1.  Give your cushions a good cleaning before you begin. My practice cushion, sad to say, had some of that green gunk on it.  I took a Mr. Clean sponge and wiped that stuff off and was good to go.
  2. The best tip I read when getting started: Before painting, take a spritzer bottle of water to dampen the cushion.  The paint goes on better and gets into the fabric better when the cushion is slightly damp.  I didn’t need to do that.  I just went outside and found an old cushion that had been left out and it had rained some earlier.  Perfect dampness!  Sometimes it pays to be lazy!
  3. Some people took their cushion covers off (if able to remove) and used cardboard between the covers so paint wouldn’t bleed through.  My thought on this:  If your cushions were so bad you were thinking of throwing them out before you decided to paint them, then just leave those covers on.  Who cares if the pillow underneath gets paint on it?  Save yourself some time and energy.
  4. I noticed when I painted my striped cushion, you were able to see the faint stripe underneath.  I also needed to spread it out a little while painting to get into the nooks and crannies. I also noticed my brush bristles went right up to the cording on the sides.  On this pillow, the cording seemed to be a plastic type material and looked ok, so I just left it like it was.  I painted a second coat in one area, but still saw the faint stripe.  So, my conclusion on that was:  That stripe was kind of cool.  It gave the pillow a look I liked.  Why waste paint and time and cover it all up.  Patterns are good under a coat of paint.  In fact, they are very, very good.
  5. I saw some people added stencil designs to their pillows and some used painters tape and painted their own stripes in coordinating colors.

Finishing Tips:

  1. You don’t want to wax….my friend’s cushions are on a screened-in porch, but it does get hot out there.  We wouldn’t want to sit on those cushions on a hot summer day and have wax come off on our clothes….so no waxing outside….on any project.  The sun and the heat will cure your chalk-type paint projects.
  2. Some suggested sealing with a poly of some kind, some did not.  I would guess it would all depend how much they are left out in the elements.
  3. My finishing tip?  Don’t bother.  I’ll explain why below.

What a difference a little chalk-type paint makes, right?  It literally took me just seconds to paint the area I painted as the paint covered so well.  But then came the question of sealing.

I let the cushion dry for several hours and then tried an experiment.  I put a poly sealer on half of the cushion and let the other half stay as it was. My thought was the poly would not only give it more protection, it would make the cushion easy to wipe off.

After the poly dried well, I took a wet cloth and scrubbed it really hard.  No paint came off on the rag, and it was easy to scrub, so I thought that was very nice.  Then, I took a wet rag and scrubbed the area that just had paint. I scrubbed and scrubbed.  Guess what?  No paint came off that area, either.  It was easy to scrub and actually, except for the slight sheen of the poly area, you really couldn’t tell any difference.

Bottom line…..don’t bother sealing.  Bring your cushions in to protect them like you did when they were new (as you can tell from the beginning of this post – I tend to leave mine out in the elements at times) and your newly painted cushions should last the summer, at least.  I personally believe the heat of the summer will make the paint cure even more and they will last a good long while.  If they don’t, just paint them again next year.

I’m so glad I did my research and experiments.  I, too, have a set of patio chair cushions that I’m going to paint……now my biggest problem is choosing a color!


Christmas Mystery Gifts

Update:  Scroll to the bottom to see a completed Mystery Gift!

We were shopping in Kohl’s last week and Danny spotted an item that we could do!  It was a shutter painted and prettied up and is used for displaying Christmas cards and/or photos.  So, off to the resale/flea markets we went!  We found exactly what we were looking for in the first flea market we visited.  That doesn’t happen often!

We now had what we needed (except for prettied up part, but that will come later) to make some great Christmas gifts for 6 lucky family members and friends.  LOL

We decided to make a contest out of it for our facebook page.  It took less than an hour after posting the contest for someone to guess what Danny was making and to win it!  molimestonepaint_ruralamericaThe winner will receive a 6 oz. jar of “Rural America” the color we used on the shutters.

Here’s Danny working on the mystery Christmas gifts.  You’ll notice that with chalk-based paint you can paint anywhere without worries…..even in a remodeled basement!  We will dry brush distress the shutters with “Sunday Silver” and will post a photo of the finished projects when complete.

mysterychristmasgifts

Good job, Danny!  Love the one that is now hanging on our wall.  ; )

shuttercardholder1

Do You Need a Project to Paint?

Do you need a project to paint? Gift Emporium & CAFE’ has unfinished decorative birdhouses for sale. I just painted and waxed one in the color “Trading Post” and it painted beautifully in just one coat. This one is going to Gift Emporium & CAFE’ as part of the paint display, but if you would want to buy it already painted, I’m sure Michelle would sell it to you. : )

birdhouse

Gift Emporium in Sullivan is Carrying our paint now!

Gift Emporium & CAFE’  – 228 South Highway 185 – Sullivan, MO  63080

is now carrying SharSum Paint’s chalk-based paint from Missouri Limestone Paint Company. Be sure to stop by Gift Emporium to see the beautiful display of paint Michelle created (right by the font door) and purchase a jar or two or three. : )

display_GiftEmporium_Sullivan

We guarantee you will love it! Missouri Limestone Paint strives to keep prices reasonable and we want others to enjoy painting with chalk-based paint at a price we all can afford, so a 6 oz. jar is only $5.99 and a pint jar is just $15.99. The color chart is available there and we can order even more awesome colors. Just let Michelle know what other colors you’d like to see. BriWax and a paint starter kit are also available for purchase. Be sure to enter our contest on our SharSum Paint facebook page, if you haven’t yet, to win a 6 oz. jar of paint. You must Like our page and tell us whose pic is on the profile. : ) You also must be able to pick up your prize if you win. Contest ends when we have 200 Likes. Thanks!

If you would take our Interest Survey (see the menu on our website) and let us know the color choices you’d like to see, we can make sure we stock popular colors.

We will be scheduling some Make and Take classes soon, so watch our Facebook page and our website at http://sharsumpaint.com for upcoming classes.

Be sure to click on the link on the upper right of this page to follow our blog to keep updated on what is happening next with SharSum Paint.  We hope to make the paint available in several counties surrounding Sullivan soon.  In the meantime, check out Gift Emporium and CAFE’ and our paint display there!

Kerr Canning Jar Vase

givethanks_fallOne more project tonight.  I was on a roll today finding projects to paint and re-purposing things from around my house. This one only cost me $.99 and that was for the fall font.

Silhouette fall font – purchased from Silhouette store for $.99.  Re-designed the letters on my Silhouette Portrait machine and printed on brown contact paper.  Yes.  I have one of those, too.  I make a lot of projects with my Silhouette machine.  I love that thing!

Ribbon – from a stash I kept when making bows for my grand daughter, which she basically never wore.  She hasn’t ever liked bows.  But I saved the left overs.  Remember, I’m a teacher.  We don’t discard.

Chalkboard – you will recognize it from the project I made earlier today.  Just erased one message and added a new one.

Pumpkin with air plant – bought that from a Vintage Market earlier this month.  The other side is a jack-o-lantern!

Flowers – Stole those out of an ancient arrangement I had.  I may need to re-arrange that one a little to disguise the holes I left.

Kerr Canning Jar – bought for Young Living Sugar Scrub.  Yes, I like  essential oils, too! I gave this jar two coats of off white chalk-based paint I had left over from other projects.  It was a little thick, so just added a bit of water and it was fine.  Then I sanded the jar a bit with 220 sandpaper and added the fall letters. I tied a ribbon around it, stuck in the flowers, made a vignette with my chalkboard, pumpkin and jar— and there you have it!  A beautiful fall arrangement. Don’t you agree?

Chalkboard from a Cabinet Door

I was looking for ideas for class projects using chalk-based paint that is so popular.  I had to look no further than Pinterest and my basement. Pinterest sparked the idea that I could paint a cabinet door.  I happened to have 6 of them in my basement.  Don’t ask. I’m a former classroom teacher.  I save things.  You never know when you will need them.  And, see….I needed a cabinet door. The upside down copper drawer pull was a left over from our kitchen remodel.  I didn’t miscount.  I realized later the way two drawers were installed, drawer pulls on either one wouldn’t allow the other drawer to open. Hmmm.  Twenty-nine years in this house when we did the makeover last year and I never noticed this before.  But, then, I never had drawer pulls on my kitchen drawers before.  Click here for a peek at our kitchen makeover.

I will say that a chalkboard idea might be better using chalkboard paint rather than chalk-based paint, but I didn’t have that so I thought I’d give my Missouri Limestone Paint a try.  It worked just fine, thank you!  And, with grandkids, I just happened to have a fat piece of chalk.

So, with no expense, and using left over Missouri Limestone Paint in the colors of “Homemade Ice Cream” and “Something Blue”, missourilimestonepaint_chalkboardI have a nifty little chalkboard sign for a kitchen or entryway or wherever you’d like to put it, and to show my “students” when I teach my classes.

Chalk-based paint is definitely not just for furniture.  See my Chalk Paint Project Pinterest Board for more class project ideas I’ve been collecting.  Of course, I added this great idea – can’t lose it! I can’t wait to make some more example pieces!

Class Project Ideas

I have been gathering chalk-based paint project ideas on Pinterest that I think would be fun things to do in our classes.  Check these out!  Start gathering items now to paint in class.

Vintage Buffet to Bathroom Vanity Using Chalk-Type Paint

I’ve been wanting to update my bathroom for quite awhile now.  We had already put down a different floor back in March 2014 (See that post on my personal blog) and I had put a new shower vanity_curtain
curtain
on my Amazon birthday wish list for July of this year.  It has been sitting in my closet waiting.  Note:  This curtain needs a vanity-showerhooks
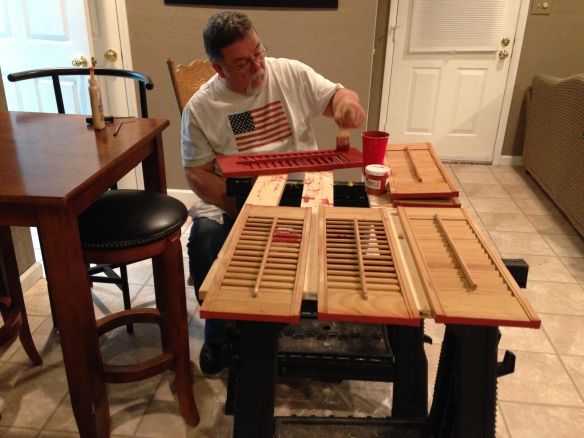
liner and I researched and found the coolest shower curtain hooks that allow you to leave the curtain on and just remove the liner for washing. These work great! I know because even though I’ve not finished my bathroom, I have hung the shower curtain for incentive.  : )

The only thing I had left to do was replace the vanity and paint the walls.  I knew what I wanted.  I wanted to paint the walls a rather dark gray (but lighter than my floors).  They are going to be Silver Liberty by Glidden.  For the vanity, I wanted to use a vintage buffet and paint it a soft, buttery yellow.  I am passionate about the chalk-type paint.  If you follow my blog at all you know I have painted many items with Annie Sloan Chalk paint and love it.  I had every intention of finding an old buffet and paintinvanityinspiration
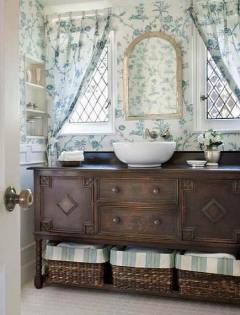
g it with Annie Sloan and adding a vessel sink.

Here is my inspiration photo – found when doing a Google Search for turning vintage buffets into bathroom vanities.

I found a buffet I fell in love with at a local flea market.  Isn’t it beautiful?

vanityoriginal

I almost felt guilty painting over this refinished piece, but, upon closer inspection, there were some flaws and cracks in this one that we needed to repair so that made me feel better about painting over it.

It is very tall to use with a vessel sink, though, so we knew we would have to cut the legs off some.  The way this one was made, that was easily done.  The refinishing looked to be a linseed oil finish and I knew from experience using the chalk-type paint, I would need to give it a coat of shellac before painting to stop any oil bleed-through.  I’ve also been told that oak has tannin and that might seep through if I didn’t shellac it first, so that’s what we did.

Here it is, repairs made and the shellac applied.  I use the Zinsser Brand.  It is fast drying and easy to apply.  I actually applied it with a rag.  My husband also cut out and reinforced the drawers to accommodate the plumbing.

vanity_readyforpaint

vanitydrawers

We had purchased from IKEA (what I thought was a vessel sink) and had cut a hole for it.  I realized, though, it wasn’t truly a vessel sink as it was unfinished on the back and made to attach to the wall. Darn!  We took it back and I looked high and low for a shallow vessel sink reasonably priced.  Most store fronts do not carry them in stock.  Hoods had a good variety, though.  Unfortunately, they were not shallow enough.  I really needed no more than 3-4″ depth due to the height of the vanity.  Otherwise, my husband and I might need a step stool to wash our hands.  : )  We finally found what we were looking for on Amazon.  The depth for this one is 4″.   vanitysinkHopefully, we will be able to work around the hole we already made.  I really liked this vessel sink as it came with the faucet.  The faucet stand was also part of the sink like the original one was and I liked that.

Annie Sloan did not have the color yellow I was wanting, so I mixed several colors together and thought I had the color.  I painted my mirror with it and hung it up, but the more I looked at it, the more I decided it was much too bright and was not feeling the love.  : )  Then, we took a short trip and I discovered Missouri Limestone Paint Company.  I fell in love with this paint and the colors.  Right now they are featuring 27 different colors, too!  We loved this paint so much, we now hold a franchise for selling it in our area.  See our website:  http://sharsumpaint.com or follow us on facebook.

vanitypaint I decided I just wasn’t going to be able to live with the other color and purchased the yellow and a blue/green color for some nightstands I bought on the trip, too.  The nightstands will have to wait for another day.  : )  vanitymirrorYou can see the difference in the two colors as I started repainting my mirror.  The top color is the new paint.  I absolutely loved working with this non-toxic chalk-type paint, which uses limestone as an additive!  You’ll be hearing more about this company in a future blog, so stayed tuned!

I also discovered, when researching how to finish a vanity in a bathroom, that waxing is not a good option.  In my research I came upon a blog post from Painted Vintage that led me to finish my vanity with a water-based floor finish from Varathane!  Another tip I learned from this blog was to sand between coats with a crumpled up paper bag!  Really!  It was a great idea!

Click on image to enlarge

Click on image to enlarge

This floor finish was awesome to work with and dried very quickly!  I used a sponge brush to apply it.  I did a practice board and after curing overnight, I tried in many ways to scratch it with a paint can opener.  I finally was able to produce a few scratches, but it still didn’t penetrate to the wood underneath.  I think this is going to be a very durable and water-resistant finish.  I did have trouble finding it anywhere locally, but did finally find it on Amazon!

A little “just-saying” humorous note here:  To give you an idea of how long it took to start and finish and finish the painting and final finish of this piece – I was able to paint two coats on the whole vanity (I had applied the first coat the night before) for a total of 3 coats of paint and applied two coats of floor finish over the whole vanity with a third coat on the top for even more protection, in the amount of time it took Congress to question Hillary Clinton.  As one friend noted, “Maybe if Congress had hobbies, they could be more productive”.  Sorry, but it just tickled me to realize this really illustrated just how quickly you can finish a project like this…in less than 10 hours.  I love, love, love it!!!!

vanitycomplete

One of the most exciting parts of this project came when I started cleaning the drawer pulls and knobs.  I figured they were brass plated or something, but when they came clean they were a lovely copper! I love them!  I used a mixture of vinegar and salt and soaked them for several hours.  That loosened some of the dirt. Then I used a toothbrush to scrub as much gunk away as I could.  I used a toothpick to get into some of the smaller areas.  I then tried a Mr. Clean Magic Eraser and Wow!  That took the rest of it off.  What a fun find!

vanitydrawerpulls

Even using a thin coat of shellac, the old oak really soaked up the paint.  I love how the grain of the wood still shows through, as you can really see in the drawers.

vintage_drawersfinal

Now, it is onto painting the walls and waiting for the sink to arrive.  Final pics will be posted as soon as that happens.  The sink should be here no later than November 3.  I can’t wait to finish this project.

Update:  LOVE, LOVE, LOVE my bathroom! And to finish it off, see our Lowe’s Pull-down Shade hack. And what the heck….see how I crocheted my rug in front here!

bathroom2.jpg


Ben’s Baseball Dresser – Another Chalk Paint Project

I created this project September 2014

Pinterest inspiration, an old chest (I estimate $25 as I purchased a dresser and night stand at the same time – all for $75), Annie Sloan Old White paint, sharpies, clear wax, and one afternoon turned an old dresser into a new one for Ben’s room.  At first I tried red paint for the stitching….whoa!  That didn’t work.  So more Annie Sloan Old White over the red paint (good thing I hadn’t done too much).   Continue reading

Wedding Invite on Canvas – Using a Silhouette Machine and Annie Sloan Paint

I created this project in July 2014.

Standard

Wedding Invite on Canvas W/SilhouetteI love my Silhouette Portrait machine and all it can do. I scanned Katie and Richard’s wedding invitation and saved it as a jpg. Then I put the image into my Silhouette software and traced it. I copied and pasted each section into a new design, making sure I welded the lettering. I then turned each section sideways and enlarged them to fit on a large stretched canvas. I cut each section using contact paper.

Next I painted the canvas with Old White Annie Sloan chalk paint. I applied the contact paper lettering and painted over everything in Old white again. This is to make sure there is no bleed through with the final color.

Once dry, I used Annie Sloan Graphite and when that dried, I peeled off the contact paper lettering. As a final step I will add a coat of Annie Sloan clear wax and now Katie and Richard will have a large vintage look wall hanging with the exact fonts from their wedding invitation.

I’m still amazed that you can trace and cut lettering from an image with the Silhouette. 20140706-125426-46466661.jpg

Continue reading