My experiment kind of worked, but I think it would have worked better if I had used a glue stick or a decoupage medium, but I didn’t have a glue stick. I decided to give it a try on this little Dollar Tree photo frame. I painted the front of the flower with our paint brand Missouri Limestone Paint Company chalk-style paint, color “January” first to help make the print of my napkin stand out. I think the napkin I used was also from Dollar Tree.
DO NOT DO THIS! Instead of the glue stick I, unfortunately, used Dollar Tree spray adhesive. I should have known better. I haven’t found it to work on anything I’ve tried. I think it got the paper too damp and I had to keep relighting it as my fire would go out almost immediately.
The lady in the video showed using this technique on several cut out letters. I think her technique worked great on them.
One more time….decoupage with fire
I salvaged my project, though I needed to sand the edges. I had no idea what to do with the little Dollar Tree photo frame, but then decided to turn it into a pin cushion. It’s kind of cute and functional, too!
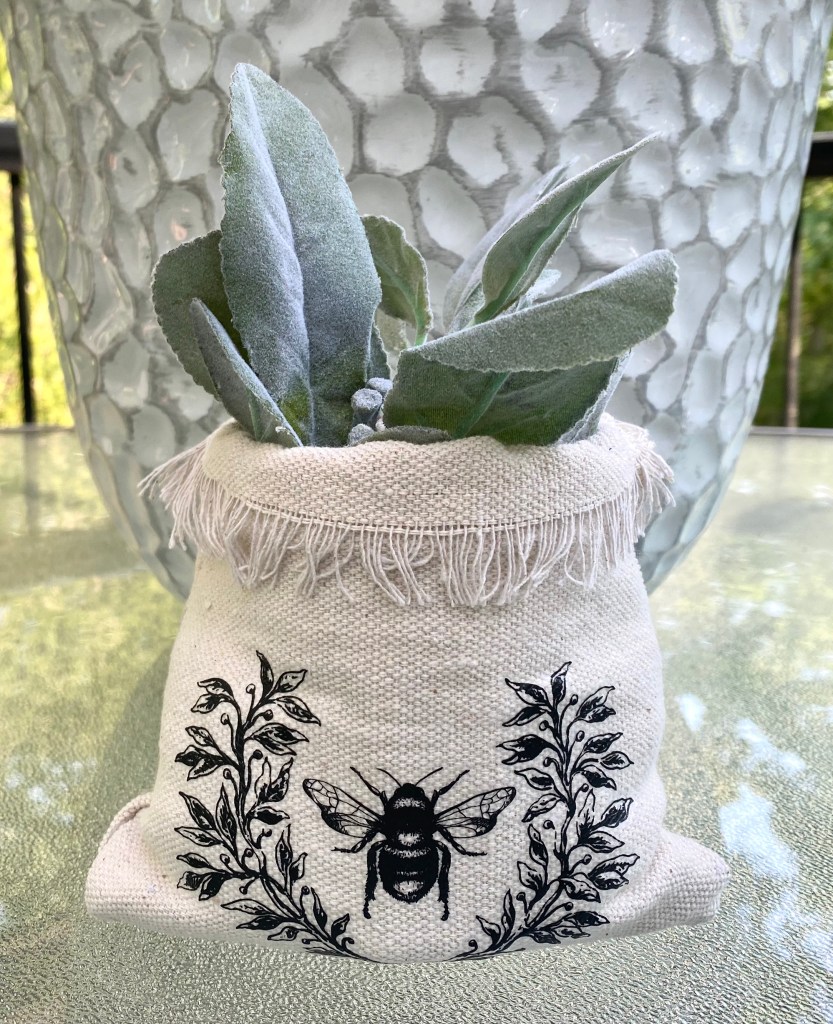
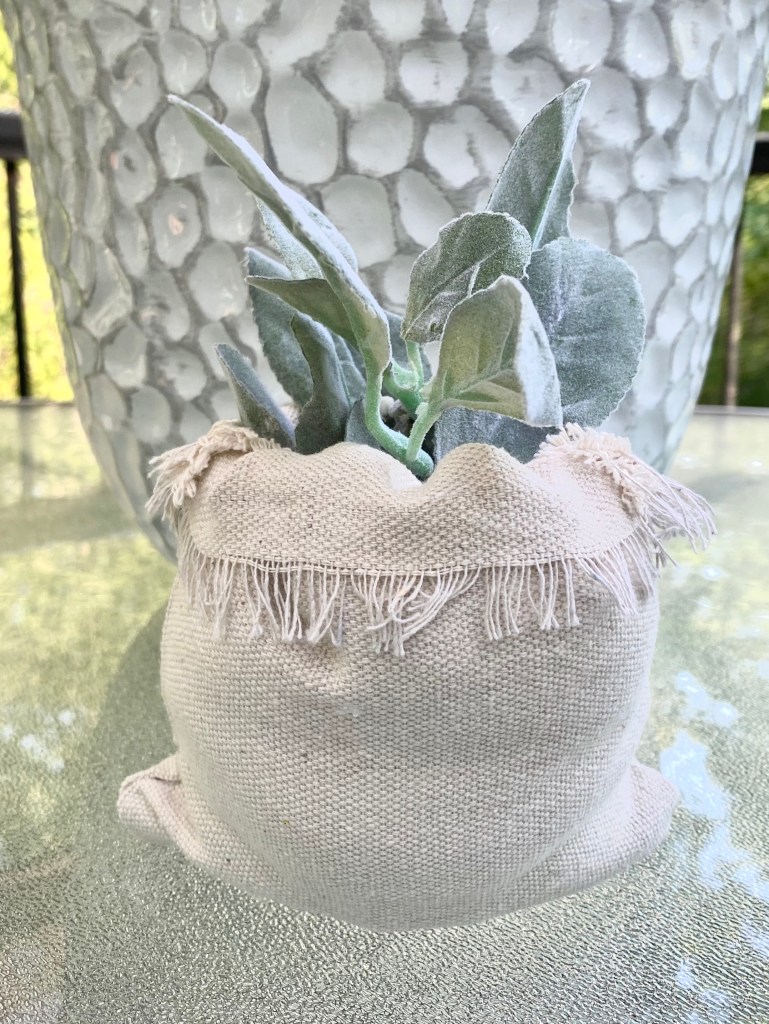
I used a left over piece of Redesign with Prima transfer this morning on a little “bag” vase I made with painters drop cloth. (6” w x 8” h with the faux lambs ear plant added)
I hot glued the sides and bottom of the drop cloth to make the bag and turned it inside out. I took out strings along the top for the fringe. And stuffed any extra fabric inside the jar. I added a jam jar I had and a sprig of lamb’s ear from Walmart.
I then added a bit of stuffing along the sides and back (a trick I learned from a video) to make it look more like a slouchy bag. I didn’t add any under the transfer side as I wanted the transfer to stand out.
I decided not to seal the transfer as I burnished it into the cloth really well and it won’t be handled much.
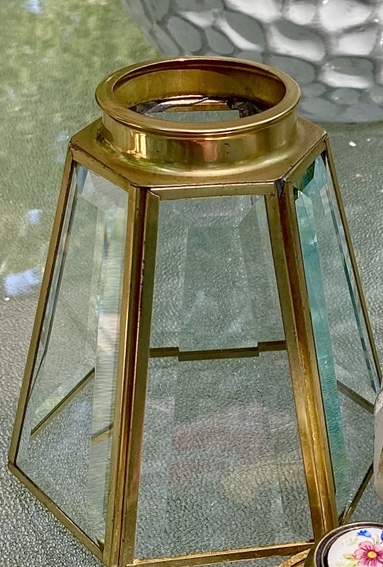
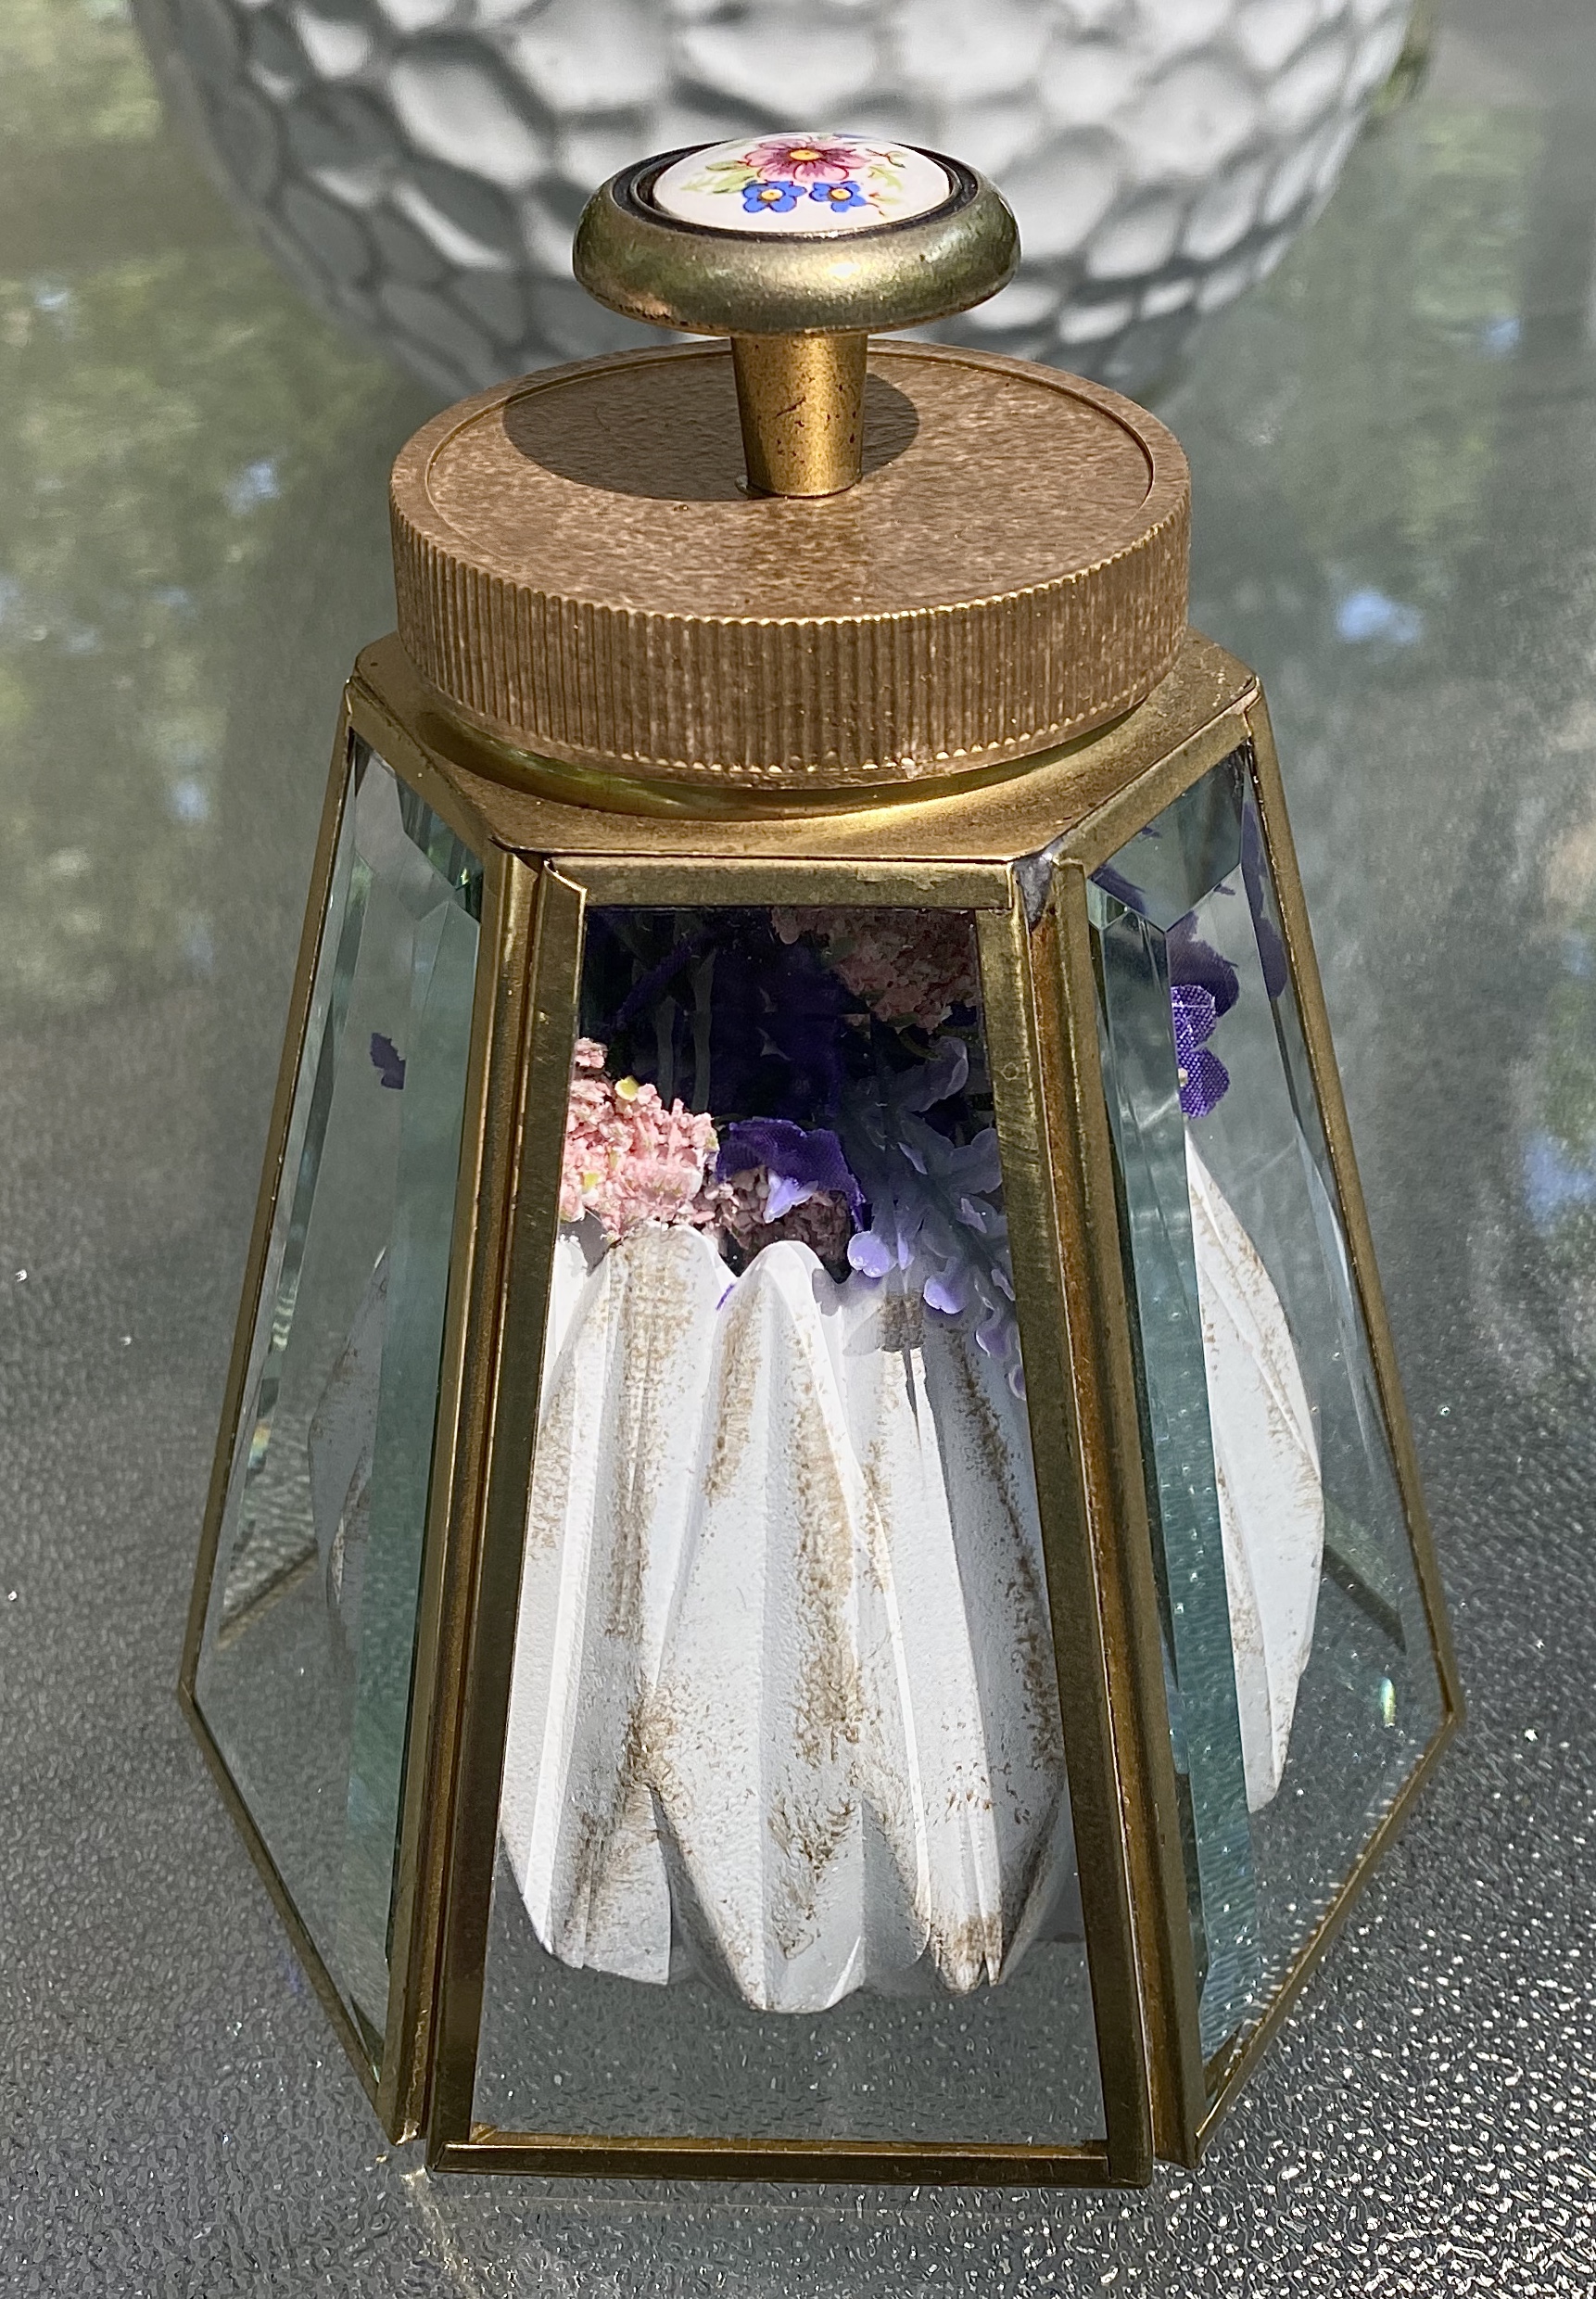
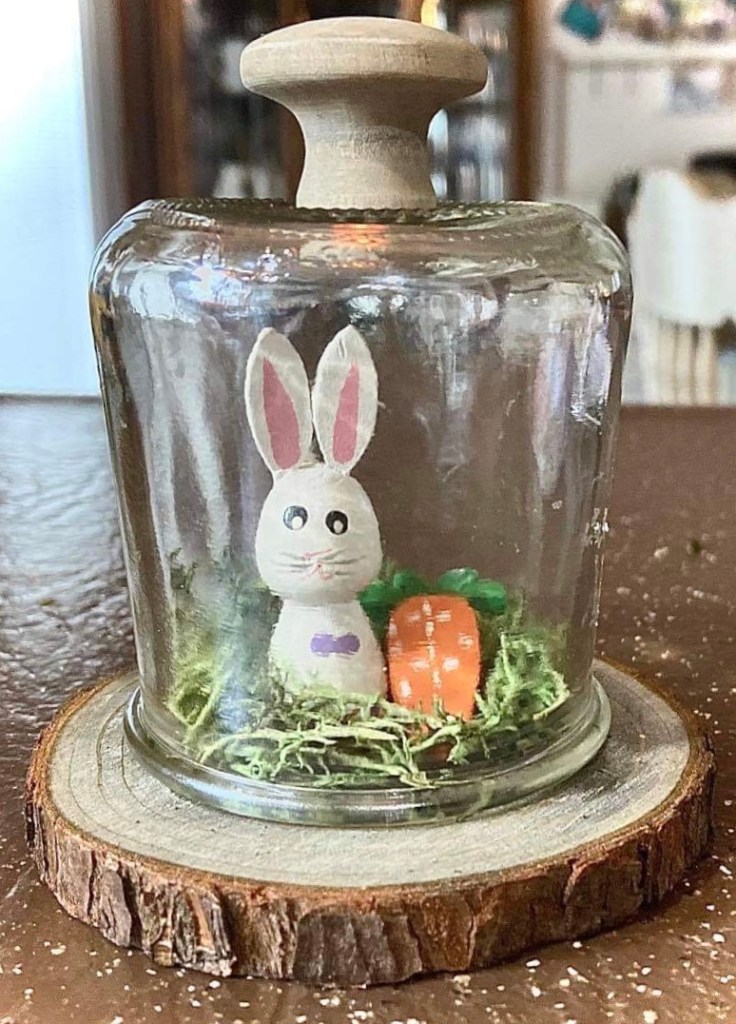
I decided I would go shopping in my basement this morning. I found some treasures, so I created a little cloche covering a pot of flowers.
1) I had a shade from a fan light. The beveled glass in it is beautiful. I left it metallic gold because I’ve been seeing metallic gold trending lately.
2) I also had this little white tea light holder so I gave it a little metallic gold paint here and there (just like Pottery Barn would) and added a few faux flowers.
3) I had a plastic lid that fit perfectly on the shade, but it was white, so I painted it a metallic gold to match.
4) The lid needed a knob to lift the cloche, so I found the perfect knob in my collection that coordinated with the flowers. I super glued it to the lid then super glued the lid to the shade.
And there you have it…my Pottery Barn inspired cloche and pot. Place the cloche over the pot of flowers, or if you don’t want to display flowers, just remove them and add a battery operated tea light or votive. I wouldn’t use a real candle since this is enclosed and the lid is a plastic.
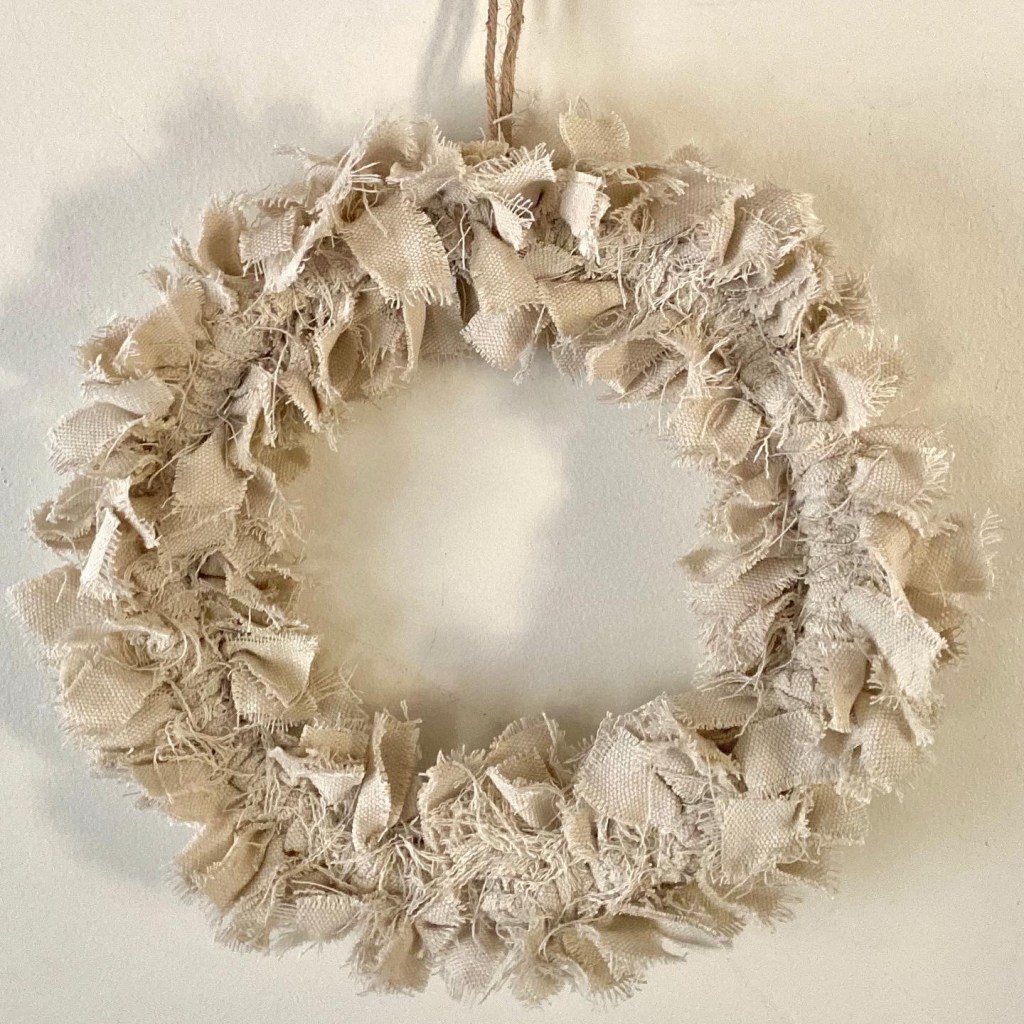
Our microwave quit working. We got rid of it, but not before I salvaged the plastic ring with rollers that goes under the glass plate.
Ok. I saved the glass plate, too. I’m sure it will become a project at some point.
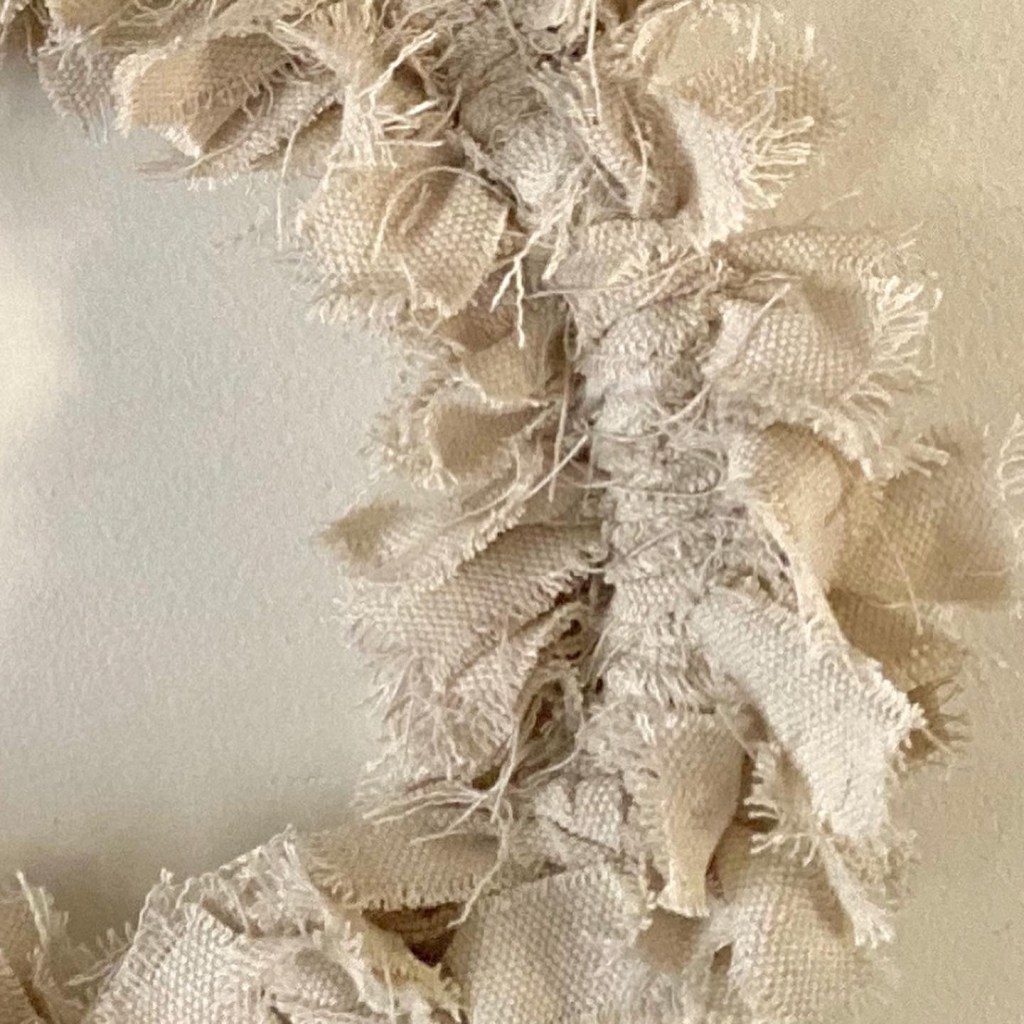
Yesterday, I had an idea for the ring.. 💡 I used it as a frame for a wreath!
I cut the little rollers off and cut strips of drop cloth about 6” long. I tied each strip onto the frame, fraying them as I tied. I pushed them together as tight as possible.
It made a 12” wreath.
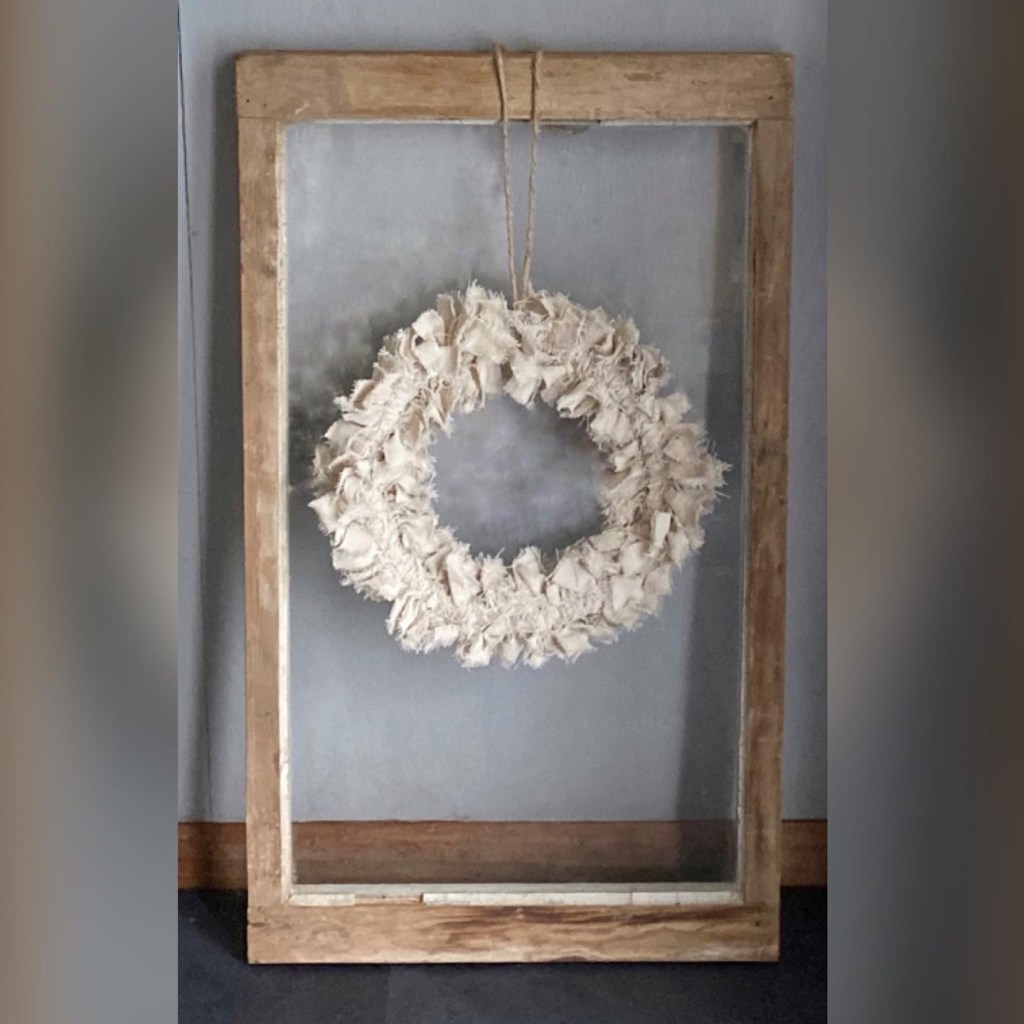
I love it hanging from a vintage window I have. Sorry about the pics. It is rainy and overcast today and I was having trouble with the reflection in the window glass. I smudged out my reflection as best I could (you’re welcome), but hopefully you can see how pretty it is anyway.
I’m on a kick of creating early morning projects lately. Today’s came to me out of the blue, thinking of supplies I had on hand. I love when inspiration strikes and what’s in my mind actually works out!
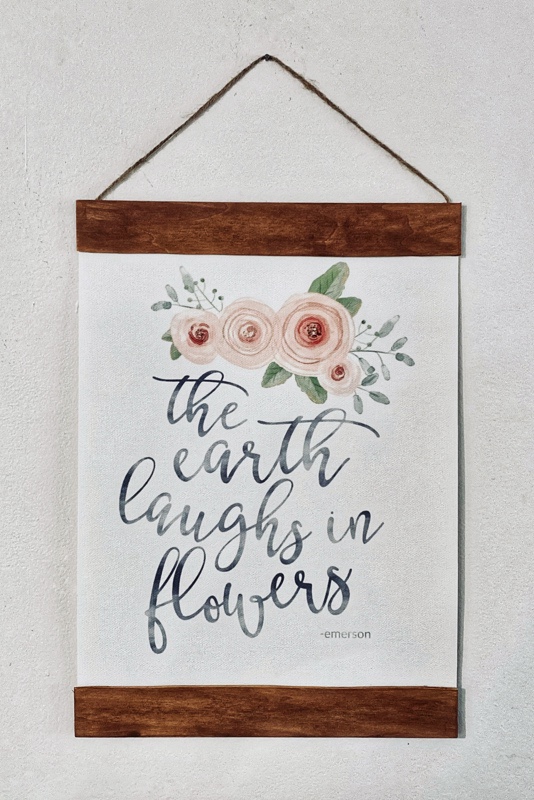
However, it should actually say “The earth laughs in snow in Missouri in late April.” Missourians all over hurriedly covered budding plants the last few days in preparation for the snow and freezing temperatures. So this image made me feel better at looking at snow in my yard still today.
Step 1: I had a couple of sheets left of this stiff canvas paper I bought several years ago. I knew I wanted to print an 8×10” sign out on it. I did a search for you and found, at this time, you can purchase the canvas and water color combo for a good price on this site on eBay. It isn’t easy to find, but I’m sure you can find it or something similar other places, too. This Printworks brand I used is made for ink jet printers.
Step 2: Next I went in search of an image to print on my canvas paper. I found the perfect free image on this amazing blog “Harbour Breeze Home”. Thank you so much for sharing. It printed out perfectly on my canvas paper. It looks like it is a water color painting on canvas!
Step 3:
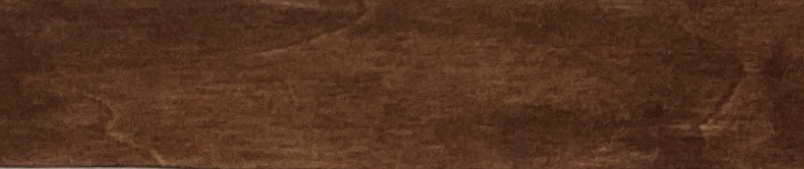
I made the wooden slats for the top and bottom by cutting a balsa wood slat from Hobby Lobby to size (with scissors), sanded, and then stained it with the brand of chalk-style paint we produce “Missouri Limestone Paint Company” paint. I added a bit of water to “River Bottom Dirt”, painted it on, then wiped it down with a paper towel. This really helped enhance the grain in the wood.
Step 4:
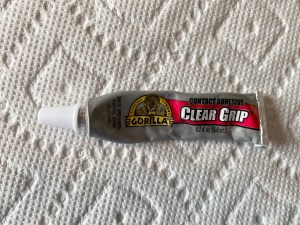
I then used Gorilla Glue Clear Grip to glue the paper onto the slats and the jute rope for hanging.
And there it is …. hanging on my wall next to another DIY I did, using a Oui Yogurt jar, a macrame hanger and a banana stand. But that’s another project! 🙂
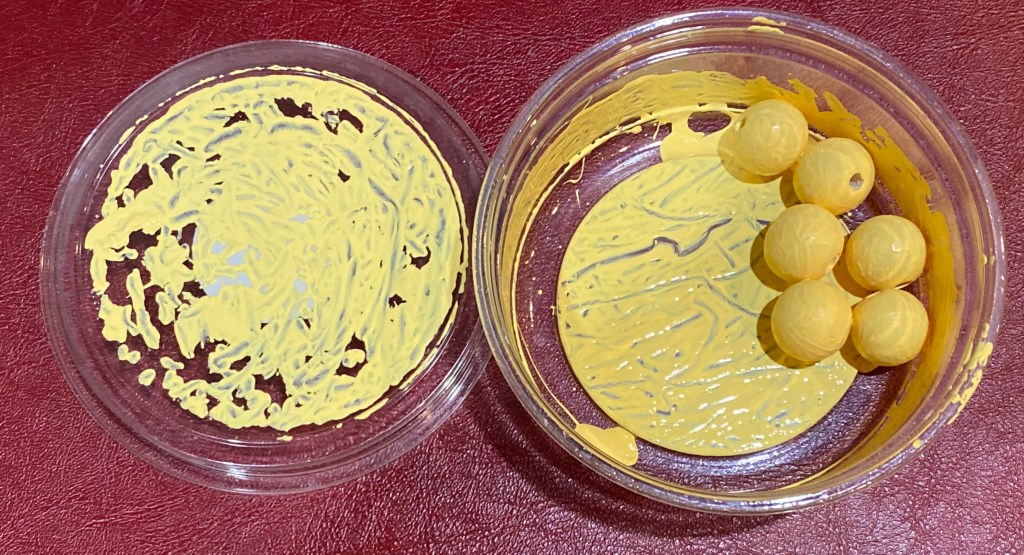
I searched and found an easy way to paint wooden beads that worked for me.
I also used our brand of chalk style paint, Missouri Limestone Paint Company which we produce for our small business. In this project I used the colors “Field Corn” and “Coal Shovel”.
I used two of the little throw away plastic containers that come with some of my Home Chef meals. I wash them out and store them away to use as needed. But any little container with a lid would work. I choose to use ones you can throw away after use. Who wants to wash out paint containers?
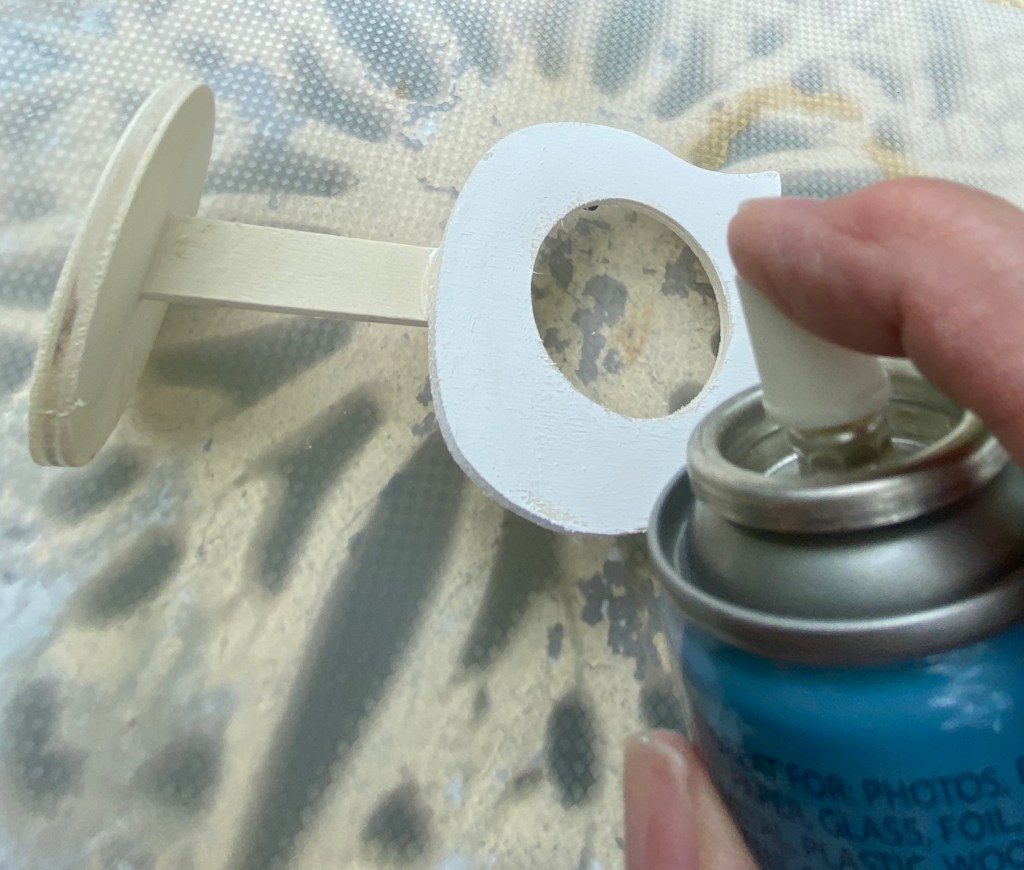
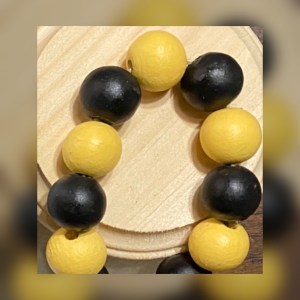
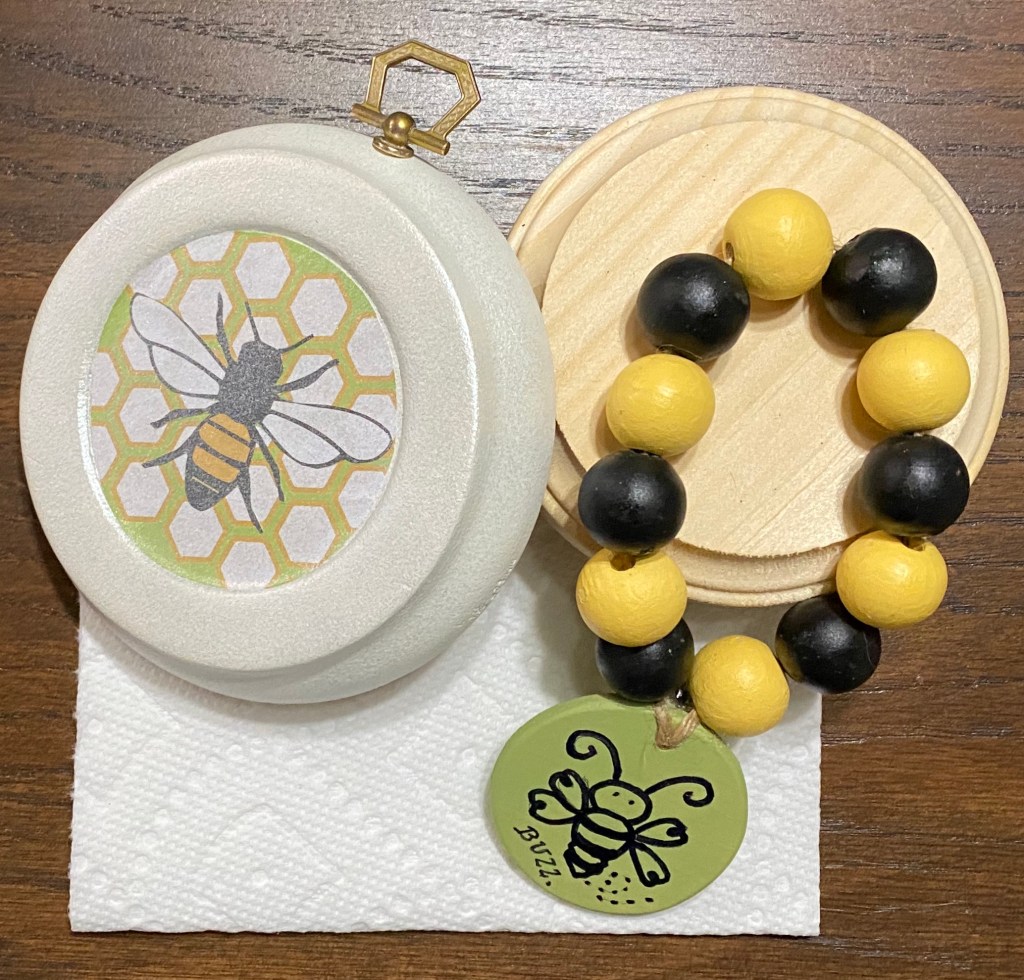
My first project was to make a small “bee” garland, so I wanted yellow and black beads.
I poured a little yellow paint into one of the containers and added the beads. I put the lid on securely, the shook and rolled the beads around inside.
I then threaded the beads onto a bamboo skewer from Dollar Tree. I took a small artist brush and smoothed the paint out a bit and then, holding them on the skewer, I made sure they were separated.
I held them with one hand and with the other, I used a hair dryer to dry them, turning the skewer as I dried them. This took just a few minutes. I alternated between heat and air drying.
I then sealed them by spraying them with Mod Podge matte sealer, holding the skewer and turning it as I sprayed. I dried them again with the hair dryer.
I did the same with the black beads.
And here is my finished project, shown with another project I made. I have enough beads painted to make another.
Update: I’ve added quite a few ideas for Oui jar upcycling.
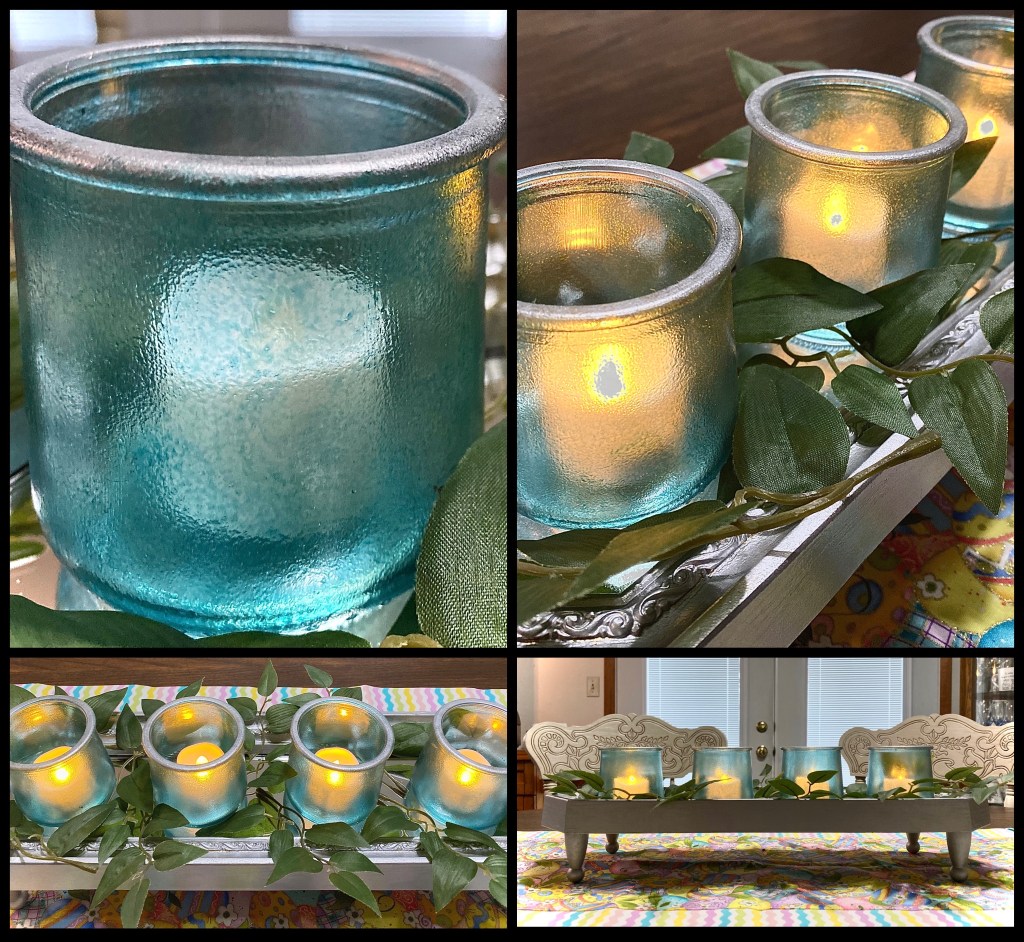
When a friend contacted me to see if I would like a large bag of Oui yogurt jars, I jumped at the offer. I’d been seeing many different ideas on using them for projects. Better yet, she had already cleaned them and…..she delivered! I couldn’t wait to try adding a transparent color to them!
I am a crafter who likes quick results but still want to produce a quality product as I usually sell my creations. Except this one. The final result reminds me of depression glass and is so beautiful! I loved my project so much I kept it for myself. 😌 I do have more jars, though. 😏
My friend’s jars were already cleaned, but I have read that it can be a little difficult to remove the label and the glue around where the foil lid was. Some have found soaking them for 30 minutes worked. Others report using Goo Gone, and an emery board on the lip will remove stubborn glue there.
I had watched some tutorials that just seemed too time consuming or I know wouldn’t work for me (coloring the inside of the jar, or spray paint, or painting it on are a few techniques that come to mind.)
I have painted glass with a special technique and baked it before with excellent results, but I have also skipped the baking and used what I call my magic finishing spray and the finish becomes as hard as rock and passes the scratch test even before curing. My magic spray is shown in the photo above: Mod Podge Pearlized Sealer. I usually purchase mine on Amazon. It is hard to find in craft stores.
This technique I’m using here has worked for me so well when using chalk style paint on glass (and metal) I thought it should work well with Mod Podge and food coloring. And it did!!!
If your jars are free of glue and have been washed thoroughly, it is time to create some faux depression glass! Here are the supplies I used:
I also used a hair dryer with this technique and some metallic silver paint
Step 1: Wipe down your clean jar with alcohol to make sure there are no oils on it. Try not to touch the surface of the jar with just your fingers now. Use a paper towel to pick it up.
Step 2: I used the dishwasher safe Mod Podge. Again, I usually purchase from Amazon because I’m not close to big craft stores, but this is normally available there. I do not use this type because I think these will be dishwasher safe afterwards. I don’t. I’m not recommending washing them at all. Dust them or use a damp cloth, but avoid hand washing even. These also are used for decoration only, in my opinion, not for food. I use it because it is glossy and I think not as thick or sticky as regular Mod Podge. Any glossy should work, though. As you can see it looks rather opaque, but trust me the glossy dries clear. Matte will not.
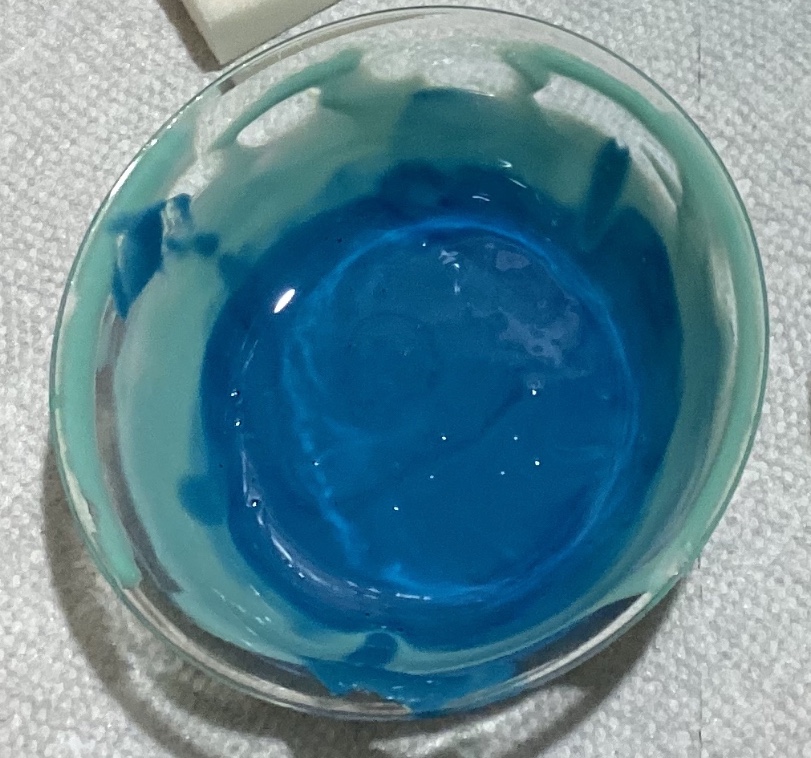
Mix your Mod Podge and food coloring. This is tricky because as you can see the color I mixed looks nothing like the jar does when dry. It is a little trial and error. I was going for the look of the teal colored vintage insulators. In the photo I realized I had to much green at first so I added more blue. This color ended up being perfect.
So…. I would suggest you try a couple of tablespoons of Mod Podge and about 4 drops of blue food color. You might not even need any green.
Step 3: I wrapped my hand in a paper towel and put my 4 fingers inside the jar. The reason for doing this is that the paper towel and my fingers made a snug fit and the jar didn’t move on me. Also, it kept my hand from getting too hot when I used the blow dryer to dry my coat of Mod Podge/food color combo.
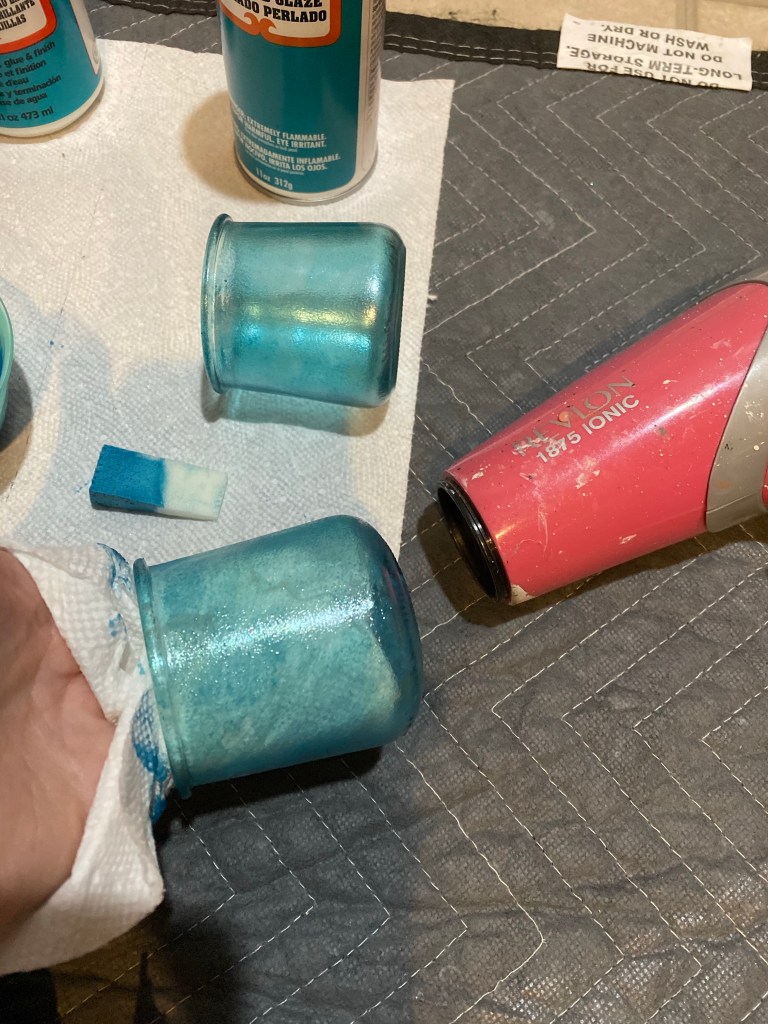
My trick to get a really neat texture on glass is to daub on what you are applying onto the surface with a makeup sponge (like you are stenciling.) I buy these at Dollar Tree. Best of all, I just throw them away when finished. I just daubed the mixture all around, turning my hand to reach all the jar sides. Don’t worry about the lip. I later daubed some metallic silver on it.
Step 4: I mentioned I was an impatient crafter, so a hair dryer is my best friend. I made passes of heat and shots of cool air, finishing with the cool air and not getting too close to the jar, until I felt it was dry enough to do a second coat. It will be a bit tacky, but that’s ok. (I’m just showing the hair dryer here. I couldn’t take a pic and dry at the same time, so I’m not really drying that close!)
I then applied a 2nd coat. You can see the 2nd coat makes it a bit darker when applying, but once dry you can really see the difference.
Step 5: Use the hair dryer again, getting it as dry as possible. I admit, I rushed it a bit. It was still a bit tacky. But, truthfully, I think Mod Podge always stays a bit tacky. 🤷🏼♀️ You could wait awhile to see if it goes away, or you could be impatient like me and move on to sealing it. 😬
Step 6: Now is the time to seal your jar. I missed taking a photo of this step but I basically turned the jar upside down on a piece of plastic, and sprayed all around with the Mod Podge Pearlized Glaze sealer. Again, don’t worry about the rim. I recommend wearing a mask for this step and have good ventilation. It doesn’t take long for this to dry to the touch. Just a couple of minutes. But then I used the hair dryer on it, too. After about 15 minutes, lightly try the scratch test. Hopefully, you will not get any scratch marks. And it will continue to cure and get harder.
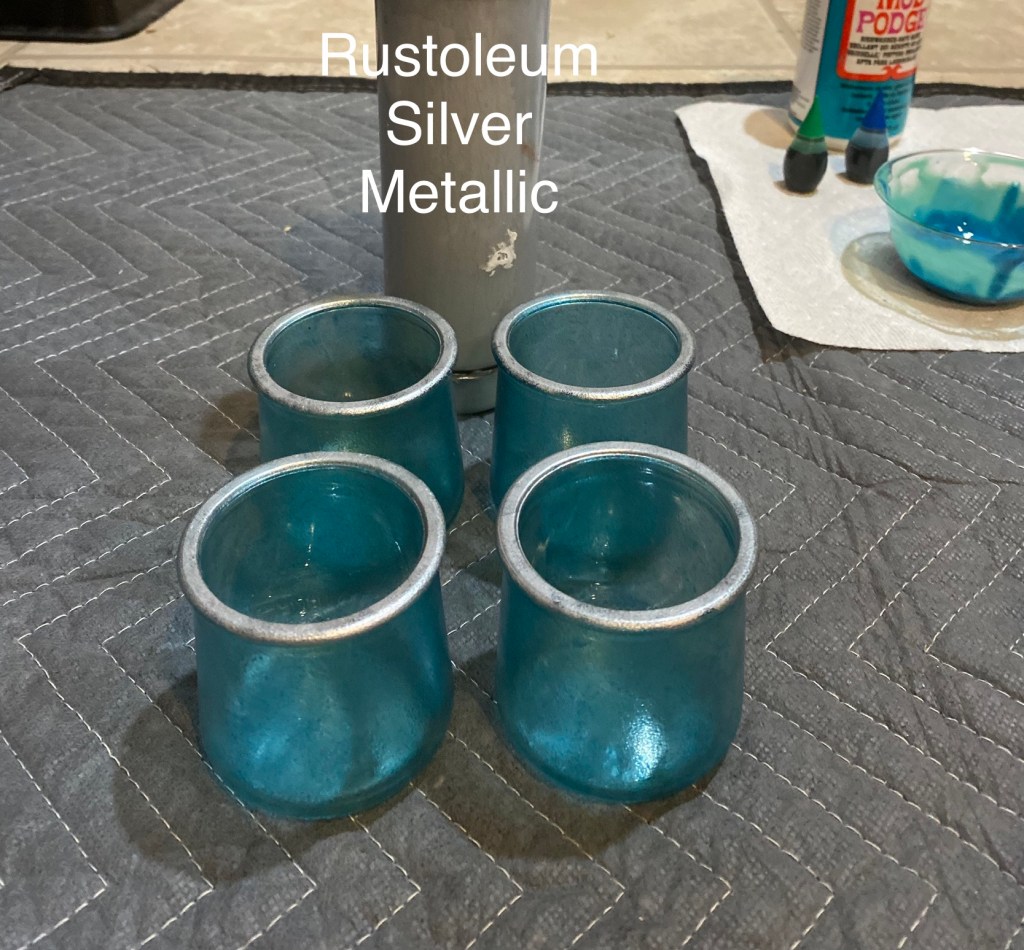
Step 7: Final Step: Use another makeup sponge and daub over the rim lightly with a metallic silver to give it a vintage look as well as a finished look. I use Rustoleum metallic water-based paint I got from Menards. But any will work.
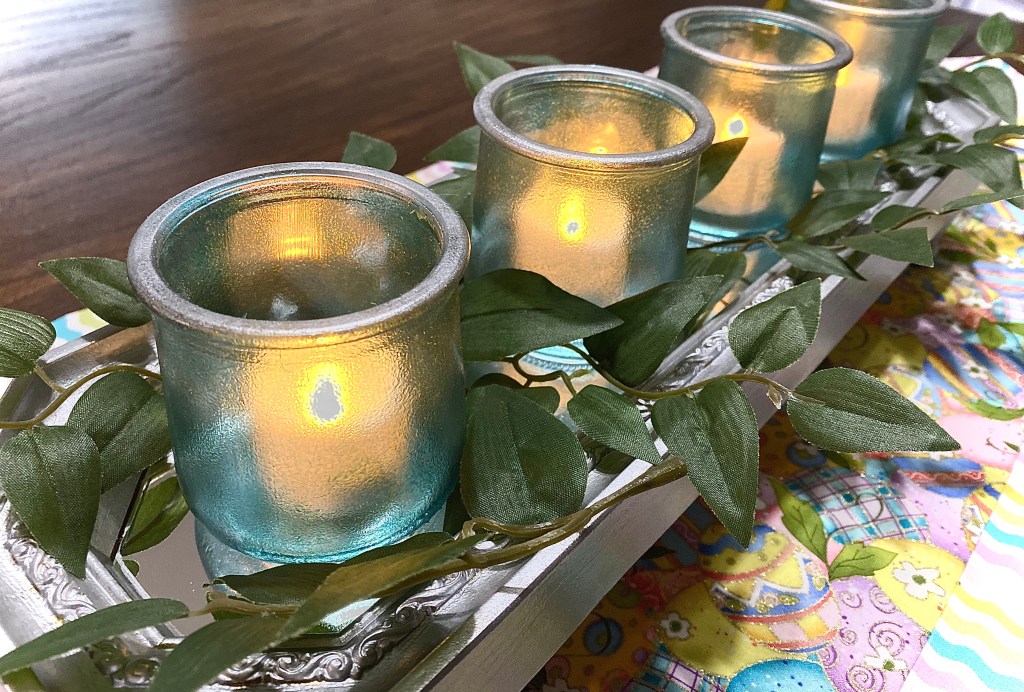
And now for individual photos! I can’t tell you how pretty this is on the table. I used timed battery operated votives that stay on 6 hours and automatically go off and back on again at the same time as I first turned them on. Again, I found these on Amazon.
The tray was a vintage gold Home Interiors mirror. I painted it with the metallic silver and added legs I purchased from Amazon. They are called Woodpeckers and are the 2” size.
I loved doing this so much, I just had to see what the red food coloring would do, so I tried a couple of tablespoons of the Mod Podge and about 4 drops of red food coloring. Beautiful! Although, if doing it again, I would use less drops for an even lighter pink.
Oui French Yogurt jars are the best! Can’t wait to make more projects with these jars!
I’m on a roll with these jars. Here’s a couple more things I’ve made. 🙂
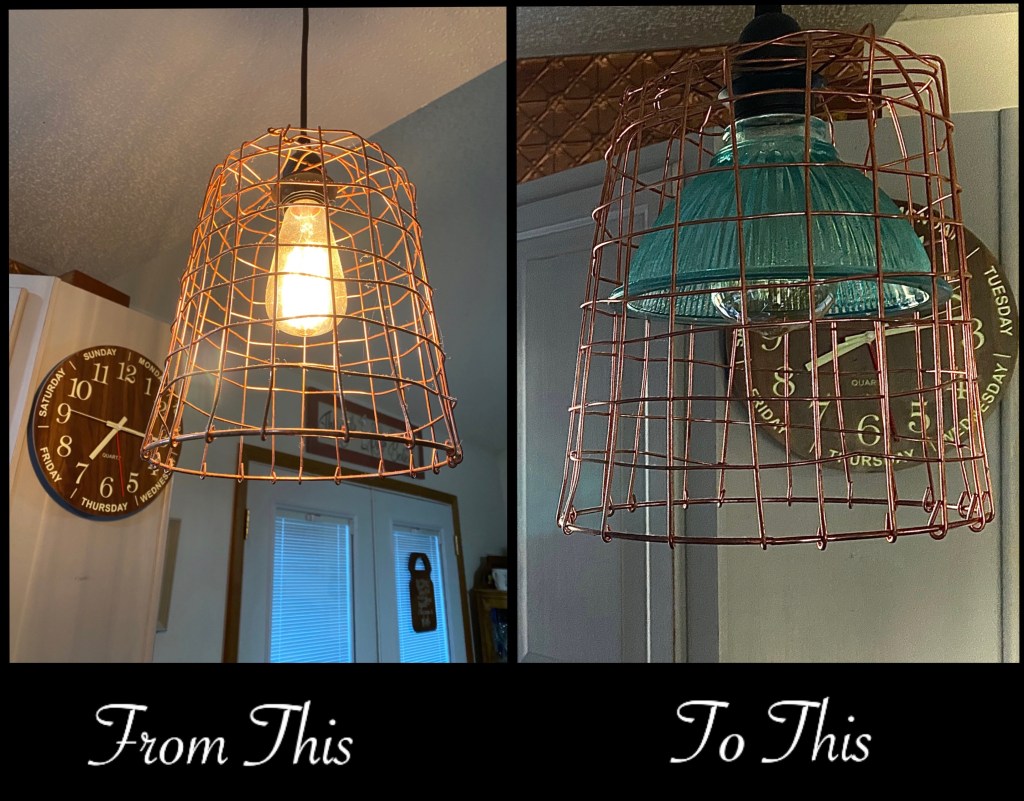
Not a Oui jar, but a pendant shade I added to my light fixture. I used the same method on a clear glass shade.
I have created quite a few projects using a Oui jars. Here are just a few more!
Mod Podge and Epsom salt Dollar Tree rub ons, a canning seal lid and a wooden knobThis jar came decorated. Added a canning seal lid with a wooden knob.
I think my favorite way to use the jars lately has been creating face planters. 🙂 I painted the jar and a small terra cotta pot. I bought a face design on Etsy and cut it out on vinyl on my Silhouette machine. I added the face items to the Oui jars. I turned the pot upside down and using E6000 I glued the jar to the pot. I then added a bit of rub on transfers to the bottom edge. I sealed everything with Mod Podge Pearlized spray. I love these little planters!
I do quite a bit of decoupage and my favorite technique is the iron on method. My thought was if you can iron on wood, it would make even more sense to iron on fabric. I was right!
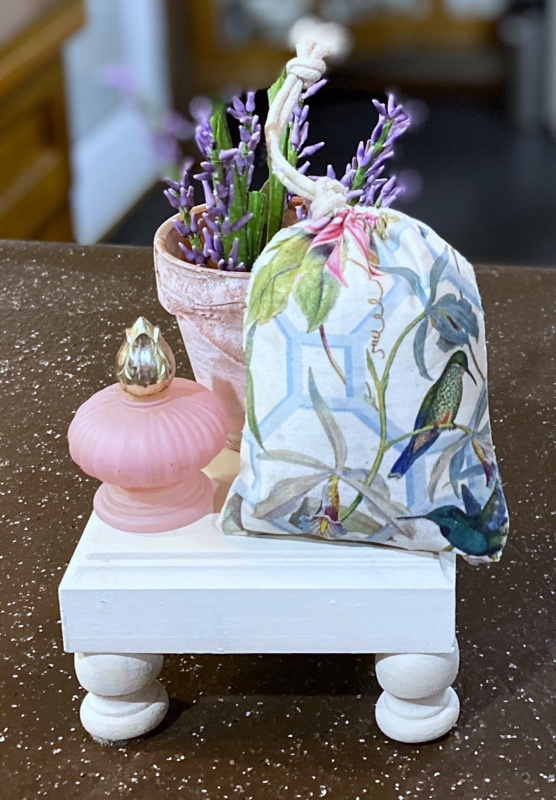
I have been stenciling on bags and stuffing them with poly fill, but I have so many beautiful napkins, I wanted to try to use napkins. So ….. I did.
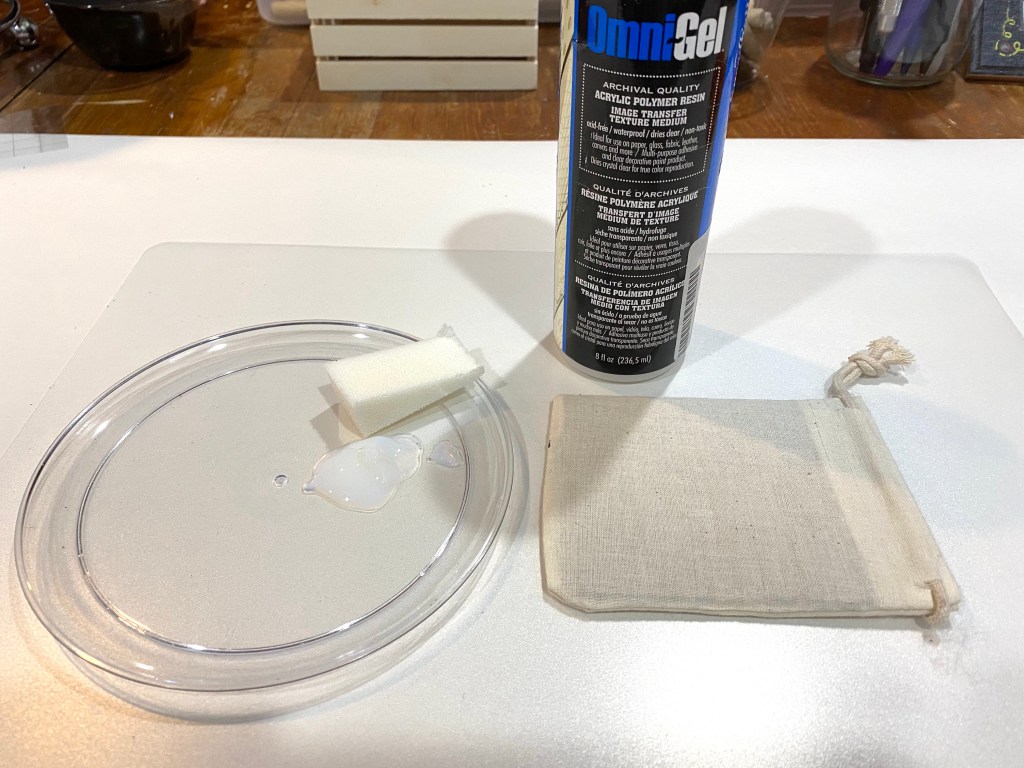
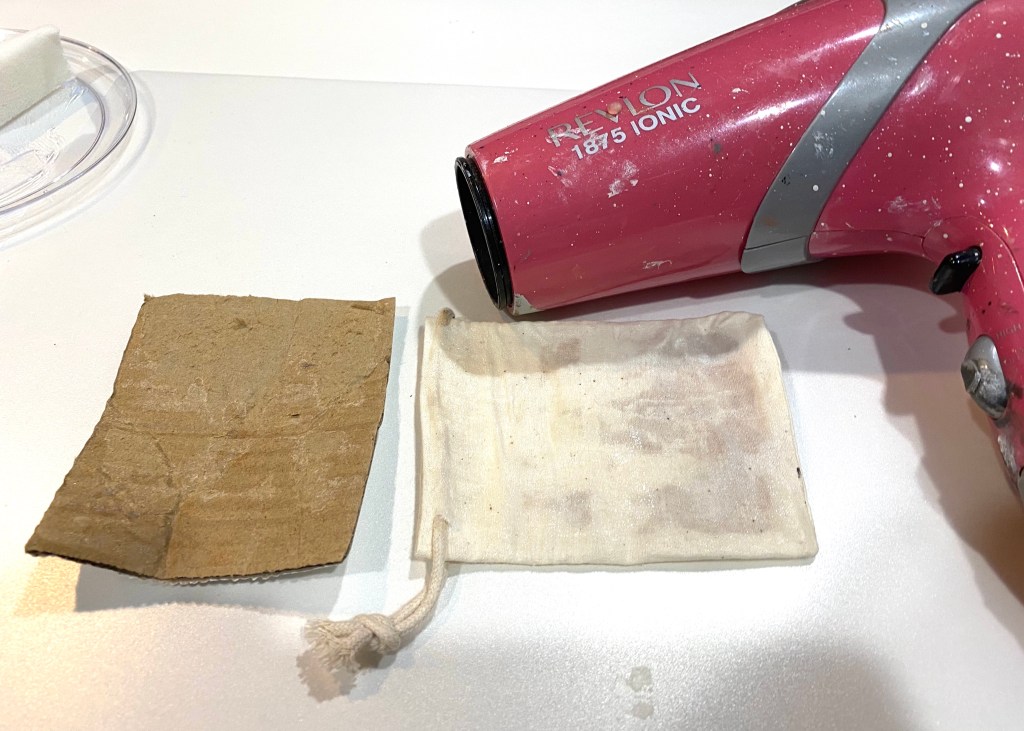
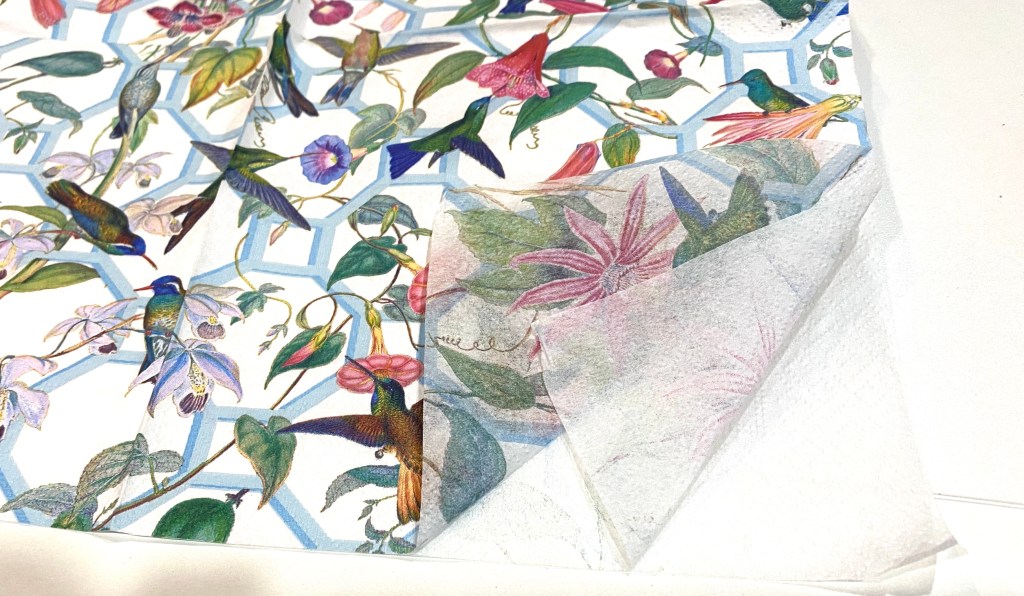
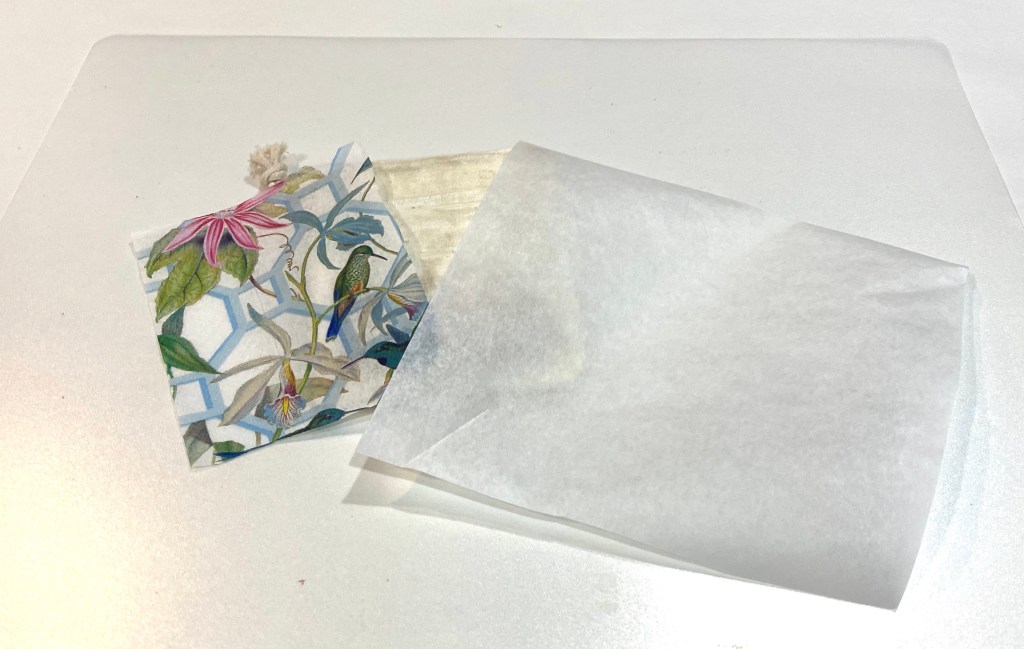
The first thing I did was cut a piece of cardboard to fit inside the bag so I didn’t get the gel medium I used on the other side of the bag. I could paint the top of the bag white as this will make the napkin really stand out, but this cotton bag is so light, it should work fine as is.I use Omni Gel (I purchased this on Amazon but I have seen it in craft stores) as I love how easy it is to apply. You can, however use Mod Podge to decoupage, among other mediums. I’ve even used water-based polyurethane sealer! I daubed the Omni Gel on with a makeup sponge. I ended up using more than what I have on the plate.I covered the whole front of the bag, even over the drawstring. Later, I almost regretted that as it kind of glued the napkin to the drawstring, but a little pushing worked it loose and it was fine.I immediately removed the cardboard so it wasn’t glued in. I think a piece of heavy vinyl or plastic might even be a better choice. And then I used a hair dryer to quickly dry it.I have collected so many beautiful napkins it was hard to choose, but I chose the one with hummingbirds because of the pretty spring colors.Napkins are usually 2 or 3 ply. This one is 3 ply. You need to pick at the layers on a corner to peel all the layers off until you are left with the printed transparent layer.I then cut the napkin to fit the top of the bag and cut a piece of parchment paper to place over the napkin when ironing. The parchment paper is crucial!!! Do not forget to use it or you will have napkin stuck on your iron.I put the piece of cardboard (not shown) back inside. This gave it a nice solid base and kept the two sides of the bag separated. I then started ironing with the small crafting iron I purchased on Amazon but any craft store carries them. I would lift up the parchment paper every so often to make sure the napkin was sealed onto the bag. You can use a regular iron, but this one is very handy for getting into small spaces. Note to self: do not move the little stand after iron heats up so you can take a picture. The wire gets really hot and seared my finger nicely. Ouch!I then stuffed the bag with poly fill (you can get this at any craft store or even use the fill from an old pillow). I pulled the drawstring tight and tied a knot to hold it. My tiered tray pillow is now completed and on display.
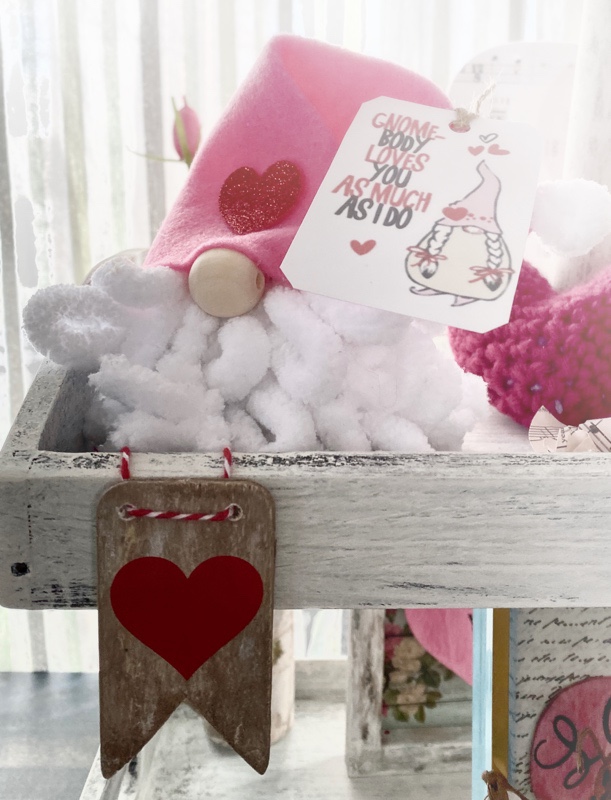
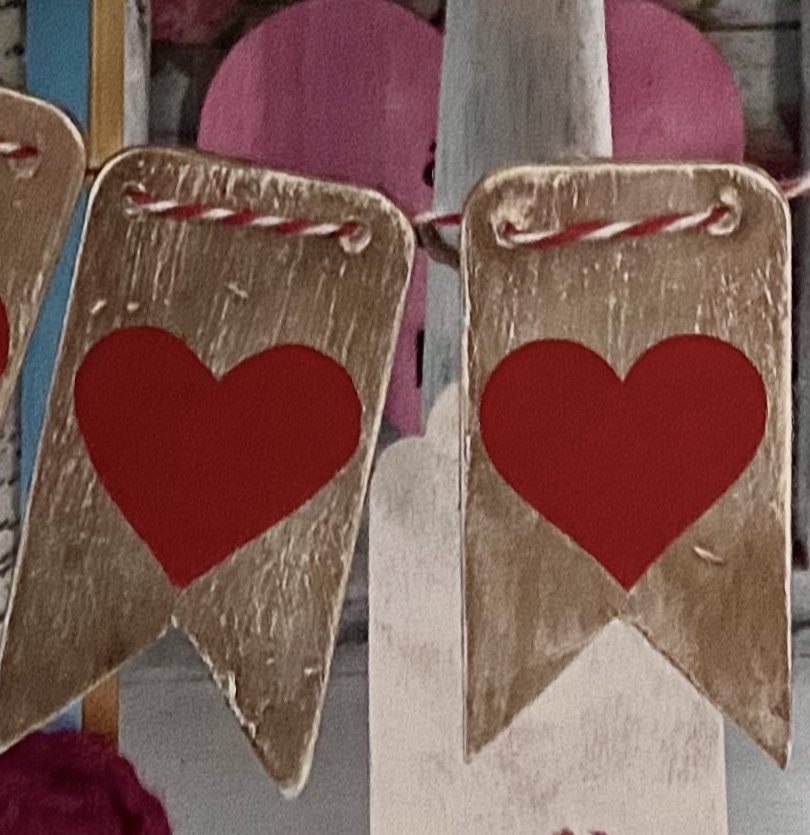
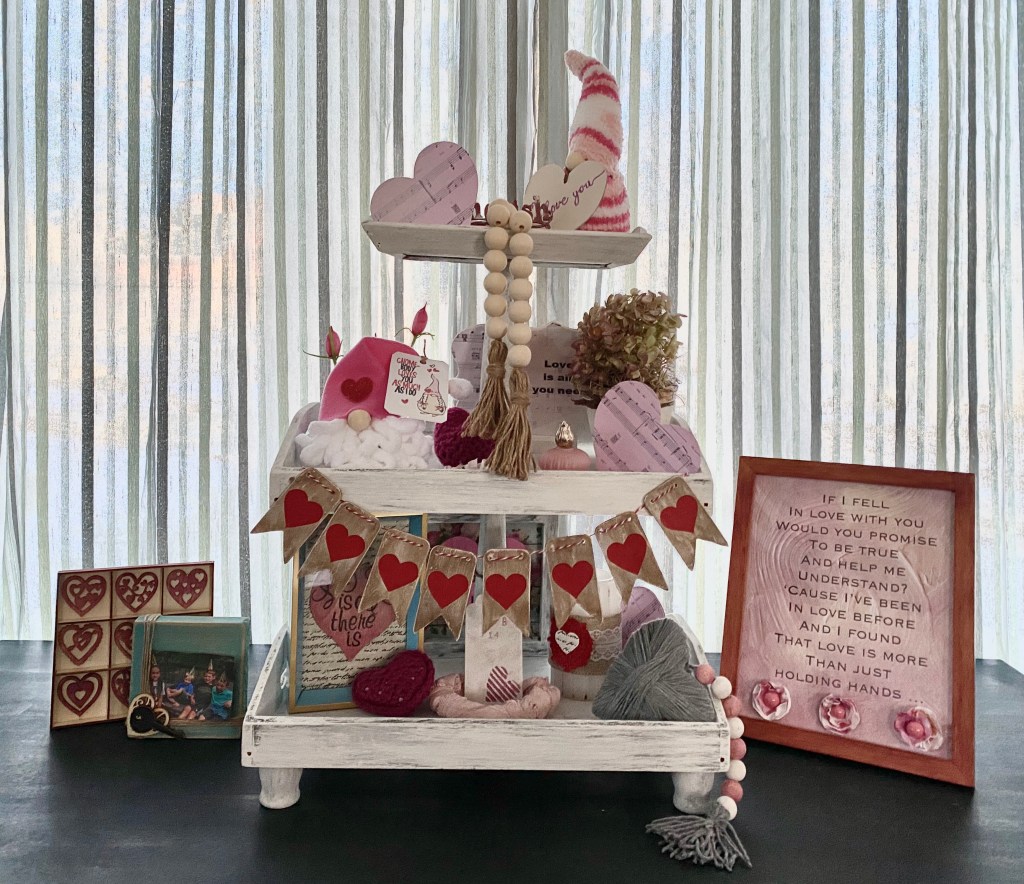
A Valentine Craft – A Tiny Banner from Dollar Tree Dominoes
I’ve come up with a way to use these flat wooden dominoes from Dollar Tree! I bought some of these thinking there had to be a way to use them in crafts and this morning, it hit me….💡 Tiny banners for tiered trays…..or other ways you can think of.
I made one to see how they would look, but you can see they work great! I just had to share so you could run out and get a supply of these dominoes. They are generally in stock, but I did see you can buy anywhere from 4-32 packages online. You might have to pay shipping to your home for smaller quantities, but for at least 36 ordered, I think you can have them shipped to your store.
These dominoes are raw wood on the back and paper on the front.
The wood is thin Balsa wood, like the little wooden airplanes you put together. I cut this one into a banner shape with scissors. I tried a craft knife later, but strong scissors worked better. I sanded the edges smooth and drilled small holes for the baker’s twine, also from Dollar Tree.
To get the aged wood look, I painted both sides with white chalk-style paint and let dry. Then I watered down a little dark walnut gel stain and used a paper towel to wipe it on and wipe off. I did just a bit of white on top again. Just a bit. Then sanded each one just a bit. The sanding really distressed them nicely. I hadn’t done the final sanding on my sample.
I painted right over the paper. I did both sides, but the back is raw wood so I don’t suppose you’d have to finish it.
I had some hearts I cut from vinyl but you could also use stickers. Dollar Tree did have a lot of those.
If you use generic string or jute twine and removable vinyl, you could easily change out your banner for any season. Stickers might be harder to remove, but maybe not.
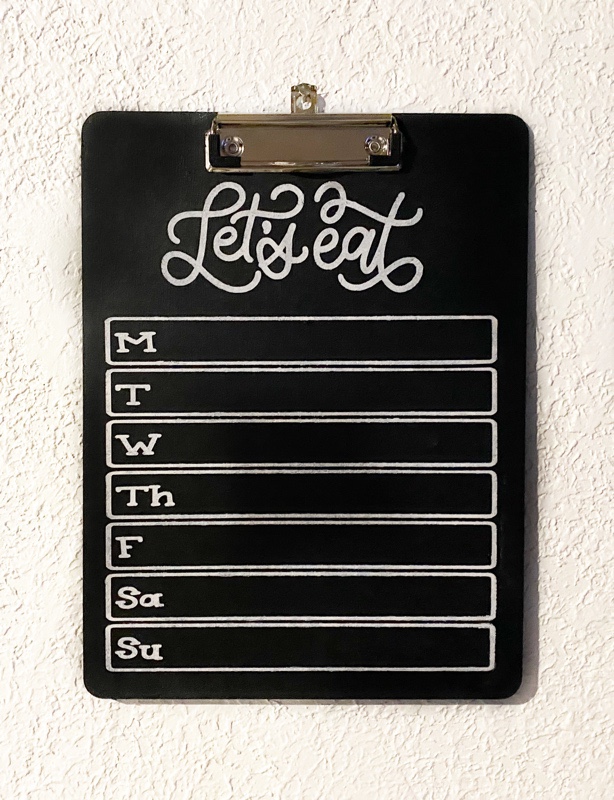
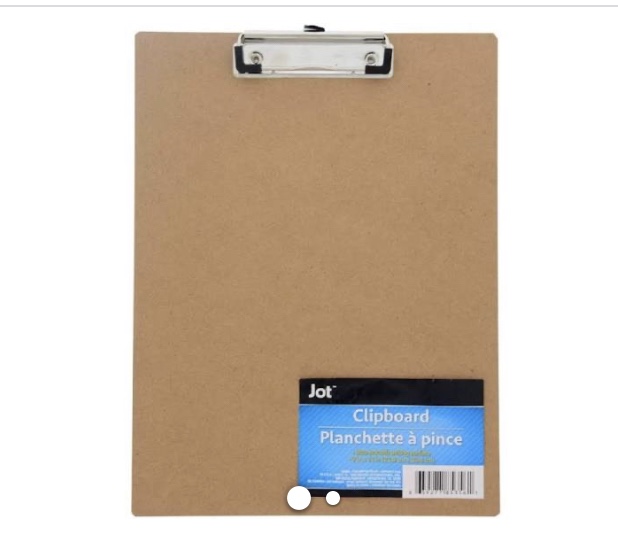
Don’t you hate planning meals and grocery lists for those meals, then think? Why did I buy this? What did I plan for meals? When did I plan to make the meals? A Chalkboard clipboard with a template stenciled in paint (or cut from vinyl) lets you fill in the name of the meal with a chalk pen and then wipe it all away, ready for the next week.
I purchased this clipboard from Dollar Tree and painted it with chalkboard paint. It may have come from Dollar Tree or possibly Dollar General.
I used a cut file I purchased with a commercial license from https://dawnnicole.co so I could legally sell the menu planning clipboards I created.
However, if you want to do this for yourself personally, the template is free for that.
I cut out a stencil on my Silhouette machine for this project and stenciled it with our brand of chalk-style paint “Missouri Limestone Paint Company” in the color January. You can also use permanent vinyl.
The first time before using chalk on it, though you need to prime it with a layer of chalk. Then clean it off. This keeps older messages from showing as a ghost image after it is erased.
I may just start planning some meals and buying some groceries regularly now. 😁