We’ve all seen these…..those spools in the hardware store that hold electrical wiring, etc. You may not realize that at stores like Lowe’s (at least in my town) you can put your name on a list to get one of these for next to nothing.
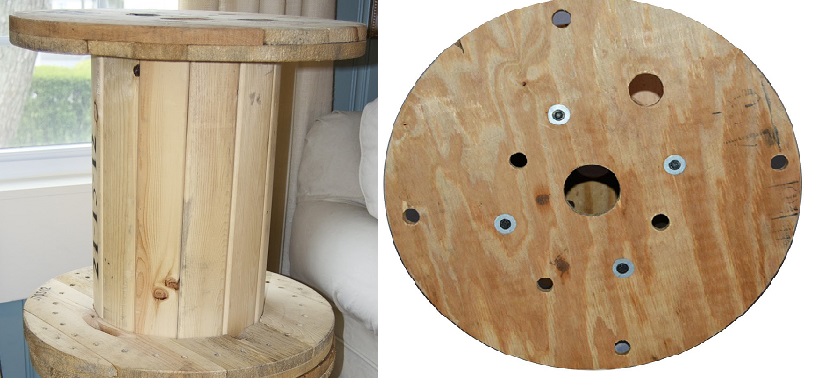
Then, once you have one…..what to do with it? I recently, thanks to my son’s father-in-law, received one. It was a smaller one, the perfect size! I forgot to take a picture of mine before the redefine, but it looked similar to this one…especially the top. The bottom had 4 holes around the perimeter that matched the 4 top holes.
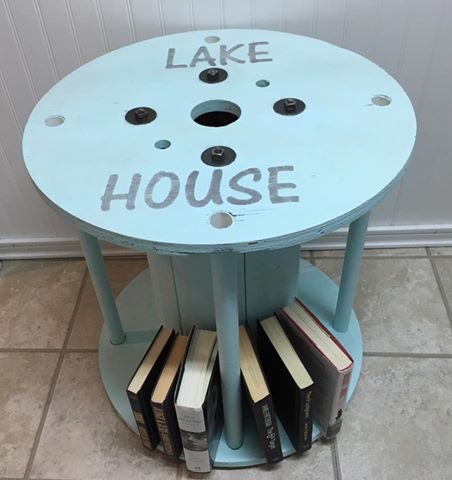
A quick search on the internet “electrical spool DIY” produce quite a few results. One of the ideas I ran across was to make a coffee table/bookcase. I loved that idea. I also knew I wanted to keep all the imperfections in the spool so I chose not to sand mine. My project was going to be to redefine my spool into a shabby/chic coffeetable/bookcase perfect for a lake house. Why not beach house? We live closer to a lake rather than an ocean and I think one that says lake house would sell much better….more market for a lake house table. LOL
It’s a little difficult to see from the photo above but there are 4 washers and screws on the top. I also decided to leave them as is and not paint them. I did clean them good as they were kind of oily. Now, onto creating my table. Here’s the inspiration piece I found.

Off to Lowe’s we went to purchase dowel rods….oops…stumbling block. They had the perfect size dowel rod, but at over $6 a rod and we need 4 of them, that meant over $24 just for the rods to create the bookcase part. Nope….that wasn’t going to happen. So, we put on our thinking caps and decided pvc pipe was the way to go and off to the plumbing department we went. They had a long piece that would make 4 the size we needed for a little over $3 for the piece. Yes…..pvc pipe it is. However, there was printing in black up one side. We knew from experience that wouldn’t wash off. So, off to the paint department we went. We found a can of spray paint for plastic for about $6. I knew I would use this again, so we purchased it and were on our way home.
The first thing Danny (my handyman husband) did was cut the pvc into 4 pieces just about the right length and then sanded out the existing 4 holes around the edge so the pvc pipe would fit. It was just a bit too snug. It didn’t take long and soon our bookcase supports were in place. He then sawed them off even with the top of the spool. We took them out again and gave them one coat of the spray paint for plastic. (I wanted to have that base coat so that the chalk-based paint I would be applying later would have a good bond).
While that paint was drying, Danny turned the table over and added some wood on the bottom to create a stable base. There were washers and nuts on the bottom, too, so without that (or casters – which were more expensive than I wanted) this worked out fine. He made kind of an X pattern with the wood that fit around the nuts and washers. He made one long piece and then two shorter pieces that formed the X and screwed them in place. He also added on each edge, those little things you put on the bottom of furniture to keep it from scratching floors. The ones he used were round and had what looks like carpet pieces on them that you tap into place.
I was now ready to paint the spool and bookcase supports with Missouri LImestone Paint Company’s (MLPC) chalk-based paint – “Front Porch”. We put the supports back in and for good measure, Danny added a small screw on the inside of each one to make sure they stayed in place. But they were a good type fit as he pounded them in with a rubber hammer so I don’t think they were going to go anywhere. I gave the whole thing one coat, allowing a little of the wood to peek through if it wanted to. On the supports I also only used one coat. A lot of the white showed through, but I liked that. It looked like the front page color was just a wash over them and it created a nice effect.
Note: All the other hole in the top of the table we left open, including the pvc pipe holes. In interesting thing to note is at the bottom of the spool column there is a little hoe shaped like an upside down U. I saw one idea that someone draped white Christmas lights down the big middle hole. The plug would easily come through that little upside down U hole and you could plug them in. That would make a nice effect at night.
After the paint dried, I cut a stencil from my Silhouette machine and stenciled “Lake House” on the top using MLPC “Sunday Silver” color.
The final step was mixing up some liming wax by adding some MLPC “January” to some Briwax and giving the whole thing a coat of wax….let it dry for a bit and buffed it. I loved the effect of the liming wax. The redefine was complete. We are taking it to our storage unit “PopUp Shop” this morning. Fingers crossed that it sells! If not, I’ve posted it on Facebook’s marketplace and several local facebook swap shops, so hopefully it will sell on one of those if not today.