Be sure to visit our SharSum Paint Facebook page to see more of our work.
Using a water-based poly to transfer an image??? I am in love with this method for transferring an image. I have tried many different ways with several degrees of success. This is by far the easiest and quickest and the best results I’ve found.
I’m not sure why I haven’t run across it before, but when I saw how this video tutorial by The Craftsman transferred the images using water-based poly I knew I had to try this. The video is linked from The Graphics Fairy site, which has an amazing selection of files free to use. I found a French Handwriting Script that worked perfectly. I chose the reverse image as I would be transferring text.
The Craftsman is entertaining and a very good tutorial. I linked it above as it is buried on The Graphics Fairy site under Transfer Methods.
Note on changes I made from what is suggested in the video:
- In the video, The Craftsman used a product called Poly-Finish (which is a poly acrylic). In another tutorial I read, Minwax Polycrylic was used. I used Varathane water-based crystal clear polyurethane in satin finish as that is what I use on all my furniture. It worked perfectly. So, your favorite water-based poly should work also.
- The video transfers onto raw wood. I had already painted a chair with chalk-based paint and had put one coat of poly on before I ran across this technique. The results were amazing, so this works not only over a painted surface, but one that has had a poly coating already added.
- I wet the edges and tore them (a trick I learned on another site). This helps hide a straight edge that might be more noticeable. Even with removing the paper, there will still be a thin layer of paper that remains.
There was another tutorial I ran across that reiterated using poly to transfer images and she shows how to do it over chalk-based paint. In this tutorial, she creates her own rulers. to make a great looking tray! People are so creative! Thanks for sharing, Cheltenham Road: https://cheltenhamroad.wordpress.com/tag/polycrylic-image-transfer-method/
A client wanted her ladder back chair to have a French Handwriting Script across the ladder backs. See update at the bottom for info on the inspiration for the handwriting script on a ladder back chair. I thought of several different ways I could accomplish that, including using a stencil, but I really wanted to do a transfer. Here are the steps I used. I am extremely happy with the final result. The whole process literally took less than an hour.
Practice make Perfect – I thought it would be a good thing to practice first. Please do not mind my ugly practice board. Just focus on the script, which literally just took minutes to do.
![]()
I printed out several reverse copies of the French Handwriting Script from The Graphics Fairy. I decided how I wanted them to look on the ladder backs, then trimmed them. I also wet down the edges and tore them so they wouldn’t be straight as mentioned above. Notice in the photo I tore 3 sides on the first one That was before I realized the top and bottom wouldn’t show anyway as I wanted it to go off the wood, but the sides would end, so I really only needed to wet and tear the sides of each.
![]()
I put the chair on its back to make it easier to work with. Each ladder back will have a liberal coat of poly painted on. I did one ladder back at a time, putting on the poly, then adding the image with the script facing down.
![]()
Each time I added the image, I made sure to smooth it down well, including around the edges. I used a credit card to burnish it into the wood and make sure there were no wrinkles. I literally let this dry only about 15 minutes (poly dries quickly). I won’t lie….I’m impatient. I even used a hair dryer to make sure it was really nice and dry.
![]()
It was then time to saturate the paper with water. In the photo below, you can see I am painting water all over the paper. I worked with just one ladder back at a time. After it was thoroughly saturated, I let it sit a minute or two.
![]()
This next step was fascinating! Unlike other transfer methods, starting at the corners, the paper almost completely peels away. I peeled as much as possible this way first.
![]()
After the first peel, I used a rough texture wet washrag and carefully rubbed away the rest of the paper. I let dry just a bit (ok….maybe used a blast or two from the hair dryer) so I could see if there was any paper left. There was, so I used the wet rag to rub some more.
![]() It was now time to let it dry. Yes, I might have used the hair dryer again. LOL. But anyway, once dry, I gave each ladder back several coats of poly, not only for durability, but the coats of poly make the thin layer of paper that remains seem to disappear.
It was now time to let it dry. Yes, I might have used the hair dryer again. LOL. But anyway, once dry, I gave each ladder back several coats of poly, not only for durability, but the coats of poly make the thin layer of paper that remains seem to disappear.
And now, for the beautiful, final results!
How about this closeup? I’m so in love with this!!!!
![]()
All three ladder backs:
![]()
Chair is now complete. The only thing left to do is to seal the new paper rush seat for durability.And…..would you believe we wove new paper rush seat for this chair? The client really wanted to save her heirloom chair and the original rush seat was in bad shape, so I found a great tutorial for that, too. If you ever need to weave rush for a ladder back chair, you have to watch this youtube tutorial:
![]()
But that’s not all! I wanted to put a fleur de lis on the knobs of the desk/vanity that will do with the chair. Easy peasy with the poly transfer. Hint: If you rub away a bit too much, no problem. That’s what black Sharpie permanent markers were made for. LOL
![]()
Update: My client saw a chair with French handwriting script and asked if I could do something like that with her chair. I found the creator of this chair and requested permission to use her chair for inspiration. (I always ask permission of artists if I can find out who they are.) She graciously allowed me to do that. Gina Kellogg of Kellogg Frosted Furniture (isn’t that a great business name) I thank you. You can see Gina’s beautiful chair here.
And now for the final reveal:
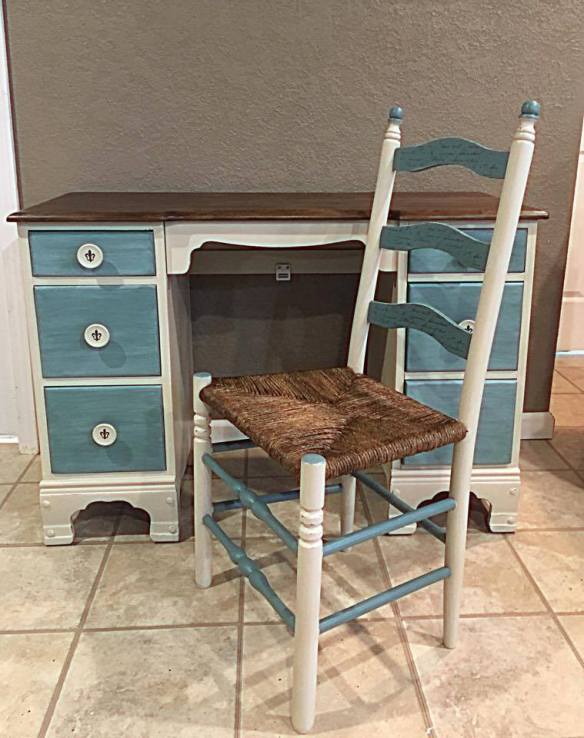 I first sealed the new rush seat with a 50/50 mix of shellac and denatured alcohol. Then I stained it with another favorite Varathane product. (I just love the Varathane products but are not affiliated with them in any way) I used Varathane water-based stain and polyurethane in Dark Walnut.
I am now thinking of all kinds of possibilities for using these transfers: jewelry boxes, cutting boards, photos on wood, hmmmm….will it work on fabric? I’m off to try that possibility.

Great idea, my fingers suffer so with transfers. I’ve never used a water based poly so Ill have to look into that as well. Thank You 🙂
LikeLiked by 1 person
and great work on the seat. I won’t be doing that. ever. but it looks really awesome.
LikeLike
LOL on the seat. It was a challenge. I really want to try this on a jewelry box, Yugonda. Can you imagine the possibilities?
LikeLike
Hi, wow would love to try this, one question, is your copy an inkjet or laser print.
LikeLike
It is a laser print. You must use a laser print for this method. An ink jet print will not work.
LikeLike
Love the transfer with french writing
LikeLike
Thank you, Janeene!
LikeLike